Move Beyond Quick Fixes—Implement a Proven, Step-by-Step System That Balances Ecology, Prevention, and Targeted Intervention to Protect Your Plants Year After Year
Integrated Pest Management (IPM) isn’t merely swapping chemical sprays for organic alternatives. It’s a fundamental reimagining of your relationship with the garden ecosystem—a shift from reactive warfare to proactive stewardship. This definitive guide delivers a customizable, science-grounded framework to accurately identify pests, establish meaningful action thresholds, deploy precisely targeted interventions, and cultivate resilient landscapes where plants thrive with minimal human disruption. Whether you’re confronting aphids on heirloom roses, squash vine borers threatening your harvest, or mysterious leaf damage with no visible culprit, you’ll gain the diagnostic clarity and strategic confidence to respond wisely. More profoundly, you’ll develop an intuitive understanding of your garden as a dynamic, interconnected community where every decision ripples through soil, plant, insect, and season.
Introduction
Picture this: You notice stippling on your cucumber leaves. Instead of immediately reaching for a spray bottle, you pause. You examine the undersides with a hand lens, discovering tiny, moving specks. You photograph them, consult a trusted resource, and identify two-spotted spider mites. But you also spot a minute, alligator-shaped larva nearby—Chrysoperla carnea, the larva of a green lacewing, a voracious mite predator. You recall recent hot, dry weather—a known trigger for mite outbreaks. You check adjacent plants, note humidity levels, and decide: Monitor for 48 hours. Two days later, mite numbers have declined significantly. The lacewing larva has done its work. No intervention was needed. This moment of informed restraint embodies the heart of Integrated Pest Management.
Rooted in decades of agricultural research refined through university extension programs worldwide—from Cornell to UC Davis to Rothamsted Research—IPM represents a convergence of ecological science, practical horticulture, and systems thinking. It acknowledges a foundational truth often overlooked in conventional gardening: pests are symptoms, not causes. Wilting seedlings may signal cutworms or poor drainage. Yellowing leaves could indicate aphids or nitrogen deficiency. True mastery begins with accurate diagnosis. IPM provides the methodology to discern the difference, moving beyond surface-level reactions to address root conditions that invite imbalance.
Unlike fragmented advice found across the internet—”spray neem oil!” or “plant marigolds!”—this guide synthesizes prevention, monitoring, intervention, and adaptation into a cohesive, cyclical practice. You’ll learn why handpicking hornworms preserves parasitic wasps that would otherwise control future generations. Why soil health directly influences a plant’s ability to withstand pest pressure. Why “tolerating” a few aphids sustains ladybug populations that prevent catastrophic outbreaks later. This isn’t about achieving a sterile, pest-free fantasy; it’s about cultivating vibrant, self-regulating ecosystems where damage remains within acceptable bounds and biodiversity flourishes. Whether your garden spans a windowsill herb box, a suburban backyard plot, or a community allotment, this framework adapts to your scale, values, and constraints. Let’s begin building your garden’s innate resilience, one informed decision at a time.
The IPM Decision Cycle: A Five-Step Framework for Sustainable Pest Control
At its core, IPM operates as a continuous feedback loop—not a linear checklist. The IPM Decision Cycle transforms pest management from a crisis-driven chore into a rhythmic, observant practice aligned with natural patterns. This cyclical model ensures every action informs the next, building cumulative wisdom season after season. Crucially, it rejects the false dichotomy of “organic vs. chemical” in favor of a nuanced hierarchy: Prevent → Monitor → Identify → Intervene Minimally → Evaluate. Each phase reinforces the others, creating compounding benefits for soil health, plant vigor, and beneficial insect populations.
The framework’s power lies in its adaptability. A desert gardener battling spider mites will emphasize different tactics than a Pacific Northwest grower managing slugs—but both apply the same decision logic. A novice with limited time can implement simplified versions of each step; an experienced steward can dive into granular detail. Think of this cycle as your garden’s operating system: once installed, it processes every challenge through a lens of ecology, efficiency, and long-term thinking.
Step 1: Inspection & Monitoring—Your Garden’s Early Warning System
Monitoring is the essential foundation of IPM. Without systematic observation, you’re gardening blind—reacting to visible damage rather than preventing escalation. This step cultivates what ecologists call “situational awareness”: the ability to read subtle cues before minor issues become major crises. It’s not about perfectionism or anxiety; it’s about gathering data to make empowered choices.
Why This Step is Essential
Early detection significantly expands your options. Removing a few cabbage looper caterpillars by hand takes seconds; salvaging a defoliated broccoli plant requires drastic measures. Monitoring also prevents misdirected efforts. That “pest” you’re about to spray might be a syrphid fly larva—a beneficial aphid predator. Practical experience consistently shows that gardens with regular monitoring routines can substantially reduce unnecessary interventions. Furthermore, tracking patterns over time reveals your garden’s unique rhythms: When do aphids typically appear on roses in your microclimate? Which plants consistently attract beneficials? This personalized knowledge becomes your most valuable asset.
Building a Sustainable Monitoring Routine
Frequency & Timing:
– Peak season (spring–fall): 10–15 minutes every 3–4 days.
– High-risk periods (e.g., post-rain for slugs, heatwaves for mites): Daily quick checks.
– Optimal time: Early morning (dew highlights tracks, pests are active) or late afternoon (cooler temperatures). Avoid midday heat when many insects hide.
Systematic Inspection Protocol:
1. Start at soil level: Kneel and examine the base of stems. Look for cutworm damage (neatly severed seedlings), frass (sawdust-like borer droppings), or slug trails. Gently part mulch to check for hiding pests.
2. Scan upward: Move slowly along stems and branches. Check leaf axils (where pests like squash vine borers lay eggs) and bark crevices on woody plants.
3. Flip every leaf: Most soft-bodied pests (aphids, spider mites, whiteflies) congregate on undersides. Pay special attention to new growth and flower buds.
4. Inspect flowers and fruit: Thrips hide deep in blossoms; tomato fruitworms burrow into developing fruit.
5. Note environmental context: Is soil dry? Are leaves dusty? (Both stress plants and attract mites.) Is there standing water? (Breeding ground for fungus gnats.)
Essential Tools:
– 10x–15x hand lens: Reveals spider mites (barely visible to naked eye), egg clusters, and beneficial larvae.
– Garden journal: Physical notebook or digital app (e.g., Gardenize, SmartPlant). Record: Date, plant/location, pest/symptom observed, estimated count, weather conditions, actions taken.
– Smartphone: Take timestamped photos. Create a dedicated album for “Pest ID Reference.”
– White paper or tray: Tap branches over it to dislodge hidden pests (e.g., thrips, leafhoppers) for easier identification.
Common Pitfalls and Solutions
– Mistake: Only checking “problem plants.”
Solution: Rotate focus weekly. Inspect healthy plants too—they may harbor early infestations.
– Mistake: Rushing inspections.
Solution: Set a timer for 10 minutes. Move slowly. Breathe. This is mindfulness practice disguised as gardening.
– Mistake: Ignoring beneficials.
Solution: Actively note predators: “Ladybug adult on rose,” “Lacewing egg cluster on bean leaf.” Celebrate these sightings—they’re working for you.
– Mistake: Inconsistent records.
Solution: Keep journal and pen in your garden tool caddy. Jot notes immediately after inspection.
Real-World Application: Maria gardens in Zone 7b. Every Tuesday and Saturday at 7 AM, she spends 12 minutes inspecting her 20′ x 30′ vegetable plot. She starts at the compost bin (a slug hotspot), moves to tomatoes (checking for hornworms and early blight), then beans (scanning for Mexican bean beetles). She uses her hand lens on cucumber undersides. Last Tuesday, she spotted tiny yellow eggs on a squash stem—Melittia cucurbitae, squash vine borer. Because she caught them pre-hatch, she simply scraped them off with her fingernail. Without monitoring, she’d have discovered wilting vines two weeks later—a far harder problem to solve.
Adapting for Your Reality
– Time-constrained? Focus on “indicator plants”—species historically prone to pests in your garden. Spend 5 minutes on high-value crops (tomatoes, berries).
– Mobility challenges? Use a stool or garden kneeler. Inspect from seated position. Prioritize container plants at waist height.
– Teaching children? Turn it into a “Bug Detective” game. Give them a magnifying glass and a checklist: “Find one beneficial insect,” “Spot three different leaf shapes.”
– Large property? Divide into zones. Monitor one zone per session. Use trail cameras near fruit trees to observe nocturnal pests (raccoons, deer).
The Fundamental Principle: Monitoring transforms anxiety into agency. What you observe with patience, you can manage with precision.
Step 2: Identification & Thresholds—Knowledge Before Action
You’ve spotted damage or an insect. Before any action—especially before reaching for a spray—pause. Misidentification is a leading cause of ineffective pest management. Spraying a beneficial insect, applying the wrong treatment, or panicking over harmless damage wastes effort, harms ecology, and erodes confidence. This step combines precise identification with the critical concept of action thresholds: the evidence-based point where pest presence justifies intervention.
Why Accurate Identification Matters
Consider these common mix-ups:
– Ladybug larva (spiky, black with orange spots) vs. Colorado potato beetle larva (orange with black spots). One devours aphids; the other defoliates potatoes.
– Syrphid fly larva (smooth, green, slug-like) vs. aphid colony. The larva eats aphids; spraying it eliminates your ally.
– Parasitized hornworm (covered in white cocoons) vs. healthy hornworm. The cocooned one is hosting braconid wasps—leave it to multiply your army of parasitoids.
Correct identification ensures your response aligns with biology. Aphids (soft-bodied, clustered on new growth) succumb to a strong water spray. Scale insects (hard-shelled, immobile bumps) require horticultural oil to smother them. Confusing the two guarantees failure. Moreover, identification reveals lifecycle clues: Finding eggs signals imminent hatching; spotting pupae means adults will emerge soon. Timing interventions to vulnerable life stages maximizes effectiveness.
A Step-by-Step Identification Protocol
1. Observe meticulously:
– Size (grain of rice? pencil eraser?)
– Color and patterns
– Number of legs/wings
– Behavior (chewing leaves? sucking sap? flying erratically?)
– Location on plant (undersides? stems? roots?)
2. Document thoroughly:
– Take 3+ clear photos: top view, side view, close-up of key features. Include a ruler or coin for scale.
– Note plant species affected and symptom details (holes, discoloration, webbing).
3. Consult authoritative resources:
– University Extension Websites: Search “[Your State] extension [pest name] identification.” Examples:
– Cornell University Garden Ecology Program
– UC IPM (University of California Statewide IPM Program)
– Royal Horticultural Society (UK)
– Field Guides: Rodale’s Basic Organic Gardening, The Organic Gardener’s Handbook of Natural Pest and Disease Control (Foster & Kourik).
– Apps (Use Cautiously): iNaturalist (community-verified IDs), PictureThis (cross-reference with extension sites). Never rely solely on app IDs.
– Local Experts: Master Gardener clinics (often free at nurseries or extension offices), agricultural agents. Bring photos or sealed samples.
4. Rule Out Look-Alikes:
| What You Might See | Harmless/Beneficial Look-Alike | Key Differentiator |
|——————-|——————————-|——————-|
| Tiny green “bugs” on stems | Aphids (pest) vs. Syrphid fly larva (beneficial) | Larva is smooth, tapered; moves deliberately to eat aphids |
| White specks on leaves | Spider mites (pest) vs. Predatory mites (beneficial) | Predatory mites are larger, faster-moving; often reddish |
| Holes in leaves | Cabbage looper (pest) vs. Cabbage white butterfly caterpillar (pest) | Looper has white stripes; butterfly caterpillar has yellow stripes |
| White cocoons on hornworm | Parasitized hornworm (leave it!) vs. Healthy hornworm (remove) | Cocoons = braconid wasp pupae; wasps will emerge to hunt more hornworms |
Understanding Action Thresholds: The Art of Strategic Patience
An action threshold is not a universal number. It’s a context-dependent decision balancing:
– Plant Value: Seedling vs. mature perennial? Heirloom tomato vs. volunteer weed?
– Plant Health & Stage: Young transplants tolerate less damage than established plants. Flowering/fruiting stages are critical.
– Aesthetic Tolerance: For ornamentals, how much damage is acceptable? For vegetables, is the edible part affected?
– Pest Population Trend: Is the number stable, increasing slowly, or exploding?
– Beneficial Activity: Are predators present and actively reducing pests?
Evidence-Based Threshold Examples:
– Aphids on Roses: Intervention if numerous aphids cluster on new shoots AND no ladybugs/lacewings present OR leaves show curling/yellowing.
– Cabbage Worms on Broccoli: Action if visible larvae are present OR feeding damage appears on developing heads.
– Japanese Beetles on Grapes: Threshold met if multiple beetles cluster per cluster AND noticeable defoliation occurs.
– Spider Mites on Tomatoes: Treat if stippling covers significant leaf area AND webbing is visible AND hot/dry conditions persist.
Gardens using defined thresholds often achieve meaningful reductions in interventions while maintaining plant health. This isn’t neglect—it’s strategic restraint. Tolerating low-level pest presence sustains beneficial insect populations, creating biological insurance against future outbreaks.
When Identification Stumps You: Symptom-Based Clues
If the culprit remains hidden, diagnose by damage pattern:
– Silvery stippling + fine webbing on leaf undersides → Spider mites
– Sticky residue (honeydew) + black sooty mold → Aphids, scale, whiteflies
– Irregular holes in leaves → Chewing insects (caterpillars, beetles, grasshoppers)
– Skeletonized leaves (veins intact) → Japanese beetles, rose slugs
– Wilting despite moist soil + sawdust-like frass at stem base → Squash vine borer, corn borer
– Tiny tunnels within leaves (serpentine trails) → Leafminers
– Chewed seedlings at soil line → Cutworms, slugs
Critical Mindset Shifts
– From “Kill all bugs” to “Manage populations”: Aim for reduction, not eradication. A few pests sustain predator populations.
– From panic to curiosity: “What is this insect telling me about my garden’s condition?”
– From isolation to connection: Identification links pests to seasons, weather, plant health—revealing your garden’s story.
Real-World Application: David noticed holes in his cabbage leaves. He found a green caterpillar with faint yellow stripes. He photographed it, searched “green caterpillar yellow stripes cabbage,” and cross-referenced images on his state extension site. ID confirmed: Trichoplusia ni, cabbage looper. He checked five nearby plants, noting moderate looper presence. His cabbages were young transplants (high vulnerability). However, he also spotted a parasitic wasp (Cotesia congregata) hovering near the plants. He decided: Handpick visible loopers immediately (reducing numbers below threshold), then monitor daily for wasp activity (egg-laying indicates natural control). He avoided spraying, preserving the wasps. Within three days, looper numbers declined sharply.
Step 3: Prevention Strategies—Building a Resilient Garden Ecosystem
Prevention is IPM’s most powerful—and most overlooked—phase. Reactive interventions address symptoms; prevention addresses root causes. By designing and maintaining gardens that inherently resist pests, you drastically reduce the need for future actions. This step focuses on cultural practices: the foundational choices in soil management, plant selection, spacing, and habitat design that create conditions where plants thrive and pests struggle to establish.
Why Prevention Delivers Compounding Returns
Healthy plants possess natural defenses: thicker cuticles, higher tannin levels, robust root systems. Prevention strategies work synergistically:
– Compost-enriched soil → stronger roots → better drought resistance → less stress-induced pest susceptibility
– Crop rotation → disrupts soil pest lifecycles → reduces nematode pressure → healthier plants
– Diverse plantings → supports beneficial insects → natural pest regulation → fewer outbreaks
Investing time in prevention today can save significant effort tomorrow. More importantly, these practices benefit the entire ecosystem—pollinators, soil microbes, birds—not just your target crops.
Core Prevention Techniques: A Layered Defense
Soil Health: The Unseen Foundation
- Test and Amend: Conduct a soil test every 2–3 years (kits available at garden centers or through extension services). Amend based on results:
- Low nitrogen? Add composted manure or blood meal.
- Compacted soil? Incorporate compost + gypsum (for clay) or coconut coir (for sand).
- Low microbial activity? Apply compost tea or mycorrhizal fungi inoculants at planting.
- Compost Generously: Top-dress beds with 1–2 inches of finished compost each spring/fall. Compost improves water retention, nutrient availability, and harbors beneficial microbes that suppress soil-borne pathogens.
- Avoid Synthetic Fertilizers: High-nitrogen synthetics promote soft, succulent growth highly attractive to aphids and mites. Opt for slow-release organic options (alfalfa meal, kelp meal).
- Mulch Mindfully: Apply 2–3 inches of straw, shredded leaves, or wood chips. Benefits:
- Suppresses weeds (pest habitat)
- Regulates soil temperature/moisture
- Prevents soil-borne fungal spores from splashing onto leaves
- Caution: Keep mulch 2–3 inches away from plant stems to deter slugs and stem rot.
Smart Plant Selection & Placement
- Choose Resistant Varieties: Seed catalogs denote resistance with codes:
- Tomatoes: “VFN” = resistant to Verticillium wilt, Fusarium wilt, Nematodes
- Cucumbers: “DM” = Downy Mildew resistance
- Roses: “Black Spot Resistant” varieties (e.g., ‘Knock Out’ series)
- Prioritize Natives: Native plants co-evolved with local pests and beneficials. They typically require fewer inputs and support greater biodiversity (e.g., milkweed for monarchs, goldenrod for predatory wasps).
- Right Plant, Right Place: Match sun/water requirements precisely. A shade-loving hosta stressed by full sun becomes slug bait. A drought-tolerant lavender in soggy soil invites root rot.
- Diversity Over Monoculture: Avoid large blocks of single plant types. Interplant herbs, flowers, and vegetables. A diverse palette confuses pests seeking host plants and provides continuous resources for beneficials.
Cultural Practices for Disruption
- Crop Rotation (Vegetable Gardens): Never plant the same plant family in the same spot consecutively. Example 4-year rotation:
| Year | Bed 1 | Bed 2 | Bed 3 | Bed 4 |
|——|——-|——-|——-|——-|
| 1 | Tomatoes (Nightshade) | Beans (Legume) | Squash (Cucurbit) | Kale (Brassica) |
| 2 | Beans | Squash | Kale | Tomatoes |
| 3 | Squash | Kale | Tomatoes | Beans |
| 4 | Kale | Tomatoes | Beans | Squash |
Why it works: Soil-dwelling pests (e.g., tomato root-knot nematodes) struggle to establish when host plants are absent for multiple seasons. - Sanitation: Remove spent plants, fallen fruit, and debris promptly. Many pests overwinter in garden litter (e.g., squash bug eggs on old vines, Colorado potato beetle adults in soil cracks). Clean tools with 10% bleach solution between uses to prevent disease spread.
- Water Wisely:
- Use drip irrigation or soaker hoses to keep foliage dry (reduces fungal diseases and slug habitat).
- Water deeply but infrequently to encourage deep roots.
- Water early morning (allows leaves to dry before evening).
- Timing Tactics:
- Plant cool-season crops (spinach, peas) early to mature before heat-loving pests emerge.
- Delay planting beans until soil warms to avoid seedcorn maggot.
- Use floating row covers immediately after planting to exclude flea beetles, cabbage moths, or squash vine borers. Remove during flowering for pollination.
Habitat Engineering for Beneficials
Create “insectaries”—dedicated spaces that provide food, water, and shelter for pest-controlling allies:
– Nectar & Pollen Sources: Plant successional blooms from early spring to late fall:
– Early season: Alyssum, dill, fennel, cilantro (attract hoverflies, parasitic wasps)
– Mid-season: Yarrow, cosmos, sunflowers, buckwheat (support ladybugs, lacewings)
– Late season: Goldenrod, asters, sedum (sustain beneficials into fall)
– Water Features: Place a shallow dish filled with water and stones (for landing) near garden beds. Refresh weekly.
– Shelter Options:
– Leave small patches of leaf litter in undisturbed corners for ground beetles.
– Install “insect hotels” with bamboo tubes, drilled logs, or bundled reeds for solitary bees and wasps.
– Allow a section of lawn to grow tall with clover and dandelions (early-season bee forage).
– Overwintering Sites: Stack brush piles or leave perennial stems standing through winter (many beneficials hibernate in hollow stems).
Companion Planting: Science-Backed Synergies
While not a standalone solution, companion planting enhances prevention when integrated with other strategies. Focus on evidence-supported pairings:
– Repellent Effects:
– Marigolds (Tagetes spp.): French marigolds (T. patula) release compounds that may suppress root-knot nematodes. Plant densely around tomatoes, peppers, or roses. Note: Effectiveness varies by soil type and climate.
– Basil: Interplanted with tomatoes, may help deter thrips and hornworms (volatile oils may mask host scent). Also repels mosquitoes for the gardener!
– Nasturtiums: Act as a “trap crop” for aphids and cabbage worms, drawing them away from beans or brassicas. Sacrifice the nasturtiums.
– Attractant Effects:
– Dill/Cilantro: When allowed to flower, attract Trichogramma wasps that parasitize caterpillar eggs.
– Borage: Near strawberries, attracts bees for pollination and may deter tomato hornworms (anecdotal but widely observed).
– Cautionary Notes:
– Avoid planting antagonistic pairs: Onions/garlic near beans or peas can inhibit growth.
– Research regional suitability: Some companions thrive in specific climates.
– Manage expectations: Companion planting reduces pest pressure but won’t eliminate outbreaks alone.
Common Prevention Mistakes to Avoid
– Overcrowding: Poor air circulation invites fungal diseases and hides pests. Follow seed packet spacing guidelines.
– Ignoring soil: “Feed the soil, not the plant” is the cornerstone of resilient gardening.
– Removing all “weeds”: Some volunteers (clover, dandelion) fix nitrogen or host beneficials. Manage strategically.
– Monoculture planting: A sea of one plant type is a pest buffet. Diversity is your best defense.
Real-World Application: Elena transformed her pest-prone vegetable garden using prevention. She:
1. Tested soil and amended with compost + greensand (for potassium).
2. Planted marigolds around the perimeter and alyssum between tomato rows.
3. Installed drip irrigation on a timer (watering at 5 AM).
4. Rotated crops annually using a journal template.
5. Left a small brush pile in the corner for overwintering beetles.
Result: By midsummer, aphid outbreaks were controlled by ladybugs from the alyssum. Squash bugs appeared but in lower numbers due to crop rotation. She spent significantly less time on pest management than the previous year.
Adapting Prevention Across Garden Types
– Container Gardens: Use high-quality potting mix (never garden soil). Rotate pot locations yearly. Elevate pots on stands to deter crawling pests. Include one pot of flowering herbs (basil, thyme) per cluster.
– Raised Beds: Line interior walls with copper tape to deter slugs. Avoid wood types treated with pesticides (use cedar or untreated pine).
– Ornamental Gardens: Prioritize native perennials. Group plants with similar water needs. Use gravel mulch in dry climates to deter slugs.
– Community Gardens: Coordinate rotation schedules with neighbors. Establish shared insectary beds at plot edges.
Step 4: Intervention Selection—Choosing the Right Tool for the Job
Despite meticulous prevention, pests may occasionally exceed action thresholds. When intervention is necessary, IPM follows a tiered approach: prioritize methods that are targeted, minimize ecological disruption, and preserve beneficial populations. This is not about eliminating all pests—it’s about reducing populations to acceptable levels while safeguarding the garden’s self-regulating capacity. The intervention hierarchy, from least to most disruptive, is: Mechanical/Physical → Biological → Chemical (as a last resort).
Why a Tiered Approach Prevents Future Problems
Broad-spectrum pesticides (even organic-labeled ones like pyrethrin) can disrupt ecological balance. They may harm ladybugs alongside aphids, lacewings alongside whiteflies. This sometimes triggers “secondary pest outbreaks”: with predators reduced, previously minor pests (like spider mites) may increase. Targeted interventions maintain the garden’s natural checks and balances. Additionally, rotating methods helps prevent pests from adapting—a consideration documented in agricultural research.
Mechanical and Physical Controls: Precision Removal
These methods physically remove, exclude, or kill pests without chemicals. Highly targeted, residue-free, and immediate.
– Handpicking:
– Best for: Large, slow pests (tomato hornworms, Colorado potato beetles, squash bugs, slugs).
– Technique: Wear gloves. Drop pests into a bucket of soapy water (1 tbsp dish soap per quart of water). Do this early morning when pests are sluggish.
– Pro Tip: Place a cloth under plants before shaking branches—fallen pests are easier to collect.
– Water Spray:
– Best for: Soft-bodied pests (aphids, spider mites, whiteflies).
– Technique: Use a strong jet from a hose sprayer. Focus on leaf undersides. Repeat every 2–3 days for 1–2 weeks.
– Caution: Avoid on delicate seedlings or fuzzy-leaved plants (lambs ear, African violets).
– Traps:
– Yellow Sticky Traps: Capture flying pests (whiteflies, fungus gnats, thrips, winged aphids). Place just above plant canopy. Critical: Position away from beneficial insect habitats; check daily to avoid trapping hoverflies. Replace when covered.
– Beer Traps for Slugs/Snails: Bury a shallow container (yogurt cup) level with soil. Fill halfway with beer. Slugs are attracted, fall in, and drown. Refresh after rain.
– Pheromone Traps: Species-specific (e.g., codling moth for apples, tomato pinworm). Use only for monitoring population levels or mass trapping in isolated areas. Warning: Can attract more pests to your garden if misused—follow label instructions precisely.
– Barriers:
– Row Covers: Lightweight fabric (Reemay, Agribon) draped over hoops. Exclude cabbage moths, flea beetles, squash vine borers. Remove during flowering for pollination. Secure edges with soil or pins.
– Collars: Cardboard tubes (from paper towels) or aluminum foil wrapped around seedling stems prevent cutworm damage.
– Copper Tape: Adhere to raised bed edges or pot rims. Creates a mild deterrent barrier for slugs/snails. Reapply after heavy rain.
Biological Controls: Harnessing Nature’s Allies
Biological control uses living organisms to suppress pests. This is IPM’s most elegant strategy—working with ecology, not against it.
– Conservation Biological Control: Protecting and enhancing existing beneficial populations (covered extensively in Step 3). This is always the first priority.
– Augmentation Biological Control: Releasing purchased beneficials. Use strategically:
| Beneficial Organism | Target Pest | Best Applied When | Key Considerations |
|———————|————-|——————-|———————|
| Ladybugs (Hippodamia convergens) | Aphids, mites, scale | Evening, near infestation; plants misted | Refrigerate 1 hour before release to slow dispersal; many fly away—set realistic expectations |
| Lacewing Larvae (“Aphid Lions”) | Aphids, thrips, mites, small caterpillars | Directly onto infested leaves | More effective than adults; larvae stay put longer |
| Parasitic Wasps (Trichogramma spp.) | Caterpillar eggs (cabbage worm, corn borer) | At first sign of adult moths | Release weekly for 3–4 weeks; tiny—apply with included shaker |
| Beneficial Nematodes (Steinernema feltiae) | Soil pests: cutworms, grubs, fungus gnats | Evening, into moist soil | Refrigerate until use; apply with watering can; avoid UV light |
| Predatory Mites (Phytoseiulus persimilis) | Spider mites | At first sign of mites | Requires humidity >60%; releases heat when shipped—use immediately |
– Microbial Insecticides: Naturally occurring pathogens targeting specific pests:
– Bacillus thuringiensis (Bt):
– Bt kurstaki: Targets caterpillars (cabbage worms, hornworms, tomato pinworm). Spray on leaves; caterpillars ingest, stop feeding within hours. Highly specific—does not harm bees, ladybugs, or mammals. Reapply after rain.
– Bt israelensis (Bti): Targets mosquito, black fly, and fungus gnat larvae. Use in standing water (rain barrels) or soil drench for gnats.
– Spinosad: Derived from soil bacteria (Saccharopolyspora spinosa). Effective against thrips, leafminers, codling moth, Colorado potato beetle. Toxic to bees when wet—apply at dusk after bees retire. OMRI-listed for organic use.
– Beauveria bassiana: Fungus infecting whiteflies, aphids, thrips, beetles. Spores attach to pest, germinate, and kill in 3–5 days. Works best in humid conditions.
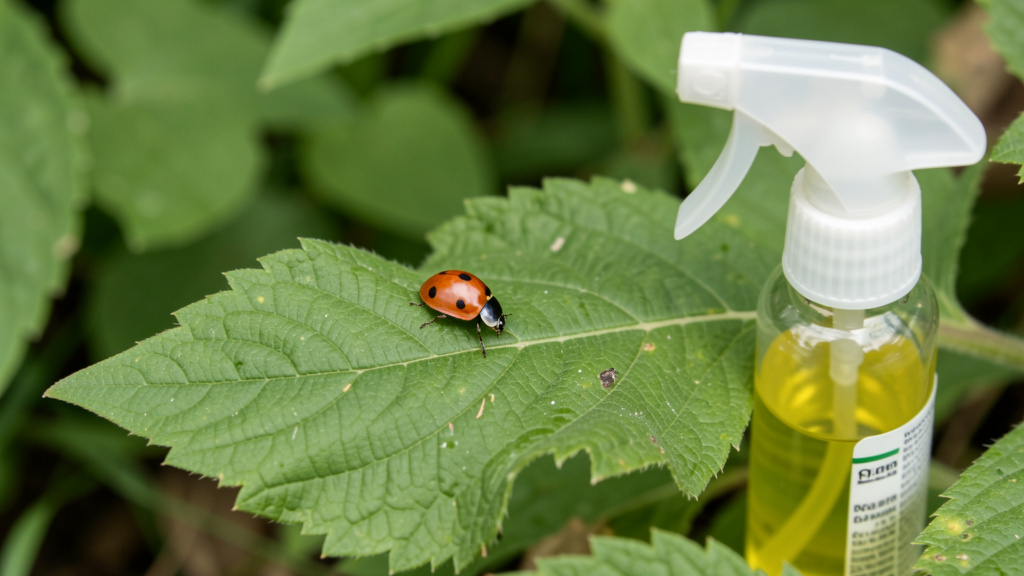
Chemical Controls: The Last Resort Protocol
When non-chemical methods fail and damage threatens plant survival, targeted chemical options may be justified. IPM emphasizes selective pesticides that minimize non-target impact. Always read and follow the label—it’s the law and contains critical safety information.
– Organic-Approved Options (Use Judiciously):
– Horticultural Oils (Neem, Jojoba, Mineral Oil):
– How it works: Smothers soft-bodied pests (aphids, scale, mites, whiteflies) by blocking spiracles (breathing pores).
– Application: Mix per label (typically 1–2 tbsp per quart of water). Spray thoroughly, especially undersides. Apply when temperatures are 40–90°F (avoid hot sun to prevent leaf burn). Test on a few leaves first.
– Neem Note: Contains azadirachtin, which may disrupt insect growth and feeding. Most effective on young larvae.
– Insecticidal Soaps:
– How it works: Potassium salts of fatty acids dissolve insect cell membranes. Must contact pest directly.
– Application: Spray until runoff on affected areas. Rinse plants after 1–2 hours to prevent phytotoxicity. Avoid on ferns, plums, or drought-stressed plants.
– Diatomaceous Earth (DE):
– How it works: Fossilized algae shards may abrade exoskeletons of crawling insects (ants, slugs, earwigs), causing dehydration.
– Application: Use food-grade only. Dust lightly on dry soil around plants or on stems. Reapply after rain or dew. Caution: May affect beneficials if applied broadly; use as a targeted barrier. Avoid inhaling dust.
– Pyrethrins (from Chrysanthemum cinerariifolium):
– How it works: Fast-acting neurotoxin.
– Critical Warning: Highly toxic to bees, fish, and aquatic invertebrates. Only use as a spot treatment at dusk, avoiding blooms. Never use near water features.
– Synthetic Options (Extreme Caution):
– Reserved for severe, persistent infestations where all else failed (e.g., invasive spotted lanternfly, emerald ash borer).
– Examples: Acephate (systemic, for tough pests like rose slugs), Imidacloprid (for soil pests—but highly toxic to bees; avoid on flowering plants).
– Non-Negotiable Rules:
1. Confirm pest ID and threshold exceeded.
2. Spot-treat only affected areas.
3. Apply at dusk when pollinators are inactive.
4. Wear gloves, eye protection, long sleeves.
5. Never exceed label rates.
6. Inform neighbors if spraying near shared spaces.
Intervention Decision Flowchart
When pests exceed threshold:
1. Can I remove it physically? (Handpick, spray off, trap) → Yes: Do it immediately. Reassess in 24–48 hours.
2. Are beneficials present and active? → Yes: Monitor closely. Intervention may disrupt natural control. Only act if pest numbers surge despite predator activity.
3. Is a biological control appropriate? (e.g., Bt for caterpillars, nematodes for grubs) → Yes: Apply per instructions. Monitor results.
4. Is a targeted organic pesticide needed? (e.g., insecticidal soap for aphids) → Yes: Spot-treat affected areas only. Avoid spraying blooms.
5. Is the situation severe enough to warrant a selective synthetic? → Only if: All prior steps failed, plant survival is at risk, and non-target risks are mitigated. Document rationale for future learning.
Common Intervention Mistakes
– Spraying preventatively: Applying pesticides “just in case” wastes resources and may harm beneficials. Only treat when pests are present and above threshold.
– Overapplying: More concentrate ≠ better results. Follow label rates precisely—excess can burn plants or reduce effectiveness.
– Ignoring timing: Spraying Bt at noon (UV degrades it) or insecticidal soap in full sun (causes burn) reduces efficacy.
– Neglecting safety: Always wear protective gear. Store pesticides locked away from children/pets.
Real-World Application: Priya’s zucchini plants showed classic squash vine borer signs: sudden wilting, sawdust-like frass at stem base. She:
1. Verified ID: Split stem carefully with razor blade—found white larva with brown head.
2. Removed pest: Extracted larva with tweezers, dropped in soapy water.
3. Repaired plant: Mounded moist soil over the wound to encourage new root growth.
4. Prevented spread: Installed yellow bowl traps (water + dish soap) to monitor adult moth activity.
5. Protected remaining plants: Wrapped stems with aluminum foil collars.
She avoided spraying the entire plant, preserving bees visiting the flowers. The damaged plant recovered; others remained borer-free.
Step 5: Evaluation & Adaptation—Closing the Loop
The IPM cycle is incomplete without reflection. Evaluation transforms isolated actions into cumulative wisdom. After any intervention (or decision not to intervene), assess outcomes: What worked? What unintended consequences occurred? How will you adjust next time? This phase builds your personalized knowledge base, making each season more efficient and ecologically attuned.
Why Evaluation is the Catalyst for Mastery
Without evaluation, patterns remain hidden. Did that neem oil application cause leaf burn on your basil? Did releasing ladybugs reduce aphids, or did they disperse immediately? Documenting results reveals insights invisible in the moment. Gardens are dynamic—pest pressures shift yearly due to weather, new plantings, or neighboring changes. Adaptation ensures your strategies evolve with your ecosystem.
A Practical Evaluation Protocol
– Short-Term Assessment (1–7 Days Post-Intervention):
– Re-inspect the treated area. Is pest population reduced?
– Check for non-target effects: Are beneficial insects still present? Any plant damage from treatment?
– Note environmental factors: Did rain wash away a spray? Did heat increase stress?
– Journal Prompt: “Intervention: [Method]. Result: [Observed change]. Unexpected outcome: [None/Yes—describe].”
– Long-Term Assessment (Seasonal/Yearly):
– Review journal entries. Which prevention strategies yielded the greatest benefit?
– Track recurring issues: Did crop rotation reduce nematode pressure this year vs. last?
– Assess biodiversity: Are you seeing more types of beneficials? Fewer severe outbreaks?
– Journal Prompt: “Top 3 Prevention Wins This Season,” “One Strategy to Improve Next Year.”
– Tools for Insight:
– Continue using your garden journal. Add columns: “Action Taken,” “Result (1–10),” “Future Adjustment.”
– Take “before and after” photos. Visual evidence is powerful.
– Create a seasonal summary each fall: What pests appeared? When? How were they managed? What would you do differently?
Adapting Based on Evaluation
– If intervention succeeded:
– Note precise conditions: “Handpicked hornworms at 7 AM on July 12; plant recovered fully.”
– Scale prevention: “After success with alyssum attracting ladybugs, plant twice as much next spring.”
– If intervention failed:
– Analyze root cause: Wrong ID? Poor timing? Inadequate coverage?
– Adjust protocol: “Bt didn’t work on hornworms—applied too late (larvae too large). Next time, inspect for eggs daily starting June 1.”
– Unexpected outcomes:
– Secondary outbreak: “After spraying soap for aphids, spider mites increased. Lesson: Soap may have affected mite predators. Next time, use targeted water spray + consider introducing predatory mites.”
– Beneficial influx: “After planting buckwheat, minute pirate bugs arrived and controlled thrips. Lesson: Expand buckwheat plantings near tomatoes.”
Building Your Personal IPM Calendar
Use evaluation data to create a proactive, season-specific action plan:
– Late Winter: Review last year’s journal. Order seeds for insectary plants. Plan crop rotations.
– Early Spring: Install physical barriers (row covers, collars) at planting. Set up monitoring stations.
– Late Spring: Begin weekly inspections. Release beneficials if historical data shows early pest pressure.
– Summer: Monitor thresholds daily during heatwaves. Avoid spraying during peak pollinator activity.
– Early Fall: Note overwintering sites (e.g., squash bug adults in debris). Plan sanitation tasks.
– Late Fall: Clean tools. Store records. Reflect on season’s lessons.
– Winter: Research new techniques. Connect with local master gardeners.
Real-World Application: After a Japanese beetle outbreak damaged her roses, Lena conducted a thorough evaluation:
– What happened: Beetles appeared mid-July; caused noticeable defoliation on two rose bushes within days.
– Actions taken: Handpicked daily (challenging due to numbers); applied neem oil (temporary reduction).
– Root causes identified:
1. No early-season barriers (row covers not used at bud break).
2. Neem oil applied midday (UV degraded it; also stressed plants in heat).
3. No trap crops planted on property edge.
– Adaptation plan for next year:
1. Install floating row covers on roses in early spring (before beetles emerge).
2. Plant tansy and rue (repellent plants) along fence line as buffer.
3. Handpick beetles into soapy water each morning at 6 AM (when sluggish).
4. Avoid broad spraying: Preserve bees and wasps that parasitize beetle grubs.
She added “Japanese Beetle Monitoring” to her journal checklist for late spring.
The Fundamental Principle: Every interaction—success or setback—is data. Wisdom grows not from avoiding mistakes, but from learning how to adapt.
Addressing Common Challenges and Alternative Scenarios
Real gardens present messy, unpredictable challenges. This section tackles frequent friction points with pragmatic, IPM-aligned solutions grounded in ecological principles.
“I Don’t Have Time for Daily Monitoring!”
Solution: Optimize, don’t eliminate. Efficiency beats intensity.
– Batch inspections: Dedicate 15 focused minutes twice weekly instead of daily. Use a timer.
– Strategic placement: Position vulnerable plants near paths, patios, or seating areas for passive observation during routine activities.
– Leverage technology: Set phone reminders. Use voice memos for quick notes (“July 10: Aphids on rose shoot 3—monitor”). Apps like Gardenize allow photo logging in seconds.
– Delegate: Involve family. Turn inspection into a “bug hunt” game with kids (“Find one beneficial insect!”). Offer neighbors gardening help in exchange for pest checks during vacations.
– Accept imperfection: Some damage is inevitable. Prioritize interventions for crops you plan to harvest or plants with high sentimental value. A few nibbled leaves on established perennials rarely threaten survival.
“Organic Methods Aren’t Working Fast Enough!”
Solution: Reassess before escalating. Perceived slowness often stems from misapplication, not method failure.
– Verify identification: Misdiagnosis guarantees ineffective treatment. Double-check with extension resources.
– Audit application technique:
– Insecticidal soap must contact pests directly—spray undersides thoroughly.
– Horticultural oil requires complete coverage; missed spots harbor survivors.
– Bt degrades in UV light—apply at dusk, not midday.
– Confirm life stage: Bt only affects feeding caterpillars; it won’t kill pupae or adults. Time interventions to vulnerable stages.
– Combine methods: For significant aphid presence:
1. Blast with water spray (immediate reduction).
2. Apply insecticidal soap to remaining clusters (targeted kill).
3. Plant alyssum nearby to attract ladybugs (long-term control).
– Last resort protocol: If plant survival is imminently threatened and all non-chemical options exhausted, a spot-treated, selective pesticide (e.g., Spinosad for thrips) may be justified. Document the rationale: “July 22: Thrips infestation on seedling tomatoes; significant leaf damage; beneficials absent; applied Spinosad at dusk to affected leaves only.” Use this as data to strengthen prevention next season.
“My Neighbor’s Garden is a Pest Source!”
Solution: Create defensive buffers and foster community collaboration.
– Physical barriers: Plant dense, aromatic hedges along property lines (e.g., lavender, rosemary, marigolds). Install fine-mesh netting on fences to block flying pests.
– Trap cropping: Plant sacrificial crops on your border edge: Nasturtiums for aphids, sunflowers for stink bugs. Monitor and remove pests from trap crops before they migrate inward.
– Diplomacy: Share IPM resources non-judgmentally. “I struggled with squash bugs too—this extension guide helped me.” Offer to help identify pests in their garden. Sometimes a collaborative approach reduces area-wide pressure.
– Focus on resilience: Strengthen your garden’s internal defenses (soil health, beneficial habitat) so it can withstand minor invasions. A robust ecosystem recovers faster from pest incursions.
– Document and adapt: Note wind direction and pest arrival patterns. If pests consistently arrive from the west, prioritize barriers on that side.
“I’m Overwhelmed by the Complexity!”
Solution: Start microscopically. Mastery builds through consistent, tiny actions.
– Pick one step: Commit to Step 1 (monitoring) for 30 days. Spend 5 minutes every other day inspecting one plant. Master observation before adding identification.
– Focus on one pest: Choose the most problematic pest in your garden (e.g., aphids on roses). Learn its lifecycle, thresholds, and controls deeply. Apply the full IPM cycle to this single issue.
– Use templates: Download a simple IPM journal template (many extension services offer free PDFs). Fill in pre-labeled sections—reduces decision fatigue.
– Celebrate micro-wins: Handpicked one hornworm? That’s progress. Noticed a ladybug larva? That’s ecosystem health. Write it down.
– Connect with community: Join a local gardening group or online forum (e.g., Reddit’s r/organicgardening). Share one observation weekly. Learning alongside others reduces isolation.
Special Considerations for Specific Garden Contexts
- Container Gardens:
- Challenge: Pests spread rapidly in close quarters; limited soil volume stresses plants.
- Adaptations:
- Isolate new plants for 10–14 days before introducing to collection.
- Use sterile, high-quality potting mix (never garden soil).
- Elevate pots on stands or saucers to deter crawling insects.
- Place yellow sticky traps vertically between pots for early detection.
- Handpick pests immediately—easier in confined spaces.
- Raised Bed Gardens:
- Challenge: Wood edges provide hiding spots for slugs, earwigs.
- Adaptations:
- Line interior bed walls with copper tape before planting.
- Avoid mulching directly against plant stems.
- Create “slug patrols”: Check edges with flashlight 1 hour after dusk.
- Plant aromatic herbs (thyme, oregano) along bed borders as natural deterrents.
- Organic Certification Compliance:
- Critical Note: If gardening for certified organic production (e.g., market farm), consult the National Organic Program (NOP) standards. Some IPM methods require approval.
- Key Actions:
- Verify all products have OMRI (Organic Materials Review Institute) listing.
- Maintain detailed records of all interventions (product, rate, date, reason).
- Prioritize prevention and mechanical controls—certifiers favor these.
- Consult your certifier before using any new material.
- Allergy or Chemical Sensitivity:
- Adaptations:
- Prioritize mechanical controls (handpicking, water spray) and habitat enhancement.
- Wear nitrile gloves and a N95 mask when applying any sprays (even soap).
- Rinse produce thoroughly under running water; use a vegetable brush for firm skins.
- Focus on prevention to minimize need for interventions.
- Renters or Temporary Gardens:
- Adaptations:
- Use portable solutions: Container gardens with casters, removable copper tape on pots.
- Focus on fast-growing annuals with strong pest resistance (nasturtiums, calendula).
- Build soil health in containers with compost—easier to control than in-ground beds.
- Document observations digitally; take knowledge to your next space.
Your Questions, Answered
Gardeners consistently encounter nuanced dilemmas. Here, we address the most frequent, evidence-based queries with clarity and depth.
Q: Is IPM truly effective for severe pest outbreaks, or only for minor issues?
A: IPM is explicitly designed to address pest challenges at all severity levels—including significant outbreaks. During a severe situation, the framework prevents panic-driven mistakes. Example: A heavy aphid presence on roses. IPM guides you to: 1) Confirm ID and check for beneficials (are ladybugs present?), 2) Assess threshold (is plant survival threatened?), 3) Apply targeted intervention: strong water spray followed by spot-treatment with insecticidal soap on heavily infested shoots, 4) Evaluate in 48 hours, 5) Plan prevention (plant more alyssum next spring). This resolves the immediate concern while reducing future recurrence. Blanket spraying might offer faster visible results but can disrupt beneficial populations, sometimes leading to secondary issues. IPM’s strength is strategic, sustainable resolution—not speed at all costs.
Q: How do I reliably distinguish pest damage from disease or environmental stress?
A: Key diagnostic clues:
– Pest Damage:
– Physical evidence: Insects present, chewed edges, holes, sticky honeydew, webbing, frass (insect droppings).
– Pattern: Often localized to specific plant parts (aphids on new growth; borers at stem base).
– Progression: Damage appears suddenly and spreads if pests are active.
– Disease Symptoms:
– Visual signs: Discoloration (yellowing, spots with concentric rings), wilting without obvious pests, mold/mildew (white powder = powdery mildew; gray fuzz = botrytis), rot.
– Pattern: Often follows environmental triggers (e.g., fungal spots after prolonged wet weather; blossom end rot from inconsistent watering).
– Progression: Spreads gradually, often from oldest leaves upward.
– Environmental Stress:
– Symptoms: Uniform yellowing (nutrient deficiency), leaf scorch (sunburn), stunted growth (compacted soil).
– Clues: Affects multiple plant types simultaneously; correlates with recent weather/events (drought, flood, herbicide drift).
When uncertain: Take clear photos of whole plant, close-up of damage, and soil. Consult extension resources or master gardeners. Misdiagnosis is a common cause of ineffective treatment.
Q: Are “natural” pesticides like neem oil completely safe for bees and beneficials?
A: No pesticide—natural or synthetic—is universally safe. Neem oil, while botanical and biodegradable, requires careful use:
– To beneficials: Can affect soft-bodied predators (lacewing larvae, ladybug larvae) if sprayed directly. Less impactful on adults.
– To bees: Low toxicity when dry, but avoid spraying open flowers. Apply at dusk when pollinators are inactive.
– To plants: Can cause phytotoxicity (leaf burn) on sensitive species (ferns, recent transplants, drought-stressed plants). Always test on a few leaves first.
– Critical principle: “Natural” ≠ “harmless.” Responsible use requires:
1. Confirming pest ID and threshold exceeded.
2. Spot-treating only affected areas.
3. Applying at optimal time (cool, dry evening).
4. Following label instructions precisely.
Prioritize non-chemical methods whenever possible. When using any pesticide, view it as a targeted intervention—not routine maintenance.
Q: Can IPM work effectively in very small spaces like balcony container gardens?
A: Absolutely—and it’s especially valuable in confined spaces where pests spread rapidly. Adaptations:
– Hyper-focused monitoring: Inspect containers daily during peak season. New plants are high-risk—quarantine for 10 days.
– Precision interventions: Handpick pests immediately (easier in small spaces). Use cotton swabs dipped in rubbing alcohol for scale on houseplants.
– Strategic plant selection: Choose pest-resistant varieties (e.g., ‘Tiny Tim’ tomatoes). Include one pot of flowering herbs (basil, thyme) per cluster to attract micro-predators.
– Physical barriers: Elevate pots on stands. Use copper tape on pot rims for slugs. Place yellow sticky traps vertically between plants.
– Soil health: Use premium potting mix with compost. Avoid overwatering (promotes fungus gnats).
IPM’s precision is ideal for micro-gardens where broad treatments are impractical and ecological balance is fragile.
Q: What should I do if I find an insect that looks like a pest but might be beneficial?
A: Pause and verify—never assume. Common confusions:
– Ladybug larva: Spiky, black with orange spots. Often mistaken for pests. Action: Leave it! It consumes numerous aphids daily.
– Syrphid fly larva: Smooth, green, slug-like. Resembles aphid colony. Action: Protect it—it’s a voracious aphid predator.
– Parasitized hornworm: Covered in white cocoons. Action: Do not remove! Braconid wasps inside will emerge to hunt other hornworms.
– Soldier beetle: Soft-bodied, orange/black. Looks like a pest. Action: Welcome it—it eats aphids and cucumber beetles.
Protocol:
1. Take a clear photo.
2. Search “[insect description] beneficial or pest” + your region.
3. Consult university extension ID pages.
4. When in doubt, observe for 24 hours: Is it eating pests? Moving deliberately?
Preserving beneficials is essential in IPM. A moment of verification prevents irreversible mistakes.
Q: How long does it take to see results from planting beneficial insect habitats?
A: Timeline varies by organism and garden context:
– Short-term (1–2 weeks): Mobile beneficials already in your area (hoverflies, adult ladybugs) may visit new blooms immediately.
– Medium-term (1 growing season): Populations of common predators (lacewings, parasitic wasps) often increase noticeably with consistent floral resources.
– Long-term (2+ seasons): Less mobile species (ground beetles, certain parasitoids) establish breeding populations. Soil health improvements compound benefits.
Keys to success:
– Plant successional blooms (spring to fall) to provide continuous resources.
– Include diverse flower shapes (umbels for tiny wasps, daisy types for beetles).
– Provide water and shelter (leaf litter, brush piles).
– Avoid pesticides that harm beneficials.
Even a single pot of alyssum can attract hoverflies within days. Patience and consistency yield compounding rewards.
Q: Is diatomaceous earth (DE) safe for earthworms and overall soil health?
A: Food-grade DE poses low risk to earthworms when used sparingly as a surface barrier. Earthworms live deeper in soil; DE applied lightly on soil surface primarily affects crawling insects. However:
– Avoid tilling DE into soil: Abrasive particles could potentially affect soft-bodied organisms in high concentrations.
– Reapplication needed: DE loses effectiveness when wet—rain or dew requires re-dusting.
– Better alternatives for soil pests: Beneficial nematodes (Steinernema feltiae) target grubs, cutworms, and fungus gnats with minimal impact on earthworms.
– Critical caution: Never use pool-grade DE (contains crystalline silica—harmful if inhaled). Only use food-grade DE labeled for garden use. Apply on calm days while wearing a mask to avoid inhalation. For most home gardens, physical removal or nematodes are safer, more targeted options for soil pests.
Q: What’s the single most impactful IPM practice for an absolute beginner?
A: Consistent, mindful monitoring. Spending just 10 minutes twice a week observing your garden builds foundational skills that make all other IPM steps possible. You’ll:
– Catch problems early when they’re easiest to manage.
– Learn your garden’s unique patterns and rhythms.
– Develop the observational skills to distinguish pests from beneficials.
– Reduce anxiety by replacing uncertainty with data.
Start small: Choose three high-value plants. Inspect them thoroughly every Tuesday and Saturday morning. Jot one observation in a notebook. This tiny habit creates outsized returns—preventing crises, building confidence, and fostering connection with your garden. Mastery of IPM unfolds over seasons, but it begins with a single moment of attentive presence.
Q: Can IPM completely eliminate the need for all pesticides?
A: For most home gardeners, a well-implemented IPM program can lead to a substantial reduction in pesticide use compared to conventional reactive spraying. In many cases—especially with strong prevention and healthy soil—pesticides become unnecessary. However, IPM does not dogmatically reject pesticides; it reserves them for rare situations where:
– Non-chemical methods have been exhausted.
– Pest pressure exceeds action thresholds.
– Plant survival or significant harvest loss is imminent.
– The chosen pesticide is highly targeted with minimal non-target impact.
The goal is minimization and precision, not ideological purity. True IPM wisdom lies in knowing when restraint is strength—and when a minimal, strategic intervention preserves greater ecological balance. For context: Commercial organic farms using IPM still occasionally apply approved pesticides, but at significantly reduced rates. Your home garden has even greater flexibility to prioritize prevention.
Q: How do weather patterns and climate influence IPM decisions?
A: Weather is a primary driver of pest activity and plant vulnerability. Key considerations:
– Wet springs: Increase fungal diseases (powdery mildew, blight) and slug/snail activity. Focus on sanitation, air circulation, and copper barriers. Avoid overhead watering.
– Hot, dry summers: Favor spider mites and aphids. Monitor closely; ensure plants aren’t drought-stressed (stressed plants attract pests). Use drip irrigation.
– Mild winters: Allow more pests to survive (e.g., squash bugs, Japanese beetles). Adjust spring monitoring intensity—start earlier.
– Microclimates matter: A shady, damp corner of your yard may harbor slugs while a sunny slope stays dry. Map these zones and tailor strategies.
– Climate considerations: Track shifting pest emergence dates in your region. Many extension services now publish updated “pest degree day” models based on local conditions.
Integrate weather awareness into your IPM calendar: “When temperatures consistently reach 70°F, begin monitoring for squash vine borer moths.”
Q: How do I manage pests on fruit trees without harming pollinators?
A: Fruit trees require special timing considerations:
– Dormant season (late winter): Apply horticultural oil to smother overwintering scale, mite eggs, and aphid eggs. Safe—no leaves or blooms present.
– Pre-bloom: Use pheromone traps for monitoring codling moth or plum curculio. Install trunk bands to catch crawling pests.
– During bloom: Absolutely avoid all sprays. This is critical for pollinator safety. Handpick pests if absolutely necessary.
– Post-petalfall: Begin targeted interventions if thresholds exceeded. Apply Bt for codling moth only at dusk. Use kaolin clay (Surround WP) as a particle barrier—it confuses pests without harming bees.
– Cultural practices: Prune for air circulation. Rake and destroy fallen fruit (harbors larvae). Maintain healthy soil to support tree resilience.
Patience during bloom pays dividends: Protecting pollinators ensures fruit set for current and future seasons.
Conclusion and Next Step
Integrated Pest Management is far more than a pest control methodology—it is a philosophy of engaged stewardship. It invites you to see your garden not as a battlefield to be dominated, but as a living community to be nurtured. In this paradigm, a ladybug is not a random visitor but a valued partner. A nibbled leaf is not a failure but a data point guiding your next action. This shift—from reactivity to relationship—transforms gardening from a chore into a profound practice of observation, humility, and reciprocity with nature.
Recap: The Three Pillars of Enduring IPM Success
- Prevention Through Partnership: Invest in soil vitality, plant diversity, and habitat for beneficials. Create conditions where plants thrive inherently, reducing vulnerability at the source.
- Precision Over Power: When action is needed, choose the most targeted, least disruptive method. Handpick before spraying; conserve beneficials before introducing controls; spot-treat before blanket applications.
- Learning as Legacy: Document, evaluate, and adapt. Your garden journal is a living record of wisdom—each season deepening your understanding and refining your practice.
The 24-Hour Rule: Your Immediate, Actionable Step
Within the next day, take one small, concrete action to integrate IPM into your rhythm:
– If you garden actively today: Spend 7 minutes inspecting three plants. Check leaf undersides, stems, and soil. Write one observation in a notebook or phone note: “July 15: Tiny green dots on rose shoot—monitor for aphids.”
– If your garden is dormant or you’re planning: Research one insectary plant suited to your hardiness zone. Add it to your seed order or shopping list (e.g., “Alyssum ‘Snow Princess’ for container edges”).
– If you feel overwhelmed: Bookmark your local university extension website’s pest management page. Save it where you’ll see it (phone home screen, garden tool caddy).
This micro-action builds momentum. Mastery unfolds over seasons, but it begins with a single moment of intentional attention. You’ve already taken the hardest step—choosing to learn. Now, honor that choice with one small act.
The Big Picture: Cultivating Ripple Effects
Every IPM-aligned decision you make sends positive ripples far beyond your property line. By choosing targeted interventions over broad-spectrum sprays, you support the bees pollinating your neighbor’s fruit trees. By enriching your soil with compost, you contribute to healthier watersheds. By planting native insectaries, you bolster biodiversity in an increasingly fragmented landscape. Your garden becomes a node in a larger network of ecological resilience—a quiet act of hope in a world facing environmental challenges.
More personally, IPM cultivates qualities that extend into all areas of life: patience to observe before acting, humility to learn from setbacks, wisdom to distinguish signal from noise. The knowledge you gain—passed to children who watch you inspect leaves, shared with neighbors over the fence, carried in your hands as you gently relocate a beneficial insect—becomes part of a legacy. It is a testament to the possibility of living in reciprocity with the natural world. Your garden, managed with intention and care, is not merely a plot of land; it is a living classroom, a sanctuary for life, and a profound expression of stewardship. Tend it well.
Explore Our Complete Garden Stewardship System:
[Soil Health Mastery: Building Living Soil for Vibrant Plants] | [Companion Planting Decoded: Science-Backed Pairings for Pest Resistance] | [Attracting Beneficial Insects: A Seasonal Habitat Guide] | [Organic Pest Control Toolkit: Safe, Effective Recipes and Techniques] | [Seasonal Garden Journal Templates: Track, Learn, and Grow] | [Water-Wise Gardening: Conservation Strategies for Every Climate] | [From Seed to Harvest: A Beginner’s Vegetable Garden Roadmap]