Master Electrical Codes, Moisture Zones, and Proven Lighting Layouts to Create a Bathroom That’s Both Safe and Stunning
Transform your bathroom into a sanctuary of safety and style with our comprehensive guide. We translate complex electrical safety standards into clear, actionable steps, clarify moisture zone requirements, and reveal vanity lighting approaches that minimize shadows while enhancing daily routines—all grounded in widely recognized safety standards and lighting principles. Whether you’re refreshing a powder room or designing a primary suite bathroom, this guide ensures every lighting decision prioritizes well-being without sacrificing visual comfort or personal expression.
Introduction
Bathroom lighting exists at the intersection of physics, physiology, and personal ritual. It must satisfy rigorous electrical safety protocols designed for moisture-rich environments while delivering precise illumination for highly personal tasks—applying makeup with accuracy, shaving without nicks, assessing skincare results, or navigating safely during nighttime visits. Available resources often present a fragmented picture: safety references may overwhelm with technical language disconnected from lived experience, while design-focused content sometimes overlooks critical moisture zone requirements. This gap leaves homeowners navigating conflicting advice, potentially compromising safety for aesthetics or functionality for perceived compliance.
This guide bridges that divide through an integrated methodology informed by widely adopted standards. We synthesize requirements reflected in model electrical codes, safety testing protocols from independent laboratories, and lighting recommendations from professional illumination societies to create a unified framework. You will learn not only where fixtures may be installed per safety guidelines but why those boundaries exist—and how to work within them to create lighting that feels intuitive, flattering, and inherently secure. Safety is not a constraint on beautiful design; it is the essential foundation upon which truly intelligent, human-centered lighting is built. By the conclusion of this guide, you will possess a clear, actionable approach to evaluate any bathroom lighting scenario with informed confidence.
The Three-Zone Safety Framework: Building Your Bathroom’s Electrical Defense System
Before selecting fixtures, drafting layouts, or exploring design inspiration, establish the invisible boundaries that govern every electrical decision in your bathroom. Moisture—whether from direct spray, splashing, condensation, or ambient humidity—interacts critically with electricity. Model electrical codes and international safety standards define distinct moisture zones radiating outward from water sources. These zones represent legally recognized safety boundaries in most jurisdictions. Misinterpreting them risks equipment failure, fire hazard, or personal injury. This framework transforms abstract guidelines into a visual, measurable map tailored to your specific space.
Step 1: Mapping Your Bathroom’s Moisture Zones with Precision
Visualize your bathroom divided into concentric zones originating from points of water exposure: bathtubs, shower stalls, and sinks. Accuracy in mapping is essential—measure carefully and document before proceeding to fixture selection. Use a tape measure, level, and sketch your layout on graph paper or a digital app. Label each zone clearly.
-
Zone 0: The Immersion Zone
This zone encompasses the interior space of the bathtub or shower stall—the area subject to full submersion or direct, forceful water spray. Concrete Example: The entire volume inside your glass-enclosed shower stall, from the drain grate up to the showerhead and outward to the walls. For a freestanding tub, Zone 0 is the interior basin where water pools. Critical Installation Rule: Only fixtures explicitly rated for submersion (IP67 or IP68) and operating at Safety Extra-Low Voltage (SELV)—typically 12 volts AC or DC—are permitted. This almost always means a dedicated, low-voltage niche light installed within the shower wall during construction or major renovation. Standard line-voltage (120V) fixtures are strictly prohibited, regardless of marketing claims. Common Fatal Mistake: Installing a fixture labeled “for showers” directly above the shower floor without verifying explicit Zone 0/IP67+ certification. Always cross-reference the manufacturer’s specification sheet. Real-World Consequence: A non-compliant fixture in Zone 0 can allow water ingress into electrical components, creating a severe hazard. -
Zone 1: The Direct Spray Zone
This zone extends vertically above Zone 0 to a height of approximately 7 feet 6 inches from the floor of the tub or shower base. It includes all wall surfaces within the shower enclosure and the airspace directly above a freestanding tub. Concrete Example: In a standard shower stall, Zone 1 covers all walls from the shower pan up to 7’6″, and the ceiling area directly above the stall within that vertical column. For a clawfoot tub, Zone 1 forms a cylinder rising 7’6″ from the tub floor. Critical Installation Rule: Fixtures must carry a “Wet Location” safety listing (UL/ETL or equivalent) and possess an IP rating of IPX4 minimum (protection against splashing water from any direction), though IPX5 or IPX6 is strongly recommended for shower environments. All fixtures must be permanently mounted and connected to GFCI-protected circuits per local code. Nuance for Sloped Ceilings: In rooms with vaulted ceilings over the tub, Zone 1 follows the slope. Measure vertically 7’6″ from the highest point of the shower floor or tub base. Critical Exception: If your shower has a bench seat, the area above the bench within the vertical column remains Zone 1. -
Zone 2: The Splash Zone
This zone extends approximately 2 feet horizontally outward from the boundary of Zone 1. Crucially, it also defines the area around sinks: extending 2 feet horizontally from the edge of the basin and vertically up to 7 feet 6 inches from the floor. Concrete Example: The wall space beside your shower enclosure within 2 feet of the glass door; the entire area surrounding your vanity sink—including the wall space where mirror lights or sconces are typically mounted. For a vessel sink, Zone 2 extends 2 feet outward from the outer edge of the vessel. Critical Installation Rule: Fixtures must carry at least a “Damp Location” safety listing with a minimum IPX4 rating. While GFCI protection requirements for lighting in Zone 2 vary by local adoption of electrical codes, it is widely considered a critical safety best practice. Critical Nuance: If your vanity has an overhead cabinet, the interior space above the sink basin may be considered part of Zone 2 due to potential steam accumulation. Verify with your local building authority. Common Oversight: Installing a decorative light bar above the mirror without confirming its damp-location certification. Many affordable fixtures lack proper safety listings—always verify markings on the fixture or its technical documentation. -
Zone 3: The General Bathroom Area
This zone encompasses all remaining areas of the bathroom outside Zones 0, 1, and 2. Concrete Example: The central floor area away from fixtures; wall space above the toilet if positioned more than 2 feet from any sink or tub; the entrance area within the bathroom door. Critical Installation Rule: While model codes may not mandate specific IP ratings for Zone 3, installing standard “Dry Location” fixtures (common in living rooms) is strongly discouraged. Ambient humidity and steam will accelerate internal corrosion, wiring degradation, and potential failure. Fixtures rated for “Damp Locations” (IPX4 minimum) represent the practical minimum standard for the entire bathroom environment. Why This Matters: A “Dry Location” rated ceiling fixture in Zone 3 may function initially but is prone to premature failure due to moisture exposure. The modest cost difference between dry-location and damp-location fixtures is insignificant compared to replacement effort and safety considerations. Pro Insight: In bathrooms with limited ventilation or high usage, treating the entire room with damp-location rated fixtures is a prudent, future-proofing strategy.
The Fundamental Principle: Your bathroom’s lighting safety is determined not by fixture cost, brand prestige, or aesthetic appeal, but by its precise alignment with moisture zones. A high-priced sconce becomes hazardous if installed in Zone 1 without a wet-location rating. Conversely, an appropriately rated fixture installed correctly in Zone 2 provides reliable, safe service for years. Map your zones on a physical sketch before purchasing any component—this single step prevents critical errors.
Step 2: Decoding Fixture Ratings—IP Codes, Safety Listings, and Cutting Through Marketing Language
You’ve mapped your zones. Now, how do you translate that map into fixture selections? The answer lies in the technical specifications molded into the fixture housing or detailed in manufacturer documentation. This is where vague marketing terms (“bathroom safe,” “moisture resistant”) must give way to verifiable engineering data. Understanding these ratings is your primary defense against unsafe purchases.
-
IP (Ingress Protection) Ratings Decoded: This two-digit international code (e.g., IP44) provides standardized indication of a fixture’s resilience. The first digit indicates protection against solid objects (dust, tools); the second digit indicates protection against liquids (water). Ignore claims like “water-resistant”—seek the full IP code.
- First Digit (Solids Protection): Ranges from 0 (no protection) to 6 (dust-tight). For bathroom applications, a minimum of 4 (protection against solid objects >1mm) is practical. A rating of 6 is ideal for longevity in humid environments.
- Second Digit (Liquids Protection): Critical for zone compliance. 0 = No protection, 1 = Condensation/dripping water (vertical), 2 = Dripping when tilted 15°, 3 = Spraying water (up to 60° from vertical), 4 = Splashing water (from any direction), 5 = Low-pressure water jets, 6 = Powerful water jets, 7 = Immersion up to 1m, 8 = Continuous immersion beyond 1m.
- Zone 0 Requirement: IPX7 or IPX8.
- Zone 1 Requirement: IPX4 minimum, but IPX5 or IPX6 is strongly recommended.
- Zone 2 Requirement: IPX4 minimum.
- Zone 3 Recommendation: IPX4 minimum due to ambient humidity.
- Real-World Translation: A fixture labeled “IP44” is suitable for Zone 2 and Zone 3. It is not suitable for Zone 1 where direct spray occurs. A fixture labeled “IP65” is suitable for Zone 1 and all outer zones. Always verify the full rating; “IP rated” without specific digits is meaningless. Pro Tip: When shopping online, download the manufacturer’s spec sheet PDF—marketing images often omit critical details. Search the document for “IP,” safety listing marks, “Damp,” or “Wet.”
-
Safety Listings: The Essential Verification for North America: In the United States and Canada, a UL (Underwriters Laboratories) or ETL (Intertek) mark indicates the fixture has undergone independent safety testing against rigorous standards. This mark is legally required in most jurisdictions for permanent installations. Look for the physical mark molded into the fixture’s housing—not just a logo on packaging or a website.
- Dry Location Listing: Suitable only for interior rooms with minimal humidity (living rooms, bedrooms). Avoid entirely in bathrooms. These fixtures lack seals to prevent moisture ingress.
- Damp Location Listing: Suitable for areas with moderate moisture—condensation, humidity, occasional dampness—but not direct water contact. This is the absolute minimum for Zones 2 and 3. Ideal for vanity lights mounted outside the 2-foot splash boundary, ceiling lights in the main bathroom area. Critical Clarification: “Damp Location” does not mean the fixture can withstand direct spray from a showerhead. It is designed for environments like covered porches or steamy bathrooms away from direct water sources.
- Wet Location Listing: Suitable for areas where water may directly contact the fixture—rain, shower spray, splashing. Mandatory for Zones 0 and 1. Also highly recommended for Zone 2 for maximum durability. Fixtures with this listing undergo rigorous testing, including exposure to flowing water. Why This Matters: Fixtures without proper damp/wet listing are prone to premature failure in bathroom environments due to internal corrosion. The safety listing mark is your assurance of baseline safety compliance.
- Red Flag Alert: Fixtures sold without visible safety listing marks, or with marks that appear altered in product images, should be avoided. Counterfeit safety marks are a documented concern. When uncertain, contact the manufacturer directly for certification documentation.
-
Addressing the “Steam” Consideration: Many express concern about steam specifically. While steam represents moisture-laden air, primary electrical hazards in bathrooms stem from liquid water (splashes, spray, condensation pooling). Fixtures rated for Damp or Wet locations are engineered to handle the humidity and condensation associated with typical bathroom use. The greater risk lies in installing Dry-location fixtures, whose internal components corrode from ambient humidity alone over time. Supporting Action: Proper bathroom ventilation is equally critical. Install an exhaust fan appropriately sized for your bathroom’s volume and run it during and for 20 minutes after showers. This reduces overall humidity, protecting fixtures, walls, and cabinetry. Fans with humidity sensors provide automatic operation.
Step 3: Wiring Safeguards—GFCI, Switch Placement, and Defining the Professional Boundary
Even a perfectly rated fixture becomes hazardous if integrated into an unsafe electrical system. These protocols are non-optional components of a safe installation.
-
GFCI (Ground Fault Circuit Interrupter) Protection: A Critical Safety Layer. A GFCI device continuously monitors electrical current flow. If it detects a small imbalance—indicating current leakage—it interrupts power rapidly. Model electrical codes mandate GFCI protection for bathroom receptacles. Requirements for lighting circuits serving Zones 1 and 2 vary by local jurisdiction but are increasingly common. Best Practice Protocol: Consult a qualified electrician to verify that bathroom lighting circuits receive appropriate GFCI protection per local requirements. Monthly Maintenance Ritual: Press the “TEST” button on every GFCI outlet in your home once per month. The “RESET” button should pop out, cutting power. Press “RESET” to restore power. If the TEST button does not trip the outlet, or if it won’t reset, replace the GFCI device immediately—it is faulty. Critical Note: GFCI protection complements, but does not replace, proper fixture zoning and installation.
-
Switch Placement: Eliminating the Wet-Hand Hazard. Light switches should never be positioned where they can be operated with wet hands near a water source. Model codes typically require switches to be located outside the bathroom or, if installed inside, at a safe horizontal distance from bathtubs or shower stalls (effectively placing them in Zone 3). This prevents reaching for a switch while standing in a wet shower or tub. Actionable Strategies:
- Install primary light switches just outside the bathroom door frame.
- For vanity-specific lighting, position switches on the wall beside the sink but outside the 2-foot Zone 2 boundary.
- Advanced Safety Enhancement: Consider touchless or wave-activated switches installed in Zone 3. These allow hands-free operation, ideal for entering the bathroom at night or when hands are soapy. Ensure the sensor unit itself carries an appropriate damp-location rating if mounted inside the bathroom.
- Avoid: Installing switches on the wall directly beside the shower enclosure or within the shower stall itself—this violates safety guidelines and creates significant risk.
-
The Clear Professional Boundary: When Expert Installation is Essential. Honoring your skill level is a critical component of safety. While replacing a light bulb is low-risk, the following tasks require a licensed, insured electrician:
- Any work involving new circuit runs, wiring through walls/ceilings, or modifications to the electrical panel.
- Installing fixtures within Zones 0, 1, or 2 due to the precision required for sealing, circuit protection, and zone compliance.
- Installing recessed “can” lights, especially near showers or tubs, which require precise cutting, housing selection, insulation clearance, and moisture sealing.
- Upgrading or installing GFCI protection at the circuit level.
- Homes with outdated wiring systems or panels known for safety concerns.
- Why This Boundary Exists: Incorrect wiring can create invisible hazards—loose connections causing arcing, improper grounding, or compromised seals allowing moisture into electrical boxes. Professional installation represents a prudent investment in long-term safety. Obtain multiple quotes, verify licenses and insurance, and request documentation of compliance with local codes. Safety is not an area for compromise.
The Vanity Illumination Blueprint: Engineering Light for Clarity, Confidence, and Daily Ritual
With safety firmly established as your foundation, we turn to the functional heart of bathroom lighting: the vanity. This is where lighting becomes an essential tool for precision tasks. Poor vanity lighting casts unflattering shadows across the face, distorts color perception, causes eye strain, and undermines confidence. The goal is shadow-minimized, color-accurate illumination that reveals true skin tones, hair details, and product application with fidelity. This blueprint moves beyond outdated clichés to provide adaptable, principle-based strategies for every vanity configuration, user need, and aesthetic preference.
Step 1: Mastering Light Quality—CRI, CCT, and Lumens Demystified
Fixture placement is futile without selecting the right light source. Three technical metrics—often obscured by marketing—are essential for vanity lighting excellence. Understanding them transforms guesswork into precision.
-
CRI (Color Rendering Index): Your Truth-in-Color Imperative. CRI measures how accurately a light source reveals the true colors of objects compared to natural daylight (CRI 100). Standard LEDs often have a CRI of 80–82. While acceptable for hallways, this is inadequate for vanities. At CRI 80, subtle skin undertones and makeup shades appear muted or distorted. Minimum Standard for Vanities: CRI 90+. At this level, color differentiation becomes precise. A foundation shade matched under CRI 90+ light will appear consistent in daylight. Dermatologists and professional makeup artists consistently specify high-CRI lighting for accuracy. Pro Insight: Some premium products specify R9 value—a subset of CRI measuring saturated red rendering, critical for skin tones. Aim for R9 > 90 where available. How to Verify: Reputable manufacturers display CRI on packaging or spec sheets (e.g., “90+ CRI,” “High CRI”). Avoid products that omit this specification. Real-World Test: Hold a color-rich object (a magazine photo, a lipstick swatch) under the light. Colors should appear vibrant and distinct.
-
CCT (Correlated Color Temperature): Setting Physiological and Emotional Tone. Measured in Kelvins (K), CCT defines the visual “warmth” or “coolness” of white light. Choosing the right CCT supports both function and mood.
- 2700K–3000K (Warm White): Soft, yellowish-white light reminiscent of incandescent bulbs. Creates a cozy, relaxing ambiance. Best Application: Ambient lighting layers (ceiling fixtures, cove lights) for evening routines. Limitation for Task Lighting: Too warm for detailed grooming; can make it difficult to discern fine details. Avoid as the primary light source for vanity task areas.
- 3500K–4000K (Neutral to Cool White): The widely recommended range for vanity task lighting. This provides crisp, clear illumination without harshness. It enhances visual acuity and color discrimination. Industry practice and professional consensus indicate this range optimizes performance for detailed visual tasks while minimizing eye fatigue. Implementation Strategy: Use 3500K–4000K exclusively for your primary vanity task lights (sconces, mirror-integrated LEDs). This creates a consistent, reliable reference point.
- 5000K+ (Daylight): Mimics bright midday sun. While excellent for color accuracy in art studios (when paired with high CRI), it is generally too harsh for bathroom vanities. It emphasizes skin texture and can create an unflattering, stressful experience. Limited Application: Potentially useful for a dedicated magnifying mirror used for precise tasks like tweezing, but should not be the main vanity light.
- Advanced Layering Strategy: Install dimmable fixtures or tunable-white systems allowing CCT adjustment. Program scenes for “Morning Routine” (4000K, bright), “Evening Wind-Down” (3000K, dimmed ambient), and “Relaxation” (2700K, accent lights only).
-
Lumens: Quantifying Useful Brightness. Watts measure energy consumption; lumens measure total visible light output. For vanities, sufficient lumens delivered to the task area is critical—but distribution matters more than raw quantity.
- Baseline Guidance: Aim for adequate lumens per square foot of vanity countertop area dedicated to task lighting. For a standard vanity, this typically requires multiple light sources totaling sufficient output. The Distribution Imperative: Lumens from a single overhead downlight will cast harsh shadows under eyes and chin. The same total lumens distributed vertically on either side of the mirror wraps light around the face, filling in shadows. Rule of Thumb: Prioritize vertical light placement and diffusion over sheer lumen count. Two well-placed sconces are vastly superior to one poorly placed ceiling light. Pro Tip: Look for fixtures with diffusers (frosted glass, acrylic panels) that soften the light source, reducing glare and creating a more flattering quality. Avoid exposed bright elements at eye level.
Step 2: The Layered Lighting Strategy for Vanities—Ambient, Task, Accent
A single light source cannot fulfill the diverse needs of a bathroom. Layering creates adaptability, reduces eye strain, enhances spatial perception, and supports different activities throughout the day. Each layer serves a distinct purpose and should be controlled independently.
-
Ambient Lighting: The Foundational Glow. This provides overall, shadow-minimizing illumination for safe navigation and general room brightness. Ideal Fixtures: Recessed downlights (IC-rated if near insulation, damp-location rated per zone), a central semi-flush ceiling fixture (damp-rated), or cove lighting. Strategic Placement: Avoid positioning ambient lights directly in front of the mirror. Space them evenly across the ceiling to wash light softly across walls and surfaces. Critical Control: Ambient lights must be on a dimmer switch. This allows reduction for relaxing baths or nighttime use, preventing harsh illumination. Dimming also extends bulb life.
-
Task Lighting: The Precision Engine (Vanity Focus). This is light directed exactly where close-up visual tasks occur. It is the most critical layer for functionality. Evidence-Based Fixture Strategies:
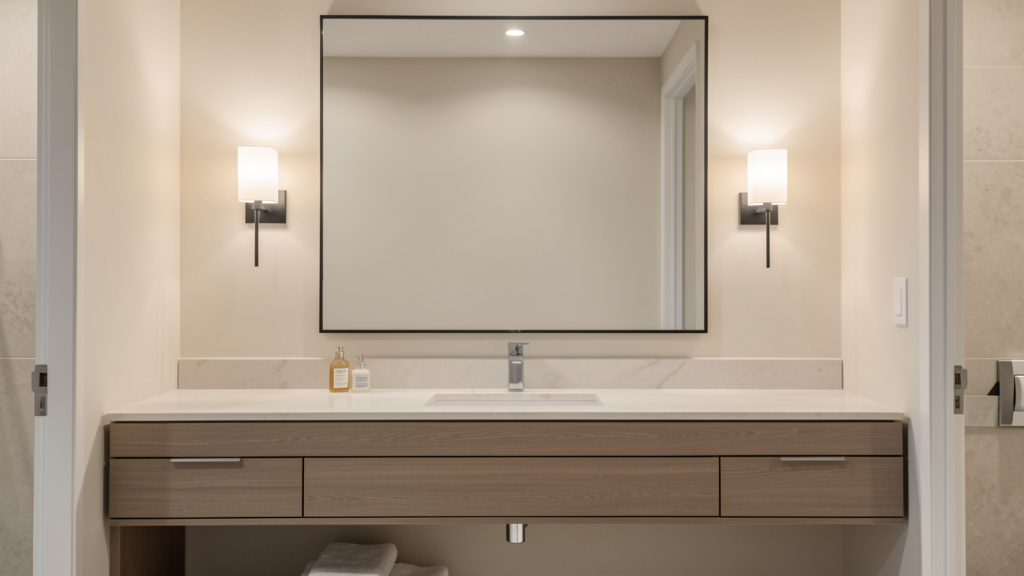
- Vertical Sconces (The Clinically Supported Standard): Mounted on the wall beside the mirror, centered at approximately eye level (66–72 inches from the floor to the center of the fixture). This placement illuminates the face from the sides, eliminating shadows cast by overhead light. Sizing Guidance: The sconce height should be proportional to the mirror height. For a standard mirror, choose sconces of appropriate scale. Spacing Guidance: For two sconces, the distance between their centers should accommodate the user’s face width. Optical Advantage: Sconces with up/down lighting create the most balanced, shadow-free illumination. Fixtures with diffused shades minimize glare.
- Horizontal Mirror Lights (A Common Approach): Mounted above the mirror. While better than no dedicated task light, this placement inherently casts shadows downward. Mitigation Strategies: Choose a fixture significantly longer than the mirror width. Select models with reflectors or diffusers that direct light outward toward the face. Supplement with vertical sconces if possible. Avoid short, centered bars.
- Integrated Mirror Lighting (A Seamless Option): LED strips or panels built directly into the mirror frame. Provides even, shadow-minimizing light. Critical Selection Criteria: Verify high CRI (90+), appropriate CCT (3500K–4000K), sufficient output, and correct safety rating for the installation zone. Look for models with adjustable brightness and CCT. Installation Note: Hardwired versions require professional installation; plug-in versions offer flexibility but require a discreetly routed cord to a GFCI outlet.
- Under-Cabinet Lighting (Countertop Task Light): LED tape lights or linear fixtures installed underneath the upper cabinet above the sink. Provides excellent downward illumination for skincare application or organizing. Critical Requirement: The LED system must be damp-location rated and properly enclosed in a channel for heat dissipation and diffusion. The power supply must be installed in a dry location. Hardwired installations require an electrician.
-
Accent Lighting: The Dimensional Enhancer. This layer adds visual interest and supports mood without competing with task lighting. Strategic Applications:
- A small, damp-rated picture light illuminating artwork.
- LED strip lighting inside open shelving units.
- A discreet uplight highlighting a textured wall.
- Key Principle: Accent lighting should be subtle—typically lower brightness than task lighting. Always use dimmers to control intensity. Avoid placing accent lights where they cause glare in the mirror.
Step 3: Fixture Selection, Sizing, and Mirror Integration—Harmonizing Form and Function
Aesthetics matter, but functionality must guide selection. Choices here directly impact usability.
-
Sconce Styles and Optical Performance:
- Up/Down Lighting Sconces: Highly recommended. The upward light component bounces off the ceiling, adding ambient fill light that softens facial shadows and reduces contrast between task and ambient layers.
- Downward-Only Sconces: Provide focused task light but can create darker areas above eye level. Best paired with strong ambient ceiling lighting.
- Diffused vs. Direct Light: Fixtures with opal glass, seeded glass, or acrylic diffusers scatter light, reducing harsh glare. Avoid fixtures with exposed bright elements at eye level—they cause uncomfortable veiling glare.
-
Mirror Considerations Beyond Lighting: The mirror itself reflects ambient light, amplifying overall illumination. However, it does not replace dedicated task lighting. Critical Checks for Integrated LED Mirrors:
- Verify output is sufficient for the mirror size.
- Confirm CRI is 90+ and CCT is adjustable or fixed at 3500K–4000K.
- Check the safety rating and listing for the specific zone where the mirror will be installed.
- Assess the light distribution—does it illuminate the entire face evenly?
- Pro Tip: For non-integrated mirrors, consider adding a separate light bar above the mirror combined with vertical sconces beside it for optimal results.
-
Solving the Multi-Sink Vanity Challenge: Double vanities require dedicated lighting for each sink position. Effective Strategy: Treat each sink as an independent lighting zone. Install a pair of vertical sconces flanking each mirror. Avoid a single long horizontal light spanning both sinks—it will not provide adequate side lighting for either user. Ensure switches allow independent control of each vanity’s lighting.
Beyond the Vanity: Crafting a Cohesive Whole-Bathroom Lighting Strategy
A thoughtfully lit bathroom considers every zone and activity. Integrating lighting for showers, tubs, toilets, and circulation paths creates a seamless, safe, and supportive experience.
Illuminating the Shower and Tub Area: Safety Meets Sensory Experience
-
Shower Lighting (Zone 1 Compliance Paramount): Fixtures inside the shower enclosure must be Wet-location rated (IP65+ minimum), permanently mounted, and on a GFCI-protected circuit per local requirements. Recessed “shower lights” with sealed, wet-location trims are standard. Elevating the Experience:
- Multiple Low-Voltage Niche Lights: For new construction or major remodels, install low-voltage LED niche lights at varying heights within the shower wall. Controlled by a transformer outside the shower, these allow adjustable ambiance. Critical: The entire system must be rated for wet locations and installed by a qualified professional. Never retrofit standard line-voltage fixtures into niches.
- Chromatherapy (Color) Lighting: Programmable systems allow color selection to influence mood. Non-Negotiable Safety: The fixture, driver, and controls must carry explicit wet-location certification. Installation must be performed by a professional familiar with low-voltage bathroom systems. Avoid uncertified LED strips—they pose significant hazards in wet environments.
- Placement Insight: Position the primary shower light slightly forward of the showerhead to avoid casting shadows on the bather’s body. For larger showers, two lights may be necessary.
-
Bathtub Lighting (Prioritizing Relaxation and Safety): Lighting for soaking tubs should avoid harsh, direct glare. Evidence-Based Approaches:
- Wall Sconces: Install damp-location rated (Zone 2) or wet-location rated (if within potential splash distance) sconces on the wall beside the tub’s headrest area. Choose fixtures with downward-facing shades to minimize direct glare when lying back.
- Recessed Adjustable Trim: Use an eyeball or gimbal trim recessed light (damp-rated for Zone 3) aimed at the tub area, angled away from the bather’s line of sight. Dimmability is essential.
- Cove or Valance Lighting: Indirect lighting creates a soft, diffuse glow perfect for relaxation. Critical Installation Note: The cove must be designed to prevent moisture accumulation, and the fixture must be damp-location rated. Ensure adequate ventilation behind the cove. This is best executed during construction or major renovation.
- Avoid: A single bright downlight directly centered over the tub—it creates unflattering shadows and glare.
Toilet Area and General Circulation Lighting: Safety in the Margins
-
Toilet Area Illumination: Often neglected, this area requires thoughtful lighting for safety and comfort, especially at night. Solutions:
- A small, damp-rated recessed light or discreet wall sconce (positioned in Zone 3) provides necessary illumination without glare. Place it to the side of the toilet.
- Nightlight Integration: Install a safety-listed, battery-operated or hardwired motion-activated nightlight low on the wall (outside moisture zones) near the toilet. Choose warm-white LEDs with auto-shutoff. Ensure it is rated for bathroom use.
- Smart Enhancement: Use a smart plug controlling a small lamp (with a warm, dimmable bulb) placed on a nearby shelf, activated by voice command or motion sensor (positioned safely outside moisture zones).
-
Pathway and Circulation Lighting: For larger bathrooms or homes with specific needs, subtle pathway lighting enhances safety. Implementation:
- Low-voltage LED step lights installed in the baseboard (damp-rated, Zone 3) along the path to the bathroom.
- Recessed “eyeball” lights aimed downward at floor level near thresholds.
- Critical Safety Note: All pathway lights must be installed low enough to avoid tripping hazards and rated for damp locations. Use warm-white, low-lumen output to avoid glare. Connect to a separate, dimmable circuit or motion sensor.
The Command Center: Controls, Dimming, and Smart Integration
Lighting controls transform a static installation into a dynamic, adaptable environment.
-
Dimmer Switches: A Recommended Standard. Every lighting layer—ambient, vanity task, shower, accent—should ideally be on its own dimmer circuit. Why Dimming Matters:
- Physiological: Allows tuning light levels to circadian rhythms (brighter in morning; dimmer in evening).
- Functional: Enables precise adjustment for tasks versus relaxation.
- Atmospheric: Creates ambiance and perceived spaciousness.
- Practical: Extends LED bulb life and reduces energy consumption.
- Critical Compatibility: Ensure dimmer switches are explicitly rated for LED loads. Older dimmers cause LED flickering or buzzing. Consult the dimmer manufacturer’s compatibility information.
-
Smart Lighting Systems: Precision and Personalization. Systems like Lutron Caséta, RA2 Select, or compatible smart switches offer advanced control:
- Scene Programming: Create one-touch scenes: “Morning Routine” (vanity task lights bright, ambient lights moderate), “Relaxing Bath” (shower light dimmed, warm ambient lighting on), “Night Mode” (pathway lights only, low brightness).
- Hands-Free Operation: Voice control or wave-activated switches allow adjustment without touching surfaces with wet or soapy hands. Ensure the control device is installed in a compliant zone (Zone 3) and carries appropriate damp-location rating if mounted inside the bathroom.
- Scheduling and Automation: Set lights to gradually brighten before wake-up time. Program exhaust fan to run automatically after shower use based on humidity sensor input.
- Pro Installation Tip: For whole-bathroom integration, consult a certified smart home installer for proper circuit design and device compatibility.
-
Ventilation Fan/Light Combos: A Critical Caution. Many opt for combination units. Safety Imperative: Verify the light component is rated for the specific zone. Many combo units are only rated for damp locations and are unsafe for direct installation over a shower (Zone 1 requires wet-location rating). Recommended Approach: Separate the functions. Install a dedicated wet-location rated shower light and a separate, appropriately rated exhaust fan. This provides superior performance, safety, and flexibility.
Troubleshooting Common Bathroom Lighting Challenges—and Practical Corrections
Even with planning, issues arise. This section provides diagnostic clarity and actionable solutions.
-
Challenge #1: The Shadowed Face (“Raccoon Eyes”).
Symptom: Dark shadows under eyes, chin, and nose when standing at the vanity.
Root Cause: Over-reliance on overhead ambient lighting without vertical task lighting.
Practical Fix: Install vertical sconces beside the mirror at eye level. If hardwiring is prohibitive:- Use high-CRI (90+), 3500K–4000K plug-in LED sconces mounted with removable adhesive strips rated for humidity.
- Supplement with a high-quality, high-CRI lighted magnifying mirror plugged into a GFCI outlet.
-
Challenge #2: Harsh, Unflattering Glare.
Symptom: Light feels stinging, causes squinting, creates hotspots.
Root Cause: Exposed bright bulbs, overly cool CCT, lack of diffusion, or fixtures at direct eye level.
Practical Fix:- Replace bulbs with frosted or opal-finish versions.
- Add fabric or glass shades/diffusers.
- Swap cool-white bulbs for 3500K–4000K.
- Install dimmers to reduce intensity.
- For recessed lights, replace standard trims with baffles or diffuser lenses.
-
Challenge #3: Flickering or Buzzing Lights.
Symptom: Visible flicker, audible buzzing.
Root Cause: Incompatible dimmer switch and LED bulbs; loose wiring; failing LED driver.
Practical Fix:- First: Turn off power at the breaker. Check all wire connections for tightness.
- Verify dimmer switch is LED-compatible per manufacturer specifications. Replace if needed.
- Try a different brand/model of LED bulb known for dimming compatibility.
- If problem persists with integrated fixtures, the internal driver may be failing—replace the fixture.
- Critical Safety Note: Persistent flickering can indicate a serious wiring fault. If basic troubleshooting fails, consult a licensed electrician.
-
Challenge #4: Condensation or Moisture Inside Fixtures.
Symptom: Water droplets visible inside the fixture; fogging that doesn’t clear.
Root Cause: Fixture not rated for the installed zone; compromised seal; inadequate ventilation.
Practical Fix:- Immediately turn off power at the breaker. Do not use the fixture.
- Replace with a fixture rated for the correct zone.
- Ensure the new fixture is installed with intact gaskets/seals per manufacturer instructions.
- Upgrade exhaust fan capacity; run fan during and after showers.
- Never attempt to “dry out” and reuse a fixture that has held moisture—internal corrosion creates fire risk.
-
Challenge #5: Inconsistent Color Temperatures.
Symptom: Some lights appear yellowish, others bluish; room feels disjointed.
Root Cause: Mixing bulbs of different CCTs unintentionally.
Practical Fix:- Audit all bulbs in the bathroom. Note CCT on each.
- Replace bulbs to create a cohesive scheme: 3500K–4000K for task lighting, 2700K–3000K for ambient and accent layers.
- Use tunable-white bulbs/fixtures for ultimate control and consistency.
Pathways to Thoughtful Bathroom Lighting: Prioritizing Safety and Function
Achieving safe, functional, and beautiful bathroom lighting is possible at every investment level. The key is strategic prioritization: safety and core functionality first.
Foundational Pathway: High-Impact, Essential Upgrades
Focus: Maximize safety and function with essential actions.
* Safety Verification & Critical Fixes:
– Verify all existing fixtures are installed in compliant zones per your zone map. Replace any fixtures not rated for their location with safety-listed damp-location equivalents.
– Non-Negotiable: Ensure GFCI protection is present and functional on bathroom circuits per local requirements. Consult an electrician if uncertain.
Vanity Lighting Improvement:
– Replace existing vanity light with two plug-in, high-CRI (90+) LED sconces mounted beside the mirror using adhesive strips rated for humidity.
– Supplement with a high-CRI LED lighted makeup mirror plugged into a GFCI outlet.
– Replace all vanity bulbs with 3500K–4000K, high-CRI LEDs.
Ambiance & Control:
– Add a smart plug to control an existing lamp for ambient light.
– Install a timer switch on the exhaust fan to ensure adequate runtime.
Key Principle:* Invest in bulb quality (high CRI, correct CCT) before expensive fixtures. Quality light sources in modest fixtures outperform poor light in premium housings.
Integrated Pathway: Professional Installation for Lasting Quality
Focus: Professional integration of safety and functional elements with quality fixtures.
* Professional Safety Foundation:
– Hire an electrician for safety assessment, circuit verification, and correction of any zone violations.
– Install new safety-listed damp/wet-location recessed lights for ambient lighting.
Vanity Illumination System:
– Install hardwired vertical sconces with high-CRI LEDs beside the mirror. Choose fixtures with diffusers.
– Install quality dimmer switches for each lighting layer.
– Upgrade to an LED mirror with high CRI and adjustable CCT.
Ventilation & Integration:
– Install a premium exhaust fan with humidity sensor.
– Add under-cabinet LED tape lighting (damp-rated, in aluminum channel) for countertop task light.
Key Principle:* Prioritize professional installation for wiring and zone-critical fixtures. Invest in dimmers and quality fixtures designed for longevity.
Comprehensive Pathway: Architectural Integration and Advanced Systems
Focus: Seamless integration, advanced controls, and bespoke solutions.
* Electrical & Structural Integration:
– Full integration with dedicated circuits for lighting layers and future-proofing.
– Architectural cove lighting, linear LED channels integrated into millwork, recessed niches for shower lighting.
– Collaboration between electrician, lighting specialist, and designer from planning phase.
Premium Fixture Selection:
– High-end fixture brands with superior optics and materials.
– Custom mirror with integrated, tunable-white high-CRI lighting and defogger.
– Wet-location rated chromatherapy shower system with professional low-voltage installation.
Advanced Control Systems:
– Whole-home smart lighting system with keypad scenes, voice control, and integration with other systems.
– Motion sensors for automatic pathway lighting; circadian rhythm programming.
Key Principle:* Engage a certified lighting specialist early. Their expertise in layering, optics, and controls ensures every element enhances both safety and user experience.
Your Questions, Answered
Q: Can I install a standard ceiling light (rated for dry locations) in my bathroom if it’s far from the shower and sink?
A: While model codes may not explicitly prohibit a dry-location fixture in Zone 3 (the general area away from water sources), it is strongly discouraged. Bathrooms are high-humidity environments. Dry-location fixtures lack the internal seals to prevent moisture ingress over time, leading to corrosion and potential failure. The modest cost difference between a dry-location and damp-location fixture is insignificant compared to the safety consideration and replacement effort. Always specify damp-location rated fixtures for the entire bathroom. Verify the safety listing mark explicitly states “Suitable for Damp Locations.”
Q: What’s the absolute minimum lighting I need for a small powder room (half-bath) with no shower?
A: Even without a shower, a powder room contains a sink, creating a Zone 2 splash area (approximately 2 feet around the basin). Minimum requirements: 1) A safety-listed damp-location rated ceiling fixture for ambient light. 2) A damp-location rated light source at the vanity—ideally a single vertical sconce beside the mirror or a horizontal fixture above it, using high-CRI (90+) bulbs at 3500K–4000K. 3) GFCI protection on the outlet circuit per code requirements. 4) A dimmer switch for the ambient light. Never use a dry-location fixture. For tight spaces, a high-CRI plug-in wall sconce mounted beside the mirror (outside the splash zone) plugged into a GFCI outlet is an acceptable solution.
Q: Are LED bulbs safe for all bathroom zones if the fixture is rated correctly?
A: Yes, LED bulbs are an excellent choice for bathrooms due to their cool operation, energy efficiency, and longevity. The critical safety factor is the fixture’s rating (Damp or Wet location) and IP rating for the specific zone, not the bulb technology itself. However, ensure the LED bulb is compatible with any dimmer switches used—check the dimmer manufacturer’s compatibility information. Always adhere to the fixture manufacturer’s specifications regarding maximum output and bulb type. Never exceed the fixture’s rated capacity.
Q: My vanity is on an exterior wall with a window. Do I still need dedicated vanity lighting?
A: Absolutely. Natural light is highly inconsistent—it varies with time of day, season, weather, and window treatments. Relying solely on a window leads to poor, unreliable lighting for grooming tasks, especially in the evening, on cloudy days, or during winter months. Dedicated vanity lighting provides consistent, controllable illumination precisely where you need it. Use the window for ambient daylight and supplement with your layered lighting system as needed. For enhanced functionality, consider tunable-white bulbs that can adjust CCT to complement natural light, but maintain dedicated task lighting as your primary source.
Q: Can I put a light fixture directly above my shower? What rating does it need?
A: Yes, but with strict conditions. The fixture must be installed within Zone 1. Therefore, it must carry a “Wet Location” safety listing and possess an IP rating of IPX4 minimum (though IPX5 or IPX6 is recommended). It must be permanently mounted and connected to a GFCI-protected circuit per local requirements. Standard recessed lights require a specific “wet-location shower trim” kit that provides the necessary seal—do not use a standard recessed trim. Never install a damp-location or dry-location fixture directly above a shower. Always consult the fixture’s specification sheet for explicit wet-location certification and follow the manufacturer’s installation instructions precisely. When in doubt, consult a licensed electrician.
Q: What is the practical difference between “damp location” and “wet location” rated fixtures?
A: “Damp Location” rated fixtures are sealed to withstand environments with moderate moisture—high humidity, condensation, or occasional dampness (like the area around a sink). They are not designed to withstand direct contact with liquid water (spray, splashing). “Wet Location” rated fixtures are sealed to withstand direct exposure to water—rain, shower spray, splashing. They undergo rigorous testing, including exposure to flowing water. In bathroom terms: Damp Location = suitable for Zones 2 and 3; Wet Location = mandatory for Zones 0 and 1. Think of it as: Damp = humidity and condensation; Wet = direct water contact. When selecting fixtures near showers or tubs, “Wet Location” is always the safer choice.
Q: How do I prevent my mirror from fogging up, and does lighting affect this?
A: Fogging occurs when warm, moisture-laden air contacts the cooler mirror surface. Lighting itself does not cause fogging, but integrated solutions exist. The most effective method is a heated mirror or a mirror defogger pad installed behind the mirror. These gently warm the mirror surface. Many high-end LED mirrors include built-in defoggers. Critical Installation Note: Any electrical component must be installed by a qualified professional and carry appropriate safety certifications for the bathroom zone. Additionally, run your exhaust fan during and for 20 minutes after showers to reduce ambient humidity—the single most effective preventative measure. Anti-fog sprays offer temporary relief but require frequent reapplication.
Q: Is it safe to install rope lighting or LED strips under my vanity cabinet?
A: Yes, but only if specific safety criteria are met. The LED strip product must be explicitly rated for damp or wet locations (check for IP65 minimum rating and safety listing for damp/wet locations). Use aluminum mounting channels to house the strips—these provide critical heat dissipation, diffusion, and physical protection. The power supply (driver) must be installed in a completely dry location (e.g., inside the vanity cabinet, away from plumbing) and must also carry appropriate safety listings. Avoid inexpensive, uncertified LED strips sold online without verifiable safety certifications—they pose significant hazards. For hardwired installations, hire a licensed electrician. Plug-in versions offer a safer option if all components are certified and the cord is discreetly routed to a GFCI outlet.
Q: My bathroom has no windows. How do I make it feel less like a cave with lighting?
A: Combat darkness with strategic lighting techniques: 1) Use neutral CCT (4000K) for ambient and task lighting to create an airy, alert feeling. 2) Install wall sconces that provide significant uplighting to bounce light off the ceiling, making the room feel taller. 3) Implement layered lighting with multiple sources (ambient ceiling, vertical vanity sconces, subtle accent lights) to eliminate dark corners and create visual depth. 4) Choose light-colored, reflective surfaces for walls, countertops, and fixtures to maximize light reflection. 5) Ensure adequate total light output—calculate based on room size. For a windowless bathroom, target sufficient lumens distributed across layers. 6) Add a mirror opposite the main light source to amplify perceived light.
Q: Can I use smart bulbs like Philips Hue in my bathroom fixtures?
A: Exercise caution. Standard consumer smart bulbs are typically rated for dry locations only and are not suitable for installation inside bathroom fixtures. The humidity can compromise safety and void warranties. However, some manufacturers offer outdoor-rated smart products with wet-location ratings. Verify zone compliance meticulously before considering use. Safer, Recommended Approach: Use smart switches or dimmers (installed in Zone 3) to control standard, high-CRI LED bulbs installed in safety-listed damp/wet-location fixtures. This keeps the smart electronics in a drier location while allowing full control. Always prioritize fixture safety ratings over smart features. Consult manufacturer specifications for environmental ratings before installation.
Q: How often should I test my bathroom GFCI outlets, and what if it fails the test?
A: Test every GFCI outlet in your home, including bathrooms, once per month. Press the “TEST” button firmly—it should click and cut power to the outlet. Verify power is off using a lamp. Then press “RESET” to restore power. If the TEST button does not trip the outlet, or if it trips but won’t reset, stop using the outlet immediately. This indicates the GFCI mechanism has failed and no longer provides protection. Replace the GFCI outlet promptly. While DIY replacement is possible for experienced individuals, hiring a licensed electrician is recommended to ensure correct wiring and functionality. Never ignore a faulty GFCI—this is a critical safety device.
Q: Are there lighting considerations specific to aging in place or accessibility?
A: Absolutely. Lighting is a critical component of universal design. Key considerations: 1) Increased Light Levels: Older adults often require significantly higher light levels for the same tasks due to age-related changes in vision. Increase ambient and task lighting output. 2) Glare Reduction: Use diffused fixtures, indirect lighting, and matte finishes on surfaces to minimize disabling glare. Avoid shiny countertops directly under bright lights. 3) Contrast Enhancement: Use lighting to highlight edges of steps, thresholds, and grab bars. Install subtle step lights in hallways leading to the bathroom. 4) Controls: Install rocker-style switches (easier to operate), place switches at consistent heights, and use illuminated switch plates. Consider motion-sensor lights for nighttime pathways. 5) Color Contrast: Ensure light switches, outlets, and grab bars contrast visually with wall colors. High-CRI lighting (90+) is essential for accurately perceiving contrasts and details. Consult resources from organizations specializing in aging-in-place design for detailed guidelines.
Conclusion and Your 24-Hour Action Plan
Bathroom lighting is far more than an aesthetic detail—it is a foundational element of home safety, personal well-being, and daily ritual. By anchoring your decisions in the clear framework of moisture zones and electrical safety, you create a non-negotiable foundation of protection. Upon this foundation, the Vanity Illumination Blueprint empowers you to engineer light that serves human needs: revealing true colors with high-CRI sources, eliminating frustrating shadows through vertical placement, and adapting to daily rhythms with intelligent controls. This integration of safety and human-centered design transforms the bathroom into a space of clarity, confidence, and calm.
The journey from uncertainty to informed action is methodical. It requires patience with technical details and compassion for the person who will use this space every single day—often during vulnerable moments like early mornings or late nights. Remember the core triad that guides every decision: Zone Compliance (safety is foundational), Light Quality (CRI 90+, CCT 3500K–4000K for tasks), and Vertical Placement (for shadow-free vanity illumination). These three principles, applied consistently, yield significantly better results than any single fixture or fleeting design trend. True lighting excellence lies in thoughtful integration, not isolated components.
The 24-Hour Rule: Your First Step to Transformation
Knowledge without action remains potential. Within the next 24 hours, take this single, concrete step: Grab a tape measure, a pencil, and a sheet of paper. Sketch a simple floor plan of your bathroom. Mark the exact locations of the shower, bathtub, and sink. Using the zone definitions from this guide (Zone 0: inside tub/shower; Zone 1: up to 7’6″ above tub/shower; Zone 2: 2 feet outward from Zones 0/1 and around sink), draw the boundaries directly onto your sketch. Label each zone clearly. This act transforms abstract safety concepts into a tangible, personalized map of your space. It is the indispensable first step toward every informed decision that follows—whether you’re replacing one bulb tomorrow or planning a full remodel next year. This sketch becomes your reference document, your safety checklist, and your communication tool with professionals. Do not skip this step. Knowledge, mapped, becomes actionable insight.
The Big Picture: Lighting as a Daily Gift of Care
When you prioritize lighting that is both rigorously safe and deeply human-centered, you gift yourself and your household the clarity to see accurately, the comfort to move without strain, and the profound peace of mind that comes from a thoughtfully designed environment. This guide has equipped you with frameworks to evaluate, plan, and execute with confidence. Carry this knowledge forward: discuss the zone map with your contractor; ask for CRI values at the lighting store; prioritize safety certifications and quality craftsmanship. In doing so, you elevate not just your bathroom, but the standard for what a home environment can and should be—a place of unwavering safety, intentional beauty, and daily support for the people who matter most. Illuminate with confidence.
Explore Our Complete Home Lighting System:
Mastering Home Lighting Layers: Ambient, Task, and Accent Explained | The Ultimate Guide to Choosing Light Bulbs (CRI, CCT, Lumens Decoded) | Bathroom Ventilation Mastery: Choosing and Installing the Right Exhaust Fan | DIY Electrical Safety: When to Call a Professional vs. Tackle It Yourself | Creating a Circadian Lighting Plan for Your Entire Home | Aging in Place: Lighting Modifications for Safety and Independence | Understanding Electrical Safety Certifications: UL, ETL, and What They Mean for Your Home