Move beyond fragmented solutions. Discover a holistic, adaptable framework to assess vulnerabilities, select appropriate technology, and build resilient protection that aligns with your lifestyle, budget, and property—without fear-driven marketing or unrealistic promises.
Your home is your sanctuary. Yet many security approaches create unnecessary anxiety or leave critical gaps unaddressed. This guide offers a clear, step-by-step methodology grounded in observable security patterns and practical implementation. You’ll learn how to thoughtfully integrate assessment, environment, technology, and human habits into a cohesive system. Whether you live in an urban apartment, suburban home, or rural property, this adaptable framework empowers you to build meaningful protection—prioritizing awareness over alarm, and informed action over impulse buying.
Introduction
Picture returning from a short trip to find your side gate unlatched. Your pulse quickens. In that moment, security shifts from an abstract concept to a tangible need. Yet too many homeowners react only after unease sets in—installing a camera after a neighbor’s incident or adding locks following a close call. Reactive choices often miss the bigger picture. Sustainable security emerges from intentional design: a balanced integration of awareness, environment, technology, and practiced habits. Drawing from widely documented residential security patterns and principles supported by community safety organizations, effective protection relies on a foundational concept—layered redundancy. No single device guarantees safety. Instead, overlapping, complementary measures create resilience: if one layer is bypassed, others remain active. This guide replaces overwhelm with clarity. We focus on what consistently works across diverse living situations, avoiding hype while emphasizing practical, human-centered strategies. By the end, you’ll have a personalized, actionable security blueprint—not just a product list.
The Layered Defense Framework: Building Resilient, Adaptable Protection
Security professionals recognize that vulnerability often exists where opportunity, accessibility, and predictability intersect. Your goal isn’t to construct an impenetrable fortress—which is neither practical nor welcoming—but to thoughtfully reduce opportunity. Imagine your security strategy as concentric layers, each adding time, visibility, or complexity for anyone with ill intent. Each layer reinforces the others. Mastering even a few layers significantly strengthens your position; implementing more creates a cohesive, responsive system. This approach is refined through analysis of common residential security scenarios where layered strategies consistently support better outcomes.
Step 1: The Vulnerability Assessment – Seeing Your Property Objectively
Before selecting any device, understand your specific context. Installing technology without assessment is like applying a bandage without identifying the wound. This step requires calm observation—not fear. Set aside 60–90 minutes. Walk your property slowly, noting details without judgment. Document observations digitally or on paper. This is proactive stewardship, not paranoia.
Why this step matters: Many documented incidents reveal that observable, addressable conditions—like obscured entry points, inconsistent lighting, or habitual routines—often present the greatest opportunity. Assessment transforms uncertainty into focused action, ensuring resources target your actual environment.
How to conduct your assessment systematically:
- Exterior Scan (The 360-Degree Walk): Begin at the street. What is visible to a passerby? Note landscaping creating concealment near windows or doors (dense shrubs, overgrown trees near access points). Examine all entryways: doors (front, back, side, garage), windows (ground level and those reachable via decks, pipes, or structures), basement bulkheads, pet doors. Test each—are any unlocked right now? Evaluate lighting: are pathways, entrances, and shadowed areas adequately illuminated after dark? Check vertical access points: drainpipes, trellises, low branches. Assess sightlines: can neighbors or street traffic easily observe main entrances? Note temporary vacancy cues: overflowing mailboxes, accumulated packages, or uncollected newspapers.
- Interior Scan (Mapping Flow and Visibility): Stand inside each room. If someone entered here, what would they encounter first? Trace likely movement paths. Are valuables visible from windows? Are interior doors (home office, bedroom) typically secured? Inspect the connection between garage and living space—a frequent oversight. Assess your own visibility: from common living areas, can you see key exterior doors or windows? Note locations of communication tools (charged phones, landlines) for emergencies.
- Human Factor Review: Consider daily patterns. When do household members typically leave or return? Are routines highly predictable? How are spare keys managed? (Avoid outdoor hiding spots.) How are deliveries handled? Do children or guests share location details or home routines online? Document habits that may signal occupancy patterns or create unintended access points.
Common pitfalls to avoid: Rushing the process. Conducting the scan only in daylight—repeat at dusk to evaluate lighting conditions. Overlooking secondary access points (side windows, garage doors) while focusing solely on the front entrance. Letting emotional attachment to landscaping override objective risk observation.
Illustrative scenario: A family in a quiet neighborhood noticed during their assessment that decorative lattice along a side fence provided concealment near a basement window. The window had an old, stiff lock rarely used due to difficulty. They also realized their garage door remote sat visibly on the kitchen counter. These three observations—concealment, vulnerable access point, and accessible entry tool—revealed a previously unnoticed risk pattern. Their solution: trimmed the lattice for visibility, installed an easy-grip secondary window lock, and stored the remote in a secured drawer. No technology required—just awareness and simple adjustments.
Adaptable alternative: No extra tools needed. Use your smartphone camera to photograph every exterior angle, window, and door. Review images later on a larger screen. Zoom in. Share photos with a trusted friend unfamiliar with your home—they often spot normalized details you’ve overlooked.
The Fundamental Principle: Security begins not with what you purchase, but with what you observe. A thorough vulnerability assessment converts concern into purposeful action, ensuring every decision addresses your home’s unique context.
Step 2: The Deterrence Layer – Reducing Opportunity Through Perception
Deterrence operates on psychology. Its purpose is to signal that your property requires more effort, time, or risk than alternatives nearby. Most individuals seeking unauthorized access prioritize quick, quiet, low-visibility opportunities. Visible, consistent cues encourage them to move on. This layer works continuously and often requires minimal investment.
Why deterrence matters: Community safety data consistently indicates that properties with visible, maintained security cues experience fewer attempted incidents. Why? Opportunity drives behavior. Thoughtful environmental cues shift perception before action occurs—making deterrence a profoundly proactive layer.
Implementing effective deterrence strategies:
- Strategic Landscaping (Crime Prevention Through Environmental Design Principles): Maintain “see-through” sightlines. Trim shrubs below three feet near windows and doors to eliminate concealment. Consider thorny, low-maintenance plantings (like certain holly varieties) directly beneath ground-floor windows. Keep tree branches trimmed six feet above ground and clear of roofs, fences, or windows. Well-maintained landscaping signals attentive occupancy—a subtle but powerful cue.
- Visible Security Indicators: Yard signs or window decals from recognized security providers can contribute to deterrence. For greater authenticity, pair signage with at least one visible security element (e.g., a doorbell camera near the front entrance). Motion-activated lighting serves as both functional illumination and a visible cue.
- Lighting as a Functional Barrier: Install bright, motion-activated LED fixtures at primary entry points (front/back doors, side gates, garage). Choose models with adjustable sensitivity and duration to minimize false triggers from wildlife or passing vehicles. Use timers or smart plugs for interior lights when away—vary schedules to reflect natural activity patterns. Low-level pathway lighting enhances your safety while reducing dark zones. Avoid constant-bright lighting, which creates harsh shadows and may signal vacancy.
- Occupancy and Maintenance Cues: Keep exteriors tidy—mow lawns, clear gutters, repair fixtures promptly. An unkempt property can unintentionally signal neglect or absence. For extended absences, pause mail delivery or arrange neighbor assistance. Park a vehicle in the driveway when possible. These subtle cues reinforce active occupancy.
Common pitfalls to avoid: Over-lighting that creates deep shadows where concealment is possible. Placing motion sensors where they trigger constantly (adjust sensitivity thoughtfully). Positioning cameras in obvious, easily disabled locations (e.g., fake rocks).
Illustrative scenario: A homeowner noticed increased lingering near a secluded backyard gate. They installed two solar-powered motion lights flanking the gate and trimmed overgrown bushes blocking the view from a neighbor’s window. A discreet security decal was placed near the gate. Within days, individuals who previously paused near the gate began walking past without stopping. The perception of visibility and attention altered behavior. Later, a doorbell camera was added—but the initial low-cost steps resolved the immediate concern.
Adaptable alternative: Begin with lighting. A single motion-sensor floodlight ($20–$30) at your most vulnerable entry point delivers significant value. Trim existing vegetation yourself. Aluminum foil strips hung discreetly in windows create subtle light reflection that deters without cost. These small actions build momentum.
Step 3: The Detection Layer – Gaining Awareness with Context
When deterrence alone isn’t sufficient, detection provides timely awareness. Modern detection moves beyond simple alarms to deliver context: Where is activity occurring? What triggered the alert? This intelligence supports calmer, more informed responses. Detection also extends to environmental concerns—fire, carbon monoxide, water leaks—integral to holistic home safety.
Why detection depth matters: Knowing activity is occurring at the back window versus the front door shapes your response. Video verification reduces uncertainty and provides documentation if needed. Detection transforms reaction into awareness.
Building a practical detection approach:
- Entry Point Sensors (Foundational Awareness): Install contact sensors on accessible doors and ground-floor windows. Prioritize models with tamper alerts and low-battery notifications. For sliding glass doors, use sensors designed for lateral movement. Placement matters: align magnet and sensor precisely on frame and moving surface.
- Motion Sensors (Interior Coverage): Position passive infrared (PIR) sensors in hallways, living areas, or stairwells—zones an intruder would likely cross. Avoid pointing directly at heat sources (radiators, sunny windows) or pet areas unless using pet-immune models with adjustable zones. Dual-technology sensors (PIR + microwave) may reduce false alerts in complex environments.
- Glass Break Sensors (Targeted Coverage): Acoustic sensors detect the distinct sound profile of breaking glass. Place near large windows, patio doors, or windows with limited street visibility. They provide awareness before entry is complete. Test periodically using manufacturer-recommended methods.
- Video Awareness Tools:
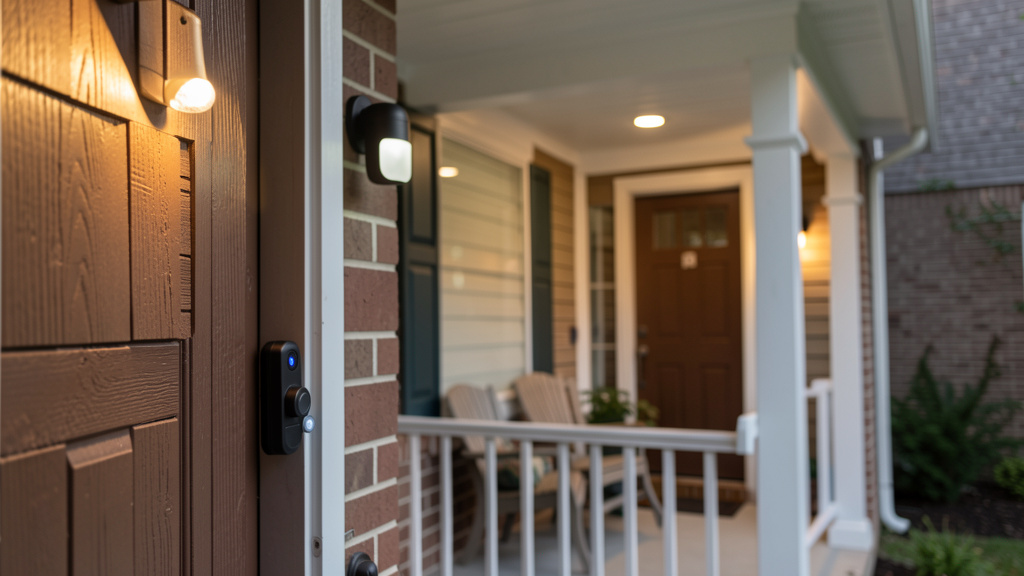
- Doorbell Cameras: Often the highest-value detection tool. Prioritize clear day/night imaging, customizable motion zones, and two-way audio. Local storage options (microSD) or subscription-flexible cloud plans support privacy preferences.
- Outdoor Cameras: Position to cover secondary entries, driveways, or blind spots identified in your assessment. Look for weather resistance (IP65/IP66 rating), wide dynamic range for challenging lighting, and adjustable motion zones to minimize street-related alerts. Spotlight models add visible deterrence.
- Indoor Cameras: Use selectively for monitoring valuables or common areas. Crucially: Avoid bedrooms, bathrooms, or areas where privacy is reasonably expected. Use physical privacy shutters when not actively monitoring. Communicate openly with household members and regular visitors about placement.
- Environmental Sensors (Holistic Safety): Integrate smoke, carbon monoxide, and water leak sensors into your awareness system. Place water sensors near appliances (water heater, washing machine, under sinks), CO detectors outside sleeping areas, and smoke alarms per fire safety guidelines. Unified alerts for all hazards simplify monitoring.
Common pitfalls to avoid: Over-sensoring leading to alert fatigue. Ignoring placement physics (e.g., motion sensor blocked by furniture). Neglecting environmental threats while focusing solely on intrusion.
Illustrative scenario: During a storm, a family received a water leak alert from a sensor under the washing machine. Though away, they contacted a neighbor who confirmed a burst hose. Immediate action prevented significant water damage. Separately, their doorbell camera captured package theft; clear footage supported recovery efforts. The system proved valuable across multiple safety dimensions.
Adaptable alternative: Start with one reliable doorbell camera—it serves deterrence, detection, and verification. Add an outdoor camera for a secondary entry point next. Use existing smartphones temporarily with free monitoring apps while planning future steps. Prioritize sensors for main exterior doors first.
Step 4: The Delay Layer – Creating Time Through Physical Measures
Detection gains meaning when paired with time to respond. The delay layer uses physical barriers to increase the effort, noise, and time required for unauthorized entry. Every additional second raises the likelihood of detection, neighbor awareness, or abandonment of the attempt. This layer relies on robust hardware and thoughtful installation—often overlooked in favor of technology alone.
Why delay matters: Response times vary by location and circumstance. The goal isn’t indefinite prevention but creating sufficient time for awareness and action. Simple, well-installed physical measures frequently cause attempts to be abandoned early.
Strengthening critical access points:
- Doors: Your Primary Barrier
- Solid Construction: Ensure exterior doors are solid-core wood, steel-clad, or reinforced fiberglass (minimum 1.75 inches thick). Hollow-core doors offer minimal resistance.
- Strike Plate Reinforcement: Replace short screws (¾ inch) on door frame strike plates with 3-inch hardened steel screws. This anchors the plate into the structural stud, dramatically increasing resistance to forced entry. Apply to both latch and deadbolt plates. Cost: under $15.
- Deadbolts: Install ANSI/BHMA Grade 1 or 2 deadbolts with a throw of at least 1 inch. For sliding glass doors, add a secondary lock (slide bolt or security bar in the track).
- Reinforcement Kits: For older doors or frames, steel reinforcement kits distribute force and prevent frame compromise. Highly effective for known weak points.
- Windows: Practical Enhancements
- Functional Locks: Ensure all operable windows have working locks. For older windows, add secondary pin locks (drill a small hole in the top sash secured by a pin) or slide bolts.
- Security Film: Clear polyester film applied to glass holds shards together if broken, significantly delaying entry. Professional installation recommended for durability; more affordable than full window replacement.
- Track Rods: For sliding windows or doors, insert a sturdy metal or wooden rod into the bottom track to prevent forced opening. Simple, immediate, and low-cost.
- Garage Doors: Frequently Overlooked
- Manual Release Security: Secure the emergency release cord/handle with a clip lock to prevent fishing tools from disengaging the opener.
- Interior Door: Treat the door between garage and house like any exterior door—solid core, deadbolt, reinforced strike plate. Keep it locked consistently.
Common pitfalls to avoid: Installing high-grade locks on weak doors or frames (the assembly is only as strong as its weakest component). Using decorative chains or bars that offer minimal resistance. Overlooking pet doors as potential access points (use locking covers).
Illustrative scenario: After reinforcing door strike plates with long screws, a homeowner later reviewed camera footage showing an individual attempting to force the back door. After several attempts, the person left—the reinforced frame held. The noise also alerted a neighbor. Simple hardware created critical delay without high-tech intervention.
Adaptable alternative: Strike plate reinforcement is the highest-impact, lowest-cost step. Next, add secondary window locks ($2–$5 each) or a security bar for sliding doors ($15). A wooden dowel in sliding window tracks provides immediate, no-cost delay. These measures form a formidable foundation accessible to any budget.
Step 5: The Response Layer – Turning Awareness into Calm Action
Detection and delay only fulfill their purpose with a clear, practiced response plan. This layer defines what happens next when an alert occurs. A documented protocol reduces panic, supports safer decisions, and ensures alerts lead to meaningful outcomes—whether addressing a delivery person or a verified concern.
Why a defined protocol matters: Stress impacts decision-making. Without practice, even simple steps become difficult. A shared household plan builds confidence and coordination, turning uncertainty into calm action.
Developing a tiered response approach:
- Tier 1: Routine Awareness (Low-Concern Alerts)
- Scenario: Daytime motion at front door (delivery), backyard motion at dusk (animal).
- Response: Gentle app notification or chime. Check live feed if available. Dismiss if expected. No siren. This handles most alerts calmly, preventing desensitization.
- Tier 2: Verified Awareness & Deterrence (Moderate-Concern Alerts)
- Scenario: Motion at side gate after dark, door sensor triggered while home.
- Response: Clear phone alert with video preview. Simultaneously, a localized spotlight or siren activates at the alert location (e.g., backyard camera light/sound). View live feed. If concern persists, use two-way audio calmly: “This property is monitored. Please leave.” If uncertainty remains, proceed to Tier 3.
- Tier 3: Emergency Protocol (High-Concern Alerts)
- Scenario: Multiple rapid alerts (glass break + interior motion), verified unauthorized presence not departing after Tier 2.
- Response: Activate loud siren if equipped. Immediately retreat to a pre-identified safe room (interior room with lock, phone access). Call emergency services. Provide clear details: location, nature of alert, description if visible. Do not confront. If using professional monitoring, the center is simultaneously alerted and follows your pre-set protocol.
- Household Protocol Essentials:
- Safe Room: Identify an interior room with a solid door, lock, and communication access. Keep a charged power bank and emergency contact list inside.
- Escape Routes: Map two exit paths from every bedroom. Integrate security scenarios into regular safety drills (“If alarm sounds at night, go to safe room” vs. “If fire alarm sounds, exit via Route A”).
- Communication Plan: Designate an out-of-area contact for household check-ins during emergencies. Establish simple code words for texts (“Pineapple” = I am safe but cannot speak freely).
- Practice Quarterly: Spend 10–15 minutes reviewing scenarios. “What if alerts trigger while children are home alone?” “What if power is out?” Familiarity builds calm competence.
Common pitfalls to avoid: Setting all alerts to trigger loud sirens (causes neighbor friction and alert fatigue). Confronting an intruder (extremely high risk). Relying on unpracticed “I’ll call 911” without a clear sequence.
Illustrative scenario: A household practiced their protocol. One evening, alerts triggered for glass break followed by interior motion. Outdoor lights activated automatically. The resident immediately moved to the designated safe room, locked the door, called emergency services, and shared real-time observations from the live feed. Authorities arrived promptly. Though the individual had fled, clear documentation supported follow-up. The practiced response ensured personal safety and effective communication.
Adaptable alternative: Without professional monitoring, partner with a trusted neighbor. Share non-intrusive app access (if system allows) or agree on a discreet signal (“Please check front porch”). Practice the “retreat and call” sequence. Set distinct phone alert tones for after-hours security notifications. Post a one-page protocol summary in a central location.
Step 6: The Integration & Maintenance Layer – Sustaining Reliability Over Time
Security systems require ongoing attention. Technology evolves, environments change, and components age. This layer ensures your ecosystem remains functional, private, and aligned with your needs—transforming initial setup into lasting resilience.
Why maintenance matters: Unaddressed issues—dead batteries, outdated software, shifted camera angles—create silent gaps. Consistent care preserves system integrity and household confidence.
Building sustainable practices:
- Thoughtful Integration:
- Unified Control: Prioritize systems managed through one intuitive app. Fragmented apps increase missed alerts. Test usability: can all household members navigate it easily?
- Smart Automations: Create simple routines: “Goodnight” (arm system, lock doors, adjust lights), “Away” (arm system, activate random lights). Critical automation: “If motion detected at back door after sunset, turn on lights and send alert with clip.” Start small; complexity can wait.
- Voice Assistant Use: Enable features like Alexa Guard (listens for glass break sounds when away). Caution: Disable voice purchasing. Never use voice commands to disarm systems in shared spaces. Review privacy settings regularly.
- Proactive Maintenance Schedule:
- Weekly: Visually check cameras for obstructions (webs, snow, dirt). Confirm alerts arrive promptly.
- Monthly: Test every sensor and camera. Walk past motion zones. Open/close doors with sensors. Verify video quality and alert accuracy. Check battery levels. Test sirens (notify neighbors first).
- Quarterly: Update device firmware. Change system passwords; enable two-factor authentication (2FA). Review and refresh your household response plan. Test smoke/CO detectors.
- Biannually: Clean camera lenses gently. Inspect hardware: door frames, strike plates, window locks. Trim regrown landscaping near sensors or cameras.
- Annually: Revisit your vulnerability assessment. Have routines, household members, or property features changed? Update your plan accordingly.
- Privacy & Data Stewardship:
- Strong Access Controls: Use unique, complex passwords for security accounts—different from email or Wi-Fi. Enable 2FA immediately; it significantly reduces unauthorized access risk.
- Network Segmentation: If your router supports it, place security devices on a separate network (guest network/VLAN) to isolate them from personal devices.
- Firmware Vigilance: Enable automatic updates where available. Manufacturers patch vulnerabilities regularly. An outdated device is a potential liability.
- Data Awareness: Understand storage options (local SD card vs. cloud). Know retention policies. Delete unnecessary footage. Use physical privacy shutters on indoor cameras when not in active use.
Common pitfalls to avoid: Ignoring firmware updates. Using default passwords (“admin/password”). Connecting devices to unsecured public networks. Forgetting to update emergency contacts after life changes.
Illustrative scenario: During a monthly sensor test, a homeowner noticed delayed alerts from a basement window sensor. Investigation revealed a low battery. Replacement was immediate. Weeks later, during high winds, a branch tapped the window—the sensor triggered instantly, alerting them to a cracked pane before weather damage occurred. Routine maintenance prevented a larger issue. Separately, enabling 2FA blocked an attempted account access from an unrecognized location.
Adaptable alternative: No smart hub? Use free automation tools like IFTTT for basic triggers (“If door opens, turn on hallway light”). Maintenance requires discipline, not dollars—set calendar reminders. Use a free password manager (Bitwarden, KeePass) for strong, unique passwords. Prioritize updating internet-connected devices first.
Navigating Real-World Decisions: DIY, Budgets, Privacy, and Constraints
Even with a clear framework, practical choices arise. This section addresses common crossroads with balanced, adaptable guidance—no universal “best,” only what fits your situation.
DIY Installation vs. Professional Support: Finding Your Fit
DIY Path: Control and Flexibility
* Well-suited for: Tech-comfortable homeowners, renters (non-invasive installs), straightforward layouts, budget-conscious planning, those valuing data control.
* Strengths: Significant cost savings. Full control over device selection, placement, and future changes. Typically no long-term contracts. Modern systems feature peel-and-stick sensors, plug-in cameras, and guided app setup. Ideal for starting small and expanding.
* Considerations: Requires time, patience, and basic troubleshooting. Initial setup may involve Wi-Fi optimization. Relies on your vulnerability assessment for placement. Warranty support may be self-managed.
* When DIY excels: Securing a standard home with reliable Wi-Fi. Adding cameras to an existing system. Renters needing removable solutions. Building a system gradually.
* Practical tip: Sketch your layout first. Note Wi-Fi strength per room (free apps like Wi-Fi Analyzer help). Start with a core kit from a brand known for clear instructions. Install and test one component at a time.
Professional Path: Expertise and Integration
* Well-suited for: Large/complex properties, homes with challenging Wi-Fi (thick walls, multiple floors), limited time/technical interest, integration with existing hardwired systems, insurance requirements mandating certified installation.
* Strengths: Expert assessment optimizes placement and coverage. Seamless integration of alarms, cameras, locks, lighting. Access to commercial-grade hardware and cellular backup. Professional wiring ensures reliability independent of Wi-Fi. Often includes user training and documentation. May be required for specific insurance discounts.
* Considerations: Higher initial investment. Potential monitoring contracts with cancellation terms. Less flexibility to swap components later in proprietary systems.
* When professional support adds value: New construction or major renovations (wiring concealed during build). Historic homes with signal challenges. Situations requiring UL-listed monitored systems for insurance. Complex estates with multiple zones.
* Practical tip: Request 3+ detailed quotes. Ask: “Are you licensed and insured?” “What brands do you install and why?” “Is monitoring required? What are contract terms?” “What post-installation support is included?” Verify references and reviews.
Hybrid Approach: Many blend paths successfully. Example: Hire a professional for initial assessment and hardwired control panel installation during a kitchen remodel, then DIY-add wireless cameras later. Or use a pro for system design, then self-install using their blueprint. Leverage expertise where it matters most while maintaining flexibility.
Budgeting Thoughtfully: Security Across Financial Realities
Security is scalable. Meaningful protection doesn’t require maximum spending. Focus resources on high-impact layers first.
- Foundational Tier ($100–$300): Maximum impact per dollar.
- Focus: Deterrence + Critical Delay + Core Detection.
- Invest in: Motion-sensor floodlights (2x), strike plate reinforcement kit, contact sensors for main doors/windows (4-pack), one reliable doorbell camera. Impact: Addresses common vulnerability points documented in community safety reports—visible deterrence, physical delay, and primary entry verification.
- Confident Tier ($300–$800): Comprehensive coverage for typical homes.
- Focus: Full layered implementation.
- Invest in: Foundational items plus: Additional outdoor camera (backyard/garage), interior motion sensor, glass break sensor, smart lock for primary door, environmental sensors (smoke/CO/water). Impact: 24/7 awareness capability, verified alerts, robust delay on key entries, holistic safety monitoring.
- Integrated Tier ($800+): Tailored ecosystem with redundancy.
- Focus: Seamless automation, professional support, future-proofing.
- Invest in: Confident Tier base plus: Professional assessment/installation, cellular backup module, expanded camera coverage, smart lighting integration, professional monitoring service, advanced automations. Impact: Enhanced reliability, coordinated response, potential insurance benefits, scalable foundation.
Stretching Resources Wisely:
* Prioritize: Reinforce strike plates and install one quality camera before buying multiple low-cost sensors.
* Refurbished/Open Box: Reputable retailers offer certified refurbished gear with warranties at significant savings.
* Seasonal Timing: Major sales events (Black Friday, Prime Day) feature security bundles.
* Insurance Inquiry: Contact your provider before purchasing. Ask: “What specific features or certifications qualify for a discount on my policy?” Get requirements in writing. Potential savings may offset costs over time.
* Start Small: Begin with the Foundational Tier. Add components quarterly as budget allows. Let your vulnerability assessment guide the next step.
Privacy Considerations: Safety and Respect in Balance
Cameras and sensors gather personal data. Responsible stewardship is essential.
-
Core Privacy Practices:
- Minimize: Record only areas essential for security. Never point cameras into neighbors’ private spaces, bedrooms, or bathrooms. Use motion zones to exclude public sidewalks.
- Control: Understand data storage—local (SD card) vs. cloud. Prefer end-to-end encryption where available. Know retention policies. Delete footage no longer needed.
- Transparency: Inform household members, regular visitors, and service providers about camera locations. Post discreet signage for exterior recording where legally required.
- Secure: Implement strong passwords, 2FA, and network segmentation as outlined in Maintenance.
-
Addressing Common Concerns:
- “Are cameras always recording?” Most consumer cameras record only upon motion detection or when actively viewed. Review device settings; disable continuous recording unless necessary. Use physical shutters on indoor cameras.
- “Could hackers access my feed?” Risk is reduced significantly with reputable brands, updated firmware, strong unique passwords, and 2FA. Avoid obscure brands with poor security histories.
- “What about audio recording?” Audio laws vary by location and are often stricter than video laws. When uncertain, disable audio recording. Confirm legality in your area before enabling.
- “My neighbors are concerned.” Proactively communicate. Show camera field of view—demonstrate it covers your driveway, not their yard. Adjust angles respectfully. Goodwill strengthens community safety.
-
Privacy-Conscious Choices:
- Select brands emphasizing on-device processing (analysis happens on the camera, not cloud).
- Choose systems with clear, accessible privacy policies.
- Consider brands offering robust local storage options as a primary method.
- For indoor monitoring involving family members, prioritize devices with physical shutters and discuss usage openly.
Your Questions, Answered
Q: I rent my home. What security steps can I take without violating my lease?
A: Focus on removable, non-invasive solutions. Peel-and-stick door/window sensors (SimpliSafe, Ring) typically leave no residue. Plug-in motion lights for exterior doors. A doorbell camera that replaces the existing button (confirm with landlord first—many welcome the added security). A doorstop alarm for secondary doors. A pin lock for sliding windows. Always discuss plans with your landlord; they may support or even contribute. Document property condition before moving in.
Q: Wired vs. wireless systems—which is better for most homeowners today?
A: Wireless systems dominate modern installations for good reason: easier DIY setup, no wall drilling, flexibility to reposition, and reliable battery life (1–2 years). Wired systems offer independence from Wi-Fi/batteries but require professional installation, especially in existing homes. For most, wireless is the practical choice. Consider wired only if: building new/renovating (wires run during construction), severe Wi-Fi dead zones persist despite mesh networks, or specific insurance requirements mandate hardwired monitored systems.
Q: Are smart locks secure, or do they introduce new risks?
A: Reputable smart locks from established brands (Schlage, Yale, August) generally enhance security when used correctly—they eliminate vulnerabilities of basic locks and provide usage logs. Key risks stem from user practices: weak codes, disabling auto-lock, or leaving physical keys accessible. Mitigate by: choosing locks with physical key override, enabling auto-lock, using strong unique codes, and storing spare keys securely. A smart lock complements a solid deadbolt and door frame—it doesn’t replace foundational hardware.
Q: Can security cameras function without Wi-Fi or internet?
A: Yes, with trade-offs. Options include: cameras with local storage (microSD card) for on-device recording (view by removing card); cellular-connected cameras (Arlo Go) using a data plan; hardwired systems connected to a local DVR/NVR. Without internet, you lose remote viewing, instant alerts, and cloud backup. For most, a reliable Wi-Fi network (potentially enhanced with a mesh system) is the most practical foundation. Consider a small UPS battery backup for your router to maintain connectivity during brief outages.
Q: How often should I test my security system?
A: Test individual components monthly (open doors/windows with sensors, walk motion zones, check camera feeds). Conduct a full-system drill quarterly: arm the system, trigger each sensor type, verify alerts and responses, test sirens (notify neighbors first). Annually, simulate edge cases: “What if power fails?” (test battery backups), “What if Wi-Fi drops?” (verify cellular backup if equipped). Document and address any issues immediately. Consistent testing builds confidence and uncovers hidden gaps.
Q: Will a security system lower my homeowner’s insurance premium?
A: Many insurers offer discounts for monitored systems or specific safety features (deadbolts, fire alarms), though requirements vary widely. Discounts are often in the range of several percentage points. Crucially: Contact your insurance agent before purchasing. Ask: “What specific certifications, features, or installation types qualify for a discount on my policy?” Get details in writing. Do not assume a DIY system qualifies—some require professional installation and monitoring certification. Potential savings can meaningfully offset costs over time.
Q: What’s the single most impactful step I can take today?
A: Complete the Vulnerability Assessment from Step 1. Spend 30–60 minutes walking your property with fresh eyes. You will likely identify 1–3 immediate, low-cost actions (trimming a bush near a window, reinforcing a strike plate, securing a garage remote). Awareness-driven action is infinitely more valuable than purchasing technology without context. This step anchors all future decisions in your actual environment.
Q: How do I maintain the appearance of occupancy while on vacation?
A: Avoid social media posts about travel before or during your trip. Use smart plugs or timers for lights and a radio—vary schedules daily (e.g., living room light 7–10 PM Tuesday, kitchen light 6–8 AM Wednesday). Pause mail/newspaper delivery. Arrange for a trusted neighbor to collect packages, occasionally park in your driveway, and handle trash/recycling. Set your system to “Away” mode. The goal is subtle, consistent cues of normal activity—not perfection.
Q: Are fake cameras or signs effective deterrents?
A: They offer very limited, short-term deterrence and carry notable risks. Experienced individuals often recognize decoys (poor placement, no wiring, unrealistic appearance). If discovered, they may signal a lack of real security, potentially increasing risk. Decoys provide zero detection or documentation value. Resources are better invested in one genuine measure: a motion light, a real doorbell camera, or strike plate reinforcement. If using signage, pair it with at least one visible, functional security element for credibility. Sustainable security relies on authentic measures.
Q: How do I discuss security with children without causing fear?
A: Frame it positively as “family safety” and “caring for our home.” For young children: Teach “never open the door without an adult.” Practice calmly: “The doorbell camera helps us see who’s there before we open.” For older children: Involve them in checking window locks during the assessment. Discuss the family response plan as part of general emergency preparedness (like fire drills). Assign age-appropriate roles (“Your job is to ensure the back door is locked before bed”). Emphasize that these are routine precautions—like seatbelts—that enable confidence and safety. Open communication reduces anxiety far more than secrecy.
Q: What should I do if my system alerts me to unauthorized activity while I’m home?
A: Prioritize personal safety above all. 1) Do not investigate or confront. 2) Retreat immediately to your pre-identified safe room. Lock the door. 3) Call emergency services. State clearly: “I am at [Address]. My security system indicates unauthorized activity. I am secured in [Room].” Provide descriptions only if visible and safe to do so. 4) Remain silent and hidden until authorities arrive and identify themselves. If using professional monitoring, they are likely already alerted—but still call directly. Your safety is infinitely more valuable than property. This protocol aligns with guidance from safety professionals worldwide.
Q: How can I help ensure my system functions during a power outage?
A: Build redundancy. 1) Battery Backup: Confirm your hub/panel has a built-in rechargeable battery (standard; typically lasts several hours). 2) Cellular Backup: For monitored systems, a cellular module (often an add-on) maintains communication if Wi-Fi/landline fails—critical for alarm signaling. 3) Device Batteries: Check wireless sensor and camera battery levels monthly; replace proactively. Consider solar options for outdoor cameras. 4) Router UPS: A small uninterruptible power supply (UPS) can keep your Wi-Fi router running for hours during short outages. Test outage response during a planned drill.
Conclusion and Your Path Forward
True home security is not a product—it is a continuous practice of awareness, preparation, and adaptation. It weaves together environmental cues, thoughtful technology, physical measures, and practiced habits into a resilient system uniquely suited to your life. This guide moves beyond the myth of a single “perfect” solution to affirm a more powerful truth: security thrives through layers. The strike plate reinforcement that adds critical seconds works with the motion light that startles and illuminates. The trimmed shrub that eliminates concealment complements the camera that documents activity. Your family’s practiced response plan transforms uncertainty into calm competence. This holistic, adaptable approach—grounded in observable patterns and respectful of diverse constraints—is what fosters genuine, lasting peace of mind.
Recap: Three Enduring Principles
- Assessment Guides Action: Your vulnerability assessment is the compass. It ensures every decision addresses your home’s reality, not generic fears.
- Layers Create Resilience: No single measure is flawless. Overlapping layers of deterrence, detection, delay, and response ensure that if one element is bypassed, others remain active.
- Maintenance Sustains Trust: A system neglected loses reliability. Regular testing, updates, and practiced protocols transform technology into a dependable partner.
The 24-Hour Rule: One Action, Tangible Momentum
Knowledge becomes power through action. Within the next 24 hours, complete one concrete step:
* Feeling overwhelmed? Spend 20 minutes on the exterior scan. Walk around your home. Note one observation.
* Have a specific concern? Reinforce the strike plate on your most-used exterior door (hardware store trip: 15 minutes; installation: 10 minutes).
* Own a doorbell camera? Open the app and refine motion zones to reduce false alerts. Test two-way audio.
* Have household members? Gather for 10 minutes. Identify one safe room and one escape route per bedroom. No drill needed—just shared awareness.
This single action breaks inertia. It builds confidence. It affirms that meaningful security is within your reach. Tomorrow, choose another. Progress, not perfection, is the path.
The Bigger Picture: Security as Care
Protecting your home is ultimately an act of care—for yourself, your loved ones, your memories, and your community. A thoughtfully secured home fosters vulnerability, connection, and rest. It is the quiet foundation upon which daily life unfolds with confidence. By implementing even part of this framework, you contribute to neighborhood safety; visible awareness and attentive stewardship support broader community well-being. Remember that security evolves. Revisit your assessment annually. Adapt your layers as your life changes. Approach this journey with patience and self-compassion. You are not building walls to live in fear, but cultivating a sanctuary where peace can take root. You have the insight. You have the framework. You have the power to begin—today.
Explore Our Complete System:
Choosing the Right Doorbell Camera for Your Home | DIY vs. Professional Security Installation: A Practical Comparison | Landscaping for Safety: Plants That Deter and Designs That Protect | Creating a Family Emergency Communication Plan | Understanding Security Sensors: Types, Placement, and Purpose | Home Fire Safety: Prevention, Detection, and Preparedness | Smart Lighting for Safety and Everyday Living