Build a Safe, Durable, and Code-Compliant Outdoor Electrical System Designed to Endure Rain, Snow, Sun, and Temperature Extremes—Without Compromising Safety or Aesthetics
Creating a truly weatherproof outdoor electrical system demands far more than simply purchasing “outdoor-rated” fixtures and plugging them in. True resilience emerges from understanding the invisible forces at play: moisture migration through microscopic gaps, thermal expansion stresses on connections, UV degradation of materials, and the critical interplay between National Electrical Code requirements and real-world environmental challenges. This definitive guide synthesizes electrical engineering principles, building science insights, and field-tested installation techniques into a comprehensive framework that transforms uncertainty into confidence. Whether you’re installing a single weatherproof outlet for holiday lights or designing a whole-property lighting and power ecosystem, you’ll gain the precise knowledge to execute safely, comply with evolving standards, and create systems that perform reliably season after season.
Introduction
Imagine returning home after a week-long vacation to discover your beautifully landscaped garden path illuminated exactly as you left it—despite three days of torrential rain and a sudden cold snap. Or picture hosting an evening gathering where string lights glow steadily above the patio, power tools operate reliably at the workshop, and the fountain continues its gentle cascade—all powered by an electrical system engineered to thrive in the elements. This isn’t luck; it’s the result of intentional weatherproofing strategy applied at every connection point, from the main service panel to the final fixture. According to the National Electrical Code (NEC) Article 406.8, all 15- and 20-ampere, 125- and 250-volt receptacles installed in wet locations must utilize weatherproof covers that maintain closure even when devices are plugged in—a specific requirement born from decades of incident analysis showing how moisture intrusion at connection points triggers corrosion, arcing, and fire hazards. This guide moves beyond superficial checklists to reveal the layered philosophy professionals use: weatherproofing isn’t a single product you buy, but a systematic approach woven through planning, component selection, installation technique, and ongoing verification. We’ll translate complex code language into actionable steps, decode product specifications that manufacturers bury in fine print, and expose subtle installation errors that compromise even “rated” equipment. By the end, you’ll possess not just instructions, but the diagnostic lens to evaluate any outdoor electrical scenario with clarity and authority.
The Three-Layer Weatherproofing Framework: Your Blueprint for Outdoor Electrical Success
Professionals don’t rely on hope or a single “weatherproof” label. They deploy a redundant defense system—a philosophy we call the Three-Layer Weatherproofing Framework. This approach acknowledges that no single component is infallible; instead, multiple independent barriers work synergistically to block moisture, resist corrosion, and maintain integrity across years of environmental stress. Layer 1 establishes the electrical foundation with code-compliant circuit design and protection. Layer 2 selects components engineered for specific exposure zones. Layer 3 executes installation techniques that seal vulnerabilities invisible to the untrained eye. When all three layers align, the system achieves resilience far exceeding the sum of its parts. This framework transforms overwhelming complexity into a logical progression, ensuring no critical detail is overlooked whether you’re adding one outlet or wiring an entire property.
Layer 1: Circuit and Power Source Planning—The Foundation of Safety
Before touching a single wire, the most critical weatherproofing decisions happen at the electrical panel. This layer establishes the non-negotiable safety backbone that protects your entire outdoor system. Skipping or shortcutting here risks catastrophic failure regardless of how perfectly Layer 2 and 3 are executed.
Understanding Wet vs. Damp Locations: The NEC Distinction That Changes Everything
The NEC draws a precise, legally binding line between “damp” and “wet” locations—a distinction that dictates every component choice downstream. A damp location is protected from weather but subject to moderate moisture (e.g., a covered porch ceiling, an enclosed garage wall not exposed to direct precipitation). A wet location is subject to saturation with water or other liquids (e.g., any area exposed to rain, snow, irrigation spray, or direct ground contact). Crucially, the NEC considers all outdoor areas as wet locations unless specifically protected by a permanent structure that prevents moisture exposure—and even then, local amendments often override this. For example, an outlet under a pergola with open sides is still classified as wet location because wind-driven rain can penetrate. Misclassifying this leads directly to using damp-location-rated covers (which lack “while-in-use” protection) in wet zones—a violation that creates immediate shock and fire hazards. Always default to wet-location requirements for any outdoor installation unless a licensed electrician confirms otherwise based on your specific architectural conditions and local code adoption.
GFCI Protection: Non-Negotiable Defense Against Ground Faults
Ground Fault Circuit Interrupters (GFCIs) are mandatory for all outdoor receptacles per NEC 210.8(A)(3). But understanding why reveals deeper insight. Water drastically reduces electrical resistance. A minor fault—like moisture seeping into a cracked cord jacket near a tool—can create a path for current to flow through a person to ground. GFCIs detect imbalances as small as 4–6 milliamps (far below lethal levels) and interrupt power within 1/40th of a second. However, GFCI placement strategy matters immensely:
– Option A (Outlet-Level): Installing a weather-resistant (WR) GFCI receptacle directly at the outdoor location. Advantage: Local reset access. Disadvantage: The GFCI mechanism itself is exposed to temperature extremes and moisture, potentially reducing its operational lifespan. Requires a weatherproof cover rated for GFCI devices (deeper “bell box” style).
– Option B (Upstream Protection): Installing a GFCI circuit breaker in the main panel protecting the entire outdoor circuit. Advantage: The sensitive electronics reside in the climate-controlled panel, maximizing longevity and reliability. Disadvantage: Reset requires accessing the panel (inconvenient during rain). Ideal for circuits powering multiple remote outlets (e.g., front yard, backyard, side gate).
– Critical Nuance: If using Option A (outlet GFCI), the first receptacle in the circuit must be the GFCI device. All downstream standard receptacles gain protection but must still be WR-rated and in wet-location boxes. Never install a standard receptacle upstream of a GFCI outlet—that receptacle remains unprotected. Test GFCIs monthly using the TEST/RESET buttons; failure to trip indicates internal damage requiring immediate replacement.
Dedicated Circuits vs. Shared Circuits: Avoiding Overload and Voltage Drop
Outdoor circuits often power high-draw devices: landscape transformers (300W+), pond pumps (500W+), holiday light displays (easily 1000W+), or workshop tools. Sharing these with indoor circuits (e.g., kitchen countertop outlets) risks nuisance tripping and dangerous voltage drop. Voltage drop occurs when wire resistance causes power loss over distance, manifesting as dimming lights, motor overheating, or tools underperforming. The NEC recommends keeping voltage drop under 3% for branch circuits. For a standard 120V circuit:
– 15-amp circuit: Maximum recommended run for 14-gauge wire is approximately 50 feet to a single outlet. Beyond this, upgrade to 12-gauge wire.
– 20-amp circuit: Maximum recommended run for 12-gauge wire is approximately 70 feet. For runs exceeding 100 feet (common in large properties), 10-gauge wire is often necessary.
Calculate anticipated load: Add wattages of all planned devices. Divide by voltage (120V) to get amperage. Example: 600W landscape transformer + 400W string lights = 1000W ÷ 120V = 8.3 amps. This fits comfortably on a dedicated 15-amp circuit (max 12 amps continuous load per NEC 210.20). However, if adding a 1500W space heater later, the circuit would overload. Proactive planning prevents future hazards. For whole-property systems, consider a subpanel near the outdoor workspace—reducing long wire runs from the main panel and allowing dedicated circuits for lighting, power, and water features.
Conduit Strategy: Choosing the Right Path for Wires
Conduit isn’t just physical protection—it’s a moisture management system. The wrong choice invites water infiltration:
– PVC Schedule 80: Ideal for most residential underground runs (minimum 18 inches depth per NEC 300.5 for 120V circuits). UV-resistant, corrosion-proof, and smooth interior eases wire pulling. Use expansion joints in long runs to accommodate thermal movement. Critical: Seal conduit ends entering boxes with duct seal compound (a non-hardening putty) to block capillary water wicking.
– Liquidtight Flexible Metal Conduit (LFMC): Essential for above-ground transitions (e.g., exiting foundation wall to an outlet box). Its corrugated design with PVC jacket handles vibration and minor movement. Must use listed LFMC fittings with integral seals. Avoid standard flexible metal conduit (FMC)—it lacks moisture sealing and corrodes rapidly outdoors.
– Rigid Metal Conduit (RMC): Valuable where extreme physical protection is needed (e.g., across a driveway). Requires meticulous threading and sealing of all joints with pipe dope rated for wet locations. Galvanized steel will eventually rust at cut threads; aluminum RMC avoids this but costs more.
– The Hidden Trap: Never run NM-B (“Romex”) cable directly underground or in buried conduit. Its paper wrap absorbs moisture, leading to insulation failure. Use UF-B (Underground Feeder) cable only for direct burial (minimum 24 inches depth), or THWN-2 wires inside conduit. THWN-2 is rated for wet locations and 90°C, providing thermal headroom.
Layer 2: Component Selection—Choosing Gear Engineered for the Outdoors
Selecting components requires decoding marketing claims versus engineering reality. “Weatherproof” is not a standardized term—look for specific certifications and construction details that prove resilience.
Weather-Resistant (WR) Receptacles: Beyond the Label
All outdoor receptacles must be labeled “WR” (Weather-Resistant) per NEC 406.8(B). But what does this mean physically? WR receptacles feature:
– Corrosion-Resistant Materials: Brass or nickel-plated contacts instead of standard steel. Nylon faceplates with UV inhibitors to prevent yellowing and brittleness.
– Sealed Internal Cavities: Gaskets or potting compound around terminal screws to block moisture ingress behind the faceplate.
– Critical Verification: Check the packaging for “WR” stamped directly on the device yoke (metal mounting strap). Counterfeit or mislabeled products exist. Reputable brands (Leviton, Hubbell, Eaton) mold the WR designation visibly. Never use indoor receptacles wrapped in tape or “protected” by a cover—that cover will fail, and the receptacle lacks internal corrosion resistance. For high-humidity coastal areas, specify marine-grade receptacles with additional nickel plating and stainless steel screws.
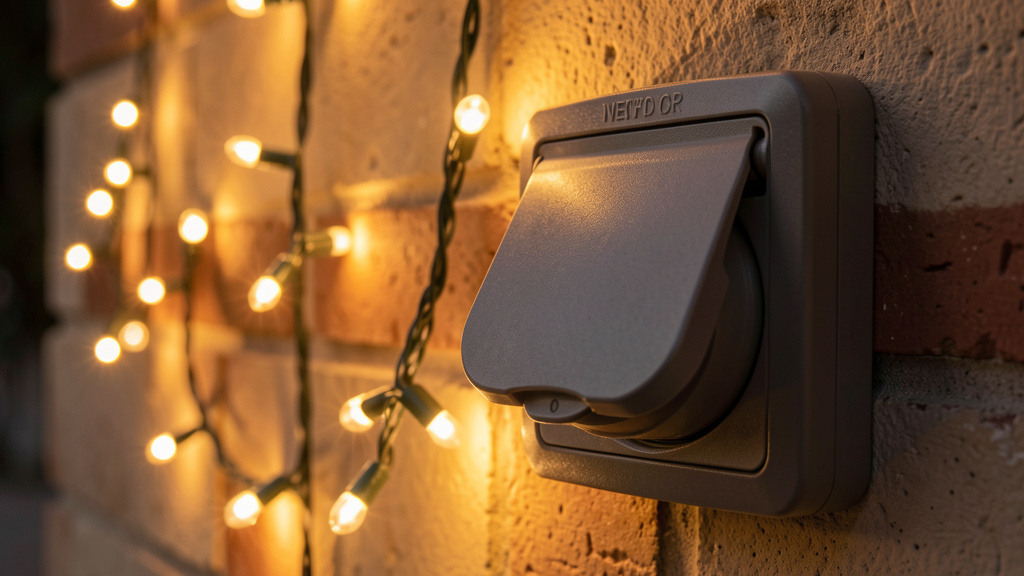
Weatherproof Covers: The “While-In-Use” Imperative
This is where most installations encounter challenges. Standard “bubble covers” (flat flip covers) are only rated for damp locations. For wet locations (all exposed outdoor areas), you need a “while-in-use” cover—officially termed an “extra-duty” cover per NEC 406.8(B)(2). These feature:
– Deep Bell Housing: Creates an air pocket around plugged-in cords, preventing water from pooling directly on connection points.
– Spring-Loaded Flap: Automatically closes when cords are inserted, maintaining a seal against wind-driven rain.
– Drip Edge Design: Channels water away from the opening.
– Material Matters: Polycarbonate covers withstand UV degradation better than standard PVC, which becomes brittle and cracks after several years of sun exposure. In snow-prone regions, choose covers with wide openings to prevent ice buildup jamming the flap. For deck railings or vertical surfaces, use “vertical mount” while-in-use covers designed to shed water downward. Never modify a cover (e.g., drilling holes for cords)—this voids its UL listing and creates direct moisture pathways.
Outdoor Electrical Boxes: Sealing the Enclosure
The box is the first line of defense. Material and design dictate longevity:
– Non-Metallic (PVC) Boxes: Ideal for most residential uses. Won’t corrode, lightweight, and often include integrated mounting ears. Choose “old-work” (retrofit) boxes with moisture-sealing gaskets around the cable clamp ports. For new construction, “new-work” boxes with nail-on brackets provide superior stability. Critical spec: Look for boxes rated for “wet locations” with gasketed cover plates. Standard indoor PVC boxes lack these seals.
– Metal Boxes: Required in some jurisdictions for commercial applications or where physical impact is likely. Must be galvanized or stainless steel. All knockouts must be sealed with listed blank plates and moisture-resistant putty pads. Grounding is critical—bond the box to the circuit ground wire with a green grounding screw. Rust at unsealed knockouts is a common failure point.
– Specialty Boxes: For post-mounted fixtures (lampposts, mailbox lights), use “post-top” boxes with weep holes at the bottom to drain condensation. For in-ground applications (path lights), use direct-burial junction boxes rated for soil contact with silicone-sealed lids. Always select boxes with slightly more capacity—crowded wires stress connections and trap moisture. A 4-inch square deep box (21 cu. in.) provides ample room for GFCI devices and wire nuts versus a standard shallow box.
Wiring and Connectors: The Hidden Vulnerabilities
Wire choice depends entirely on installation method:
– UF-B Cable (Underground Feeder): Only for direct burial (minimum 24 inches depth). Has solid PVC sheathing embedding individual conductors—no paper wrap to absorb moisture. Never use indoors (fire code violation due to smoke emission). Jacket is sunlight-resistant but can be vulnerable to physical damage; consider metal conduit sleeves at grade level exits.
– THWN-2 Wires in Conduit: A highly reliable approach. Individual wires (black-hot, white-neutral, green-ground) pulled through conduit. THWN-2 is rated 90°C wet/dry, providing thermal safety margin. Use stranded wire for flexibility in long pulls. Color-code neutrals (white) and grounds (green or bare) meticulously—mixing these up creates shock hazards.
– Wire Nuts and Connectors: Standard wire nuts fail outdoors. Use:
– Waterproof Wire Connectors: Pre-filled with silicone or butyl sealant (e.g., Ideal “In-Sure” or “Noalox” connectors). Twist on firmly until metal barrel is fully covered; sealant should extrude slightly. Never reuse.
– Heat-Shrink Butt Connectors: For permanent splices (e.g., landscape lighting). Slide connector over stripped wires, crimp, then apply heat gun until adhesive liner melts and seals the joint. Superior to wire nuts for vibration resistance.
– Pigtail Connections: Always connect device terminals (receptacle, switch) to short “pigtail” wires rather than daisy-chaining devices. If one device fails, the circuit remains intact downstream. Use pigtails rated for wet locations.
Lighting Fixtures: Decoding IP Ratings and Material Science
“Outdoor-rated” lighting varies significantly in true weather resistance. Look beyond marketing:
– IP (Ingress Protection) Ratings: Two digits indicate solid particle and liquid protection. For outdoor fixtures:
– IP65: Dust-tight + low-pressure water jets (rain). Suitable for covered areas or upward-facing fixtures.
– IP66: Dust-tight + powerful water jets. Ideal for exposed locations (deck posts, fence lines).
– IP67: Dust-tight + temporary immersion (30 mins at 1m depth). Essential for in-ground well lights, pond edges, or areas prone to flooding.
– IP68: Continuous immersion rating. For submerged applications (fountains, pools—requires low-voltage or GFCI-protected 120V with specific pool code compliance).
– Fixture Materials:
– Aluminum: Lightweight, corrosion-resistant if anodized. Avoid cheap painted aluminum—it chips, exposing base metal to rust. Look for “marine-grade” anodization.
– Brass/Bronze: Excellent corrosion resistance, develops a protective patina. Heavy and expensive but lasts decades. Ideal for coastal salt-air environments.
– Stainless Steel (316 grade): Superior to 304 grade for salt exposure. Verify grade—many “stainless” fixtures use lower grades that pit and rust.
– Plastic (Polycarbonate): Impact-resistant and UV-stable. Avoid ABS plastic—it becomes brittle in cold and yellows in sun. Check for “UV-stabilized” labeling.
– Gasket Integrity: Inspect the gasket design. Silicone gaskets maintain flexibility across wide temperature ranges. Compression-fit gaskets (requiring screws to compress) seal better than slip-fit gaskets. For path lights, ensure the stake has drainage holes to prevent water pooling inside the stem.
Transformers and Power Supplies: The Heart of Low-Voltage Systems
Landscape lighting (12V) relies on transformers. Their placement and rating are critical:
– Indoor vs. Outdoor Transformers: Indoor units must be installed in dry, protected locations (garage, basement). Outdoor-rated transformers have sealed enclosures (IP65+) and can mount directly outside—but still require protection from direct sun (heat reduces lifespan) and standing water. Mount on a post 12+ inches above grade.
– Capacity Planning: Total wattage of all lights should not exceed 80% of transformer capacity. Example: For a 300W transformer, max load = 240W. This prevents overheating and voltage drop at the end of long runs. Use multiple smaller transformers for large properties instead of one oversized unit—reduces voltage drop and creates redundancy.
– Smart Features: Timers, photocells, and dimmers add convenience but introduce potential failure points. Choose models with sealed electronics compartments. Battery-backed memory retains settings during power outages. For cold climates, verify operating temperature range—some electronics may have reduced performance in freezing conditions.
Layer 3: Installation and Sealing Techniques—Executing Flawless, Moisture-Proof Connections
Perfect components fail with poor installation. This layer transforms theory into reliable execution through meticulous technique.
Box Mounting: Creating a Positive Drainage Plane
How you mount the box determines whether water flows away or pools at the seal:
1. For wall-mounted boxes: Install with a slight downward tilt (approximately 1/8 inch per foot) away from the wall. Use a level with a slope gauge. This ensures any moisture entering the cover drains out, not back toward the wall penetration.
2. Seal the box-to-wall interface before mounting. Apply a continuous bead of exterior-grade silicone sealant (100% silicone, not acrylic-latex) around the back perimeter of the box. Press firmly against the wall to create a gasket. Wipe excess immediately. This blocks water migrating behind the box—a common cause of wall damage.
3. For post-mounted boxes: Drill a small weep hole in the lowest point of the box interior before installation. This allows condensation to escape. Never seal weep holes—they are intentional drainage paths.
4. Cable entry points: After inserting cable/conduit into the box, seal the clamp port with duct seal compound. Press firmly around the cable to eliminate gaps. For UF-B cable entering a box above ground, form a “drip loop”—a downward sag in the cable before it enters the box. This prevents water running down the cable jacket from entering the box.
Conduit Termination: Blocking Capillary Action
Water can travel through conduit via capillary action. Stopping it requires strategic sealing:
– At the box entry: After securing the conduit connector, pack duct seal compound tightly into the conduit end inside the box. This putty remains pliable, blocks moisture, and allows future wire replacement.
– At the panel entry: Repeat the duct seal process where conduit enters the main panel. Critical for underground runs—moisture can wick upward through conduit over considerable distances.
– For vertical conduit runs (e.g., up a post): Install a small weep hole approximately 2 inches above the bottom bend. Drill a tiny hole to drain condensed moisture. Position it away from direct rain exposure.
Receptacle and Switch Installation: The Micro-Seal Protocol
Even WR devices benefit from supplemental sealing:
1. Before mounting the device: Wrap the entire device yoke (metal strap) with self-amalgamating tape (e.g., Coax-Seal). Stretch and wrap tightly—this tape fuses into a solid rubber seal, blocking moisture behind the device. Overlap each wrap by 50%.
2. Terminal connections: Apply a thin film of antioxidant compound (Noalox) to copper wire strands before inserting into terminals. Prevents oxidation-induced resistance buildup. Torque terminal screws to manufacturer specs (usually 12-15 in-lbs)—under-torqued connections loosen; over-torqued damages threads.
3. Grounding: Connect the ground wire to the green grounding screw first. Ensure bare copper doesn’t contact hot/neutral terminals. For metal boxes, bond the box to ground with a separate pigtail.
4. Final box seal: After mounting the device, apply a thin bead of silicone sealant around the inside perimeter of the box where the cover plate will sit. Install the cover plate immediately before sealant skins over. This creates a secondary gasket between box and cover.
Fixture Mounting: Eliminating Thermal Stress Points
Temperature swings cause materials to expand/contract at different rates—a major cause of seal failure:
– For wall-mounted fixtures: Use mounting brackets that allow slight movement. Avoid over-tightening mounting screws—snug plus 1/8 turn. Overtightening cracks plastic housings or deforms metal brackets, breaking the gasket seal.
– Gasket seating: Clean the fixture mounting surface and gasket channel with isopropyl alcohol to remove oils/dust. Place the gasket in its channel, ensuring no twists. Hand-tighten mounting screws in a star pattern (like lug nuts) to compress the gasket evenly. Final tighten should require moderate finger pressure—not full wrench force.
– Wire strain relief: Secure fixture wires 2 inches from the entry point with a cable tie to the mounting bracket. Prevents tugging on internal connections during wind or maintenance. Leave a service loop (6-inch coil) of wire inside the fixture for future repairs.
Testing Protocol: Verification Before Final Closure
Never assume—verify at each stage:
1. Continuity Test: Before connecting to power, use a multimeter to check for short circuits between hot/neutral/ground. Set to continuity mode; probes should not beep between any conductors.
2. GFCI Function Test: After energizing, press TEST button—it should trip instantly. Press RESET. Repeat monthly.
3. Moisture Simulation Test: With power OFF, spray the installed cover and fixture with a garden hose for 60 seconds (mimicking heavy rain). Wait 10 minutes. Power ON and verify operation. Check for water inside covers during routine maintenance.
4. Thermal Check (Optional): After 24 hours of operation under load, feel connections for unusual warmth. Significant heat indicates a potential issue requiring investigation.
The Fundamental Principle: Weatherproofing succeeds not through heroic single solutions, but through the relentless accumulation of small, verified details—each seal, each drip loop, each torque specification acting as a redundant barrier that collectively renders the system resilient against environmental challenges.
Beyond the Basics: Addressing Real-World Scenarios and User Intentions
Theory meets reality in specific applications. This section translates the Three-Layer Framework into actionable protocols for common projects, addressing nuanced questions searchers actually ask.
Installing a Weatherproof Outlet on a Deck or Patio: The Step-by-Step Protocol
Scenario: Adding a single GFCI-protected outlet to a wooden deck for string lights, a fan, or charging devices.
Critical Pre-Check: Confirm local code allows DIY electrical work. Many jurisdictions require permits and inspections for new circuits. When in doubt, consult a licensed electrician—safety and legal compliance outweigh cost savings.
Materials Checklist (Verified for Wet Location):
– Weather-resistant (WR) GFCI receptacle (15A or 20A matching circuit)
– Extra-duty “while-in-use” cover (polycarbonate, vertical-mount style)
– 4-inch square deep PVC electrical box (21+ cu. in.) with gasketed cover
– UF-B cable (14/2 for 15A circuit; 12/2 for 20A) OR THWN-2 wires in 1/2″ PVC conduit
– Exterior-grade silicone sealant (100% silicone)
– Self-amalgamating tape (Coax-Seal)
– Duct seal compound
– Cable staples rated for outdoor use (galvanized)
– Grounding pigtail wire (if metal box)
Execution Sequence:
1. Power Down & Verify: Turn off circuit at main panel. Use a non-contact voltage tester at the planned tap point to confirm dead circuit. Test the tester on a known live circuit first to verify function.
2. Box Placement Strategy: Mount box on a structural post (not just deck railing) for stability. Position 12–18 inches above deck surface to avoid standing water splash. Ensure cover flap has full clearance to open/close. Mark box outline; drill pilot holes for mounting screws.
3. Seal the Interface: Apply continuous silicone bead to back of box. Press firmly against post. Wipe excess. Pre-drill mounting screw holes to prevent wood splitting.
4. Cable/Conduit Run: If using UF-B cable: Run along post underside, staple every 4.5 feet with outdoor-rated staples. Create drip loop before box entry. If using conduit: Secure PVC conduit with straps every 3 feet. Use LB conduit body for clean 90-degree turn into box. Seal conduit ends with duct seal before pulling wires.
5. Box Entry Seal: Insert cable/conduit through box knockout. Tighten clamp securely. Pack duct seal compound around cable inside box. Form drip loop outside box.
6. Device Preparation: Wrap GFCI yoke with self-amalgamating tape. Apply antioxidant compound to wire ends. Connect LINE terminals only (black-hot to brass, white-neutral to silver). Connect ground to green screw. Do not use LOAD terminals unless protecting downstream outlets.
7. Micro-Seal Protocol: Apply thin silicone bead to inside box rim. Mount GFCI. Install cover plate. Ensure while-in-use flap moves freely.
8. Final Verification: Restore power. Press TEST—should trip. Press RESET. Plug in a lamp; operate flap with cord inserted. Spray lightly with hose; verify no water ingress after 5 minutes.
Common Pitfall Avoidance:
– Mistake: Mounting box flush against deck railing where water pools.
Fix: Use a standoff spacer block to create airflow gap behind box.
– Mistake: Using indoor-rated cable staples that rust and cut cable sheathing.
Fix: Use galvanized or stainless steel staples designed for UF cable.
– Mistake: Forgetting the drip loop—water runs straight into box.
Fix: Always form a U-shaped loop below box entry point.
Landscape Lighting: Building a Resilient Low-Voltage System
Scenario: Installing path lights, uplights, and well lights across a 1/4-acre yard with varying terrain.
Core Insight: Low-voltage (12V) systems are safer but not immune to weather damage. Corrosion at connections is a leading cause of system failures.
Transformer Sizing Deep Dive:
Calculate total wattage:
– 8 x path lights @ 5W each = 40W
– 4 x uplights @ 10W each = 40W
– 2 x well lights @ 15W each = 30W
– Total Load = 110W
Select transformer: 110W ÷ 0.8 (80% rule) = 137.5W → Choose 150W minimum. For future expansion, select 200W. Place transformer within 50 feet of the first light to minimize voltage drop. Mount on a treated wood post 18″ above grade with a weatherproof enclosure. Run a dedicated 120V GFCI-protected circuit to the transformer location—do not plug into an extension cord.
Wire Selection and Run Strategy:
Use 14-gauge or 12-gauge direct-burial low-voltage cable (not speaker wire!). Thicker gauge reduces voltage drop over distance. Implement a “hub-and-spoke” layout:
– Run a main “trunk” line (12-gauge) from transformer around the property perimeter.
– Tap “spoke” lines (14-gauge) to individual lights using waterproof connectors.
– Avoid daisy-chaining all lights in one long series—voltage drop dims distant lights.
– Bury cable 6–8 inches deep. Use a flat-nose shovel to slice turf, lift flap, lay cable, replace turf. Mark cable path with landscape flags during installation to avoid future digging damage.
Fixture Installation Nuances:
– Path Lights: Choose models with removable stakes. Insert stake fully into soil; twist fixture onto stake. Ensure lens gasket is clean and seated. Angle light downward to minimize glare and skyglow.
– In-Ground Well Lights: Excavate hole 2x fixture diameter. Line with gravel for drainage. Place fixture; backfill with soil, tamping gently. Ensure top rim sits flush with grade—no depression to collect water. Verify IP67 rating.
– Tree Uplights: Mount fixture on ground stake away from trunk base to avoid root damage. Aim light upward through branches. Use adjustable fixtures to fine-tune beam spread.
– Connection Protocol: At each tap point:
1. Strip 1/2″ insulation from trunk and spoke wires.
2. Insert into waterproof connector (e.g., gel-filled wire nut).
3. Twist firmly until sealant extrudes.
4. Wrap entire connector with self-amalgamating tape.
5. Bury connector 4 inches deep in a small gravel bed for drainage.
Never leave connectors lying on soil surface—they corrode rapidly.
Troubleshooting Flickering or Dim Lights:
– Symptom: Lights dim progressively along a run.
Cause: Voltage drop from undersized wire or excessive length.
Fix: Shorten run, upgrade to 12-gauge wire, or add a second transformer zone.
– Symptom: One light flickers intermittently.
Cause: Loose connection or moisture in connector.
Fix: Excavate connector; replace with new waterproof connector. Apply dielectric grease to contacts before reassembly.
– Symptom: Entire zone fails.
Cause: Transformer overload or short circuit.
Fix: Disconnect all lights; power on transformer. If it hums but no output, transformer may need replacement. If output returns when lights disconnected, check for damaged wire causing ground fault.
Powering a Shed, Workshop, or Detached Garage: The Subpanel Solution
Scenario: Running power 75 feet from house to a backyard shed for lighting, outlets, and occasional tool use.
Critical Code Note: NEC 225.30 generally limits detached structures to one feeder circuit unless specific conditions are met. A subpanel is often the most flexible, code-compliant solution.
Why a Subpanel Beats a Single Circuit:
– Dedicated circuits prevent overloads (e.g., table saw tripping lights).
– Local shutoff required by NEC 225.31 for detached structures.
– Future expansion without trenching again.
– Reduced voltage drop with shorter branch circuits inside shed.
Installation Blueprint:
1. Feeder Circuit from Main Panel:
– Run 6/3 UF-B cable (or four THWN-2 wires in 1″ PVC conduit) for a 50-amp subpanel.
– Burial depth: 24″ for UF-B direct burial; 18″ for PVC conduit.
– Install 50-amp double-pole breaker in main panel.
2. Subpanel Installation in Shed:
– Mount panel 4–6 feet above floor on interior wall.
– Install grounding electrode system: Drive two 8-foot copper-clad ground rods 6+ feet apart. Connect to panel ground bar with #6 bare copper wire.
– Critical Separation: In subpanels, neutral and ground bars must be isolated (remove bonding screw). Neutrals go to neutral bar; grounds to separate ground bar.
3. Branch Circuits Inside Shed:
– Two 20-amp circuits: One for outlets (GFCI-protected), one for lighting.
– Use 12/2 NM-B cable inside shed walls (protected location).
– All shed outlets require GFCI protection (use GFCI breaker or first outlet).
4. Weatherproofing the Transition:
– Where feeder enters shed: Install LB conduit body on exterior wall. Seal conduit entry into LB with duct seal.
– Mount a weatherproof disconnect switch (e.g., 60-amp pullout fused disconnect) on shed exterior near entry point—required by NEC 225.32 for emergency shutoff visibility.
– Seal all penetrations with fire-rated expanding foam followed by exterior silicone.
Cost vs. Complexity Tradeoffs:
– Budget Approach: Single 20-amp GFCI-protected circuit in 12/2 UF-B cable. Powers 4–6 outlets and lights. Limited to ~1900W continuous load. No local shutoff—must return to house panel to disconnect.
– Optimal Approach: 50-amp subpanel as described. Higher upfront cost but enables workshop tools, heating, future EV charger. Required for structures over 120 sq. ft. in many jurisdictions.
– When to Call a Pro: Underground feeder installation requires precise trenching, conduit bending, and panel work. Most homeowners lack tools/expertise for safe, code-compliant execution. Permits and inspections are mandatory—hire a licensed electrician to avoid costly rework or insurance complications.
Holiday Lighting: Temporary Systems Done Right
Scenario: Installing seasonal lights on rooflines, trees, and railings without damaging property or creating hazards.
Myth Busting: “Temporary” does not mean “unsafe.” NEC Article 410 covers temporary wiring—outdoor lights must still use wet-location-rated components.
Safe Powering Strategy:
– Never daisy-chain more than three light sets (check manufacturer label—often max 210W total). Overloading causes overheating.
– Use heavy-duty, 16-gauge or 14-gauge extension cords rated for outdoor use (look for “W-A” marking). Indoor cords crack in cold, exposing wires.
– Plug all cords into a GFCI-protected outlet. If existing outlet lacks GFCI, use a portable GFCI adapter between cord and outlet.
– Route cords away from foot traffic. Use cord covers (rubber ramps) where crossing walkways. Secure cords to surfaces with plastic clips—not nails or staples that damage insulation.
Fixture Attachment Without Damage:
– Rooflines: Use gutter hooks designed for your gutter type. Never staple or nail through shingles—creates leak paths. For tile roofs, use weighted sandbags on flat surfaces (not edges).
– Trees: Wrap cords loosely around branches; avoid tight ties that girdle growth. Use zip ties with UV inhibitors; remove completely after season.
– Windows/Doors: Use suction cup hooks rated for outdoor temps. Avoid tape on painted surfaces—it leaves residue and peels paint when removed.
– Ground Mounts: For stake lights, insert into soil—not through landscape fabric where roots grow. Remove stakes promptly after season to avoid tripping hazards.
Post-Season Storage Protocol:
1. Unplug and allow lights to cool completely.
2. Wipe fixtures with dry cloth to remove moisture/dirt.
3. Coil cords loosely in figure-8 pattern around cardboard tube—prevents kinks and wire fatigue.
4. Store in original boxes or plastic bins with silica gel packs to absorb humidity.
5. Label boxes clearly: “Front Porch Lights – 50′ Warm White.”
Pro Tip: Take a photo of your installed layout each year. Saves hours of re-planning next season.
Navigating Friction Points: Common Mistakes, Code Violations, and Smart Alternatives
Even meticulous planners encounter obstacles. This section addresses real-world complications with pragmatic, code-conscious solutions.
The “Existing Non-Compliant Work” Dilemma
Scenario: You inherit a property with outdoor outlets covered by standard flip covers, NM-B cable in buried conduit, or ungrounded fixtures.
Ethical Imperative: Safety trumps convenience. Document hazards with photos. Prioritize fixes by risk level:
High-Risk Violations (Address Immediately):
– NM-B Cable in Buried Conduit: Moisture has likely compromised insulation. Turn off circuit at panel. Excavate and replace with UF-B cable or THWN-2 wires in conduit. Do not energize.
– Missing GFCI Protection: Install GFCI breaker for the circuit or replace first outlet with WR GFCI receptacle. Test monthly.
– Ungrounded Outlets: If circuit lacks ground wire, install a GFCI receptacle labeled “No Equipment Ground” per NEC 406.4(D)(2). Provides shock protection but not surge protection for electronics. Best long-term fix: Run new grounded cable.
Medium-Risk Violations (Schedule Repair):
– Damp-Location Covers in Wet Zones: Replace with while-in-use covers. Verify cover is rated for GFCI if device is GFCI.
– Corroded Receptacles: Replace with WR-rated devices. Clean box interior; apply antioxidant compound to new connections.
– Exposed Splices: Excavate; install listed waterproof connector inside an in-ground junction box.
Documentation Strategy:
– Take “before” photos for insurance records.
– Obtain permits for significant repairs—inspector verification provides legal protection.
– Keep receipts for materials and labor.
– When to Walk Away: If multiple high-risk violations exist (e.g., knob-and-tube wiring extended outdoors), consult a licensed electrician. The scope may exceed DIY capability.
Budget Constraints vs. Safety Non-Negotiables
Scenario: Limited funds but urgent need for outdoor power (e.g., for medical equipment, security lights).
Hierarchy of Spending: Allocate resources to layers that prevent catastrophic failure first.
| Priority Tier | Critical Items | Budget Alternatives | NEVER Compromise |
|---|---|---|---|
| Tier 1 (Safety) | GFCI protection (breaker or receptacle), WR-rated receptacles, while-in-use covers | Buy one high-quality GFCI receptacle instead of multiple cheap ones; use upstream GFCI breaker to protect standard WR outlets downstream | GFCI protection, wet-location covers, proper grounding |
| Tier 2 (Longevity) | THWN-2 wires in conduit (vs. direct-burial UF-B), polycarbonate covers (vs. PVC), IP67 fixtures | Use UF-B cable for short runs (<25 ft) where conduit cost is prohibitive; choose fixtures with replaceable gaskets | Conduit for above-ground runs, sealed connectors |
| Tier 3 (Convenience) | Smart timers, multiple circuits, subpanel | Start with one dedicated circuit; add zones later | — |
Phased Implementation Plan:
1. Phase 1 (Week 1): Install one GFCI-protected outlet with while-in-use cover at most critical location (e.g., near back door). Use highest-quality components here.
2. Phase 2 (Month 1): Add low-voltage landscape lighting powered by a plug-in transformer at the new outlet. Minimal electrical work; high visual impact.
3. Phase 3 (Seasonal): Expand circuit with additional outlets using proper techniques. Save for subpanel installation.
Critical Reminder: Never use indoor extension cords permanently outdoors. Never bypass GFCI because “it trips too often”—tripping indicates a real fault needing diagnosis.
Challenging Environments: Coastal, High-Altitude, and Extreme Climate Adaptations
Salt-Air Coastal Zones:
– Accelerated Corrosion: Salt particles embed in surfaces, attracting moisture.
– Material Upgrades: Specify 316-grade stainless steel boxes/hardware, marine-grade anodized aluminum fixtures, tinned copper wires. Avoid brass (dezincification).
– Maintenance Protocol: Rinse fixtures and covers monthly with fresh water. Inspect connections quarterly for white corrosion powder. Apply dielectric grease to all exposed metal contacts.
– Product Verification: Look for “Marine Grade” or “Coastal Rated” certifications from manufacturers.
High-Altitude/Sun-Intense Regions (UV Degradation):
– Plastic Embrittlement: UV radiation breaks down polymers faster above 5,000 ft.
– Material Upgrades: Specify fixtures with UV-stabilized polycarbonate (not ABS). Choose metal housings (aluminum, brass) where possible. Verify covers have UV inhibitors.
– Installation Tip: Mount fixtures in shaded areas when possible. Use light-colored fixtures to reflect heat (dark colors absorb UV/heat, accelerating degradation).
Extreme Cold Climates (Below -20°F):
– Material Brittleness: Standard PVC conduit and boxes may crack on impact when frozen.
– Material Upgrades: Use “low-temperature” PVC conduit (rated to -40°F) or rigid metal conduit. Select covers and boxes labeled for “arctic” or “low-temp” use.
– Sealant Selection: Standard silicone hardens below freezing. Use butyl rubber tape or low-temp sealants.
– Transformer Note: Low-voltage transformers may have reduced performance in freezing temperatures. Choose models rated for cold environments or install in protected locations.
High-Humidity/Tropical Zones:
– Condensation Traps: Temperature swings cause moisture to condense inside boxes overnight.
– Ventilation Strategy: Use boxes with integrated weep holes. Install silica gel desiccant packs inside large fixture housings (replace annually).
– Fungal Growth: Apply anti-fungal coating to wood mounting surfaces before installing boxes. Choose fixtures with smooth interiors—no crevices for mold.
When to Call a Licensed Electrician: Clear Decision Framework
DIY empowers, but professional expertise saves lives and money in complex scenarios. Use this objective checklist:
✅ Call a Professional If:
– Running new circuits from the main panel (requires panel work, load calculations)
– Installing a subpanel or generator transfer switch
– Working on service entrance equipment (meter base, mast)
– Local code requires permits/inspections for the work (most outdoor circuits do)
– You encounter aluminum wiring (requires special connectors and techniques)
– Existing wiring shows signs of damage: melted insulation, burn marks, rodent chewing
– You feel uncertain about any step—hesitation is a valid reason to stop
❌ DIY May Be Appropriate For:
– Replacing existing outdoor receptacles with WR GFCI devices (if circuit is already GFCI-protected and you verify power is off)
– Installing low-voltage landscape lighting powered by a plug-in transformer
– Adding fixtures to an existing, properly installed outdoor circuit (with while-in-use covers)
– Replacing weatherproof covers on existing boxes
Finding a Qualified Electrician:
– Verify state license and insurance (ask for certificate).
– Request references for similar outdoor projects.
– Get written estimate detailing materials, labor, permit handling.
– Confirm they follow NEC and local amendments.
– Avoid “handyman” electricians without specific electrical licensing—insurance may not cover damages from unlicensed work.
Your Questions, Answered: Outdoor Electrical FAQ
Q: Can I use indoor extension cords outside temporarily for a party?
A: Only if explicitly rated for outdoor use (look for “W-A” marking on jacket and “Outdoor Use” on packaging). Standard indoor cords have thinner insulation that cracks in cold temperatures, exposing live wires. Even for a few hours, moisture exposure creates shock risk. Always plug into a GFCI-protected outlet. After use, coil loosely and store indoors—never leave outdoors where UV and moisture degrade the cord.
Q: My outdoor GFCI outlet keeps tripping when it rains. Is this normal?
A: No—this indicates moisture intrusion. While GFCIs should trip during actual faults, frequent rain-induced tripping means water is entering the cover or box. Immediately stop using the outlet. With power OFF, inspect: Is the while-in-use cover damaged? Is the gasket compressed or missing? Are wire connections corroded? Replace the cover first (most common fix). If tripping persists, replace the GFCI receptacle—internal components may be compromised. Persistent issues warrant electrician inspection for hidden moisture paths.
Q: What’s the difference between “weatherproof,” “weather-resistant,” and “rain-tight”?
A: Terminology matters:
– Weather-Resistant (WR): NEC term for receptacles/switches with corrosion-resistant materials and sealed internals (required for outdoor use).
– Rain-Tight: UL designation for covers/boxes that prevent water entry during heavy rain when properly installed. All wet-location covers must be rain-tight.
– Weatherproof: Marketing term with no legal definition. Always verify specific UL listings and NEC compliance instead of relying on this label.
When shopping, look for UL/ETL marks and explicit “Suitable for Wet Locations” text on packaging.
Q: Can I install an outdoor outlet under my deck?
A: Yes, but with critical precautions. The area under a deck is considered a wet location due to splashing, humidity, and potential flooding. You must:
1. Use a WR GFCI receptacle
2. Install an extra-duty while-in-use cover
3. Mount the box with a downward tilt for drainage
4. Seal the box-to-joist interface with silicone
5. Ensure the cover flap has full clearance to operate
Avoid locations directly under deck boards where water drips persistently. If the space is enclosed with skirting, verify adequate ventilation to prevent moisture buildup.
Q: How deep must I bury outdoor electrical wire?
A: Depth depends entirely on cable type and protection:
– UF-B cable (direct burial): 24 inches minimum
– PVC conduit with THWN-2 wires: 18 inches minimum
– Rigid metal conduit (RMC): 6 inches minimum
– Low-voltage landscape cable (under 30V): 6 inches minimum
Always call 811 before digging to locate underground utilities. Local amendments may require greater depths—check with your building department. Use conduit sleeves where cable exits ground to prevent damage from lawnmowers or rodents.
Q: Are solar-powered outdoor lights a safer alternative to wired systems?
A: Solar lights eliminate electrical shock risk at the fixture since they operate at very low voltage (typically 1.2V–6V). However, they have limitations:
– Performance: Require direct sun exposure; dim significantly on cloudy days or in shaded areas. Battery life degrades after 2–3 years.
– Placement Flexibility: Must position panels in sun, which may not align with desired lighting locations.
– Security: Easily stolen or vandalized due to surface mounting.
For accent lighting in sunny areas, solar is a safe, zero-wiring option. For security lighting, pathway illumination, or areas requiring consistent brightness, hardwired low-voltage or 120V systems (installed correctly) provide superior reliability and performance.
Q: How often should I inspect and maintain my outdoor electrical system?
A: Implement this maintenance calendar:
– Monthly: Test all GFCI outlets (press TEST/RESET).
– Seasonally (Spring/Fall): Inspect covers for cracks, warping, or damaged flaps. Check boxes for moisture, corrosion, or insect nests. Tighten loose mounting screws. Clean fixture lenses.
– Annually: Excavate and inspect buried low-voltage connectors. Replace silicone sealant around box perimeters if cracked. Verify transformer operation and clean vents.
– After Major Storms: Check for physical damage, water intrusion, or displaced components.
Keep a maintenance log with dates and actions taken—valuable for insurance and future repairs.
Q: Can I use a standard indoor light fixture under a covered porch?
A: Only if the porch is fully enclosed with walls and a roof that completely prevents moisture exposure (e.g., a sunroom). For any open-sided covered porch, patio cover, or carport, the NEC classifies the area as a damp or wet location. Standard indoor fixtures lack sealed gaskets, corrosion-resistant hardware, and moisture-resistant internal components. Moisture will infiltrate through vents and seams, causing premature failure, corrosion, and potential shock hazard. Always select fixtures explicitly rated for damp or wet locations—even under cover. Look for “Suitable for Damp Locations” (for fully covered areas with no wind-driven rain) or “Suitable for Wet Locations” (for any area with potential moisture exposure).
Q: What causes white powder on outdoor electrical connections, and how do I fix it?
A: This is corrosion—typically aluminum oxide (if aluminum wires present) or copper sulfate (greenish-white on copper). It forms when moisture and oxygen react with metal, increasing electrical resistance and generating heat. Do not ignore. With power OFF:
1. Disconnect wires.
2. Clean contacts with wire brush and electrical contact cleaner.
3. Apply antioxidant compound (Noalox) to bare wires.
4. Replace corroded wire nuts with new waterproof connectors.
5. Inspect box for moisture sources; reseal penetrations.
If corrosion is severe or on the receptacle terminals, replace the entire device. Recurring corrosion indicates a persistent moisture intrusion issue needing root-cause resolution.
Q: Is it safe to install outdoor outlets near a swimming pool or hot tub?
A: NEC Article 680 imposes strict requirements within pool zones:
– Receptacles must be GFCI-protected and located at least 6 feet from the pool edge.
– While-in-use covers are mandatory.
– No receptacles allowed within 10 feet of diving boards or slides.
– Dedicated circuits required for pool pumps with specific disconnect locations.
Due to extreme shock hazards and complex code requirements, pool/spa electrical work should only be performed by licensed electricians specializing in aquatic installations. DIY attempts risk electrocution and violate insurance policies.
Q: How do I prevent animals (squirrels, rodents) from chewing outdoor wires?
A: Implement layered deterrents:
– Physical Barriers: Run wires through metal conduit (EMT or RMC) where accessible. Use metal-clad cable (MC) for above-ground runs.
– Exit Protection: Install metal conduit sleeves (12+ inches long) where cables emerge from ground.
– Repellents: Apply rodent-deterrent tape (impregnated with capsaicin) around conduit entries. Reapply after rain.
– Habitat Modification: Trim tree branches 6+ feet from rooflines. Remove debris piles near wiring paths.
– Inspection: Check vulnerable areas monthly for teeth marks. Replace damaged sections immediately—exposed conductors attract further chewing.
Conclusion: Your Path to a Safe, Beautiful, and Functional Outdoor Space
You now hold a comprehensive framework for creating outdoor electrical systems that honor both safety and aspiration. The Three-Layer Weatherproofing Approach—strategic circuit planning, meticulous component selection, and precision installation technique—transforms weather from a variable to manage into a factor you’ve systematically addressed. Remember the core truth revealed throughout this guide: resilience emerges not from single heroic gestures, but from the cumulative effect of dozens of small, verified details. The drip loop that channels water away, the silicone bead sealing a box perimeter, the torque specification on a terminal screw—each acts as a silent guardian, compounding into years of reliable service.
Recap: The Three Non-Negotiable Pillars
- Code Compliance as Your Baseline: NEC requirements for GFCI protection, wet-location covers, and proper grounding aren’t bureaucratic hurdles—they are distilled lessons from real-world incidents. They form the absolute floor of safe practice, not the ceiling. Always verify local amendments with your building department.
- Redundancy Over Reliance: Never depend on a single seal or component. Combine conduit sealing with drip loops, WR devices with self-amalgamating tape, quality covers with proper box mounting. Redundant barriers ensure system integrity even if one element degrades.
- Verification at Every Stage: Test GFCIs monthly. Inspect covers seasonally. Simulate rain before finalizing installations. Trust, but verify—your vigilance is the final, most critical layer of weatherproofing.
The 24-Hour Rule: Your Immediate Next Step
Within the next 24 hours, conduct one focused verification on your existing outdoor electrical system:
– Locate your most frequently used outdoor outlet.
– Confirm it has a while-in-use cover (deep bell style that closes over plugged cords).
– Press the TEST button—it should click off instantly. Press RESET to restore power.
– If it fails to trip, or if it has a flat flip cover, mark it with tape and schedule replacement this week.
This tiny action addresses the single most common outdoor electrical hazard in residential settings. Safety isn’t built in grand gestures, but in consistent, small acts of attention.
The Big Picture: Electrical Systems as Living Infrastructure
Your outdoor electrical system is not a static installation—it’s living infrastructure that interacts with your landscape, climate, and evolving lifestyle. Approach it with the same stewardship you’d give a prized tree: seasonal inspection, proactive maintenance, thoughtful expansion. When you install that weatherproof outlet, you’re not just adding convenience; you’re enabling evening conversations on the patio, safe illumination for returning home after dark, power for tools that shape your garden. When you wire landscape lighting with care, you’re not just highlighting shrubs; you’re extending your living space into the night, creating ambiance that welcomes and secures. This work connects deeply to why we cultivate outdoor spaces—to gather, to restore, to witness nature. A thoughtfully executed electrical system serves that purpose invisibly, reliably, and safely for years to come. Honor that purpose with knowledge, precision, and respect for the forces you’re working alongside. Your future self—and everyone who enjoys your outdoor space—will thank you.
Explore Our Complete System:
The Ultimate Guide to Landscape Lighting Design | Deck and Patio Electrical: Outlets, Lighting, and Code Compliance | Subpanel Installation Demystified: Powering Sheds, Garages, and Workshops | Low-Voltage Wiring Mastery: Transformers, Runs, and Troubleshooting | Weatherproofing Deep Dive: Sealants, Gaskets, and Material Science for Outdoor Durability | Electrical Safety First: GFCI, AFCI, and Grounding Explained | Seasonal Electrical Maintenance Calendar for Homeowners