Move Beyond Quick Crafts—Explore Five Foundational Projects Through Material Wisdom, Structural Insight, and Personal Expression
Transform your living space with handmade accessories that carry meaning and intention. This guide invites you into a deeper relationship with making—examining material behaviors, structural considerations, and design choices that help creations feel harmonious in your home. You’ll discover not only how to craft, but why certain approaches support longevity, beauty, and connection. Whether you have fifteen minutes or several weekends, these principles adapt to your rhythm and resources.
Introduction
Walk into a space filled with handmade objects, and you often sense a quiet resonance—a ceramic mug shaped by hand, a wall hanging woven with care, a shelf built from wood with visible history. These pieces do more than occupy space; they embed memory, values, and presence into daily life. Yet many crafting experiences end in frustration: finishes feel sticky, joints loosen, colors fade unexpectedly, or the result feels disconnected from the room it inhabits. This rarely reflects personal ability—it signals a gap in contextual guidance. Most tutorials share steps without exploring how materials respond to humidity, light, or use; why certain joints endure; or where subtle design choices create visual harmony.
This guide draws inspiration from enduring craft traditions and contemporary making communities. It emphasizes observation, adaptation, and respect for materials. There are no promises of perfection—only pathways to more satisfying, resilient creations. Whether you’re new to crafting or returning with fresh curiosity, you’ll find frameworks to support thoughtful making that aligns with your space, values, and lived experience.
The Five-Pillar Framework for Thoughtful Handmade Accessories
Before selecting tools or materials, consider this adaptable lens for evaluating any home accessory project. These pillars interrelate like threads in woven cloth. Strengthening one supports the others. They are not rigid rules but reflective prompts to guide decisions with clarity and care.
Pillar 1: Material Integrity
Material integrity asks: Does this substance suit its intended role within this specific environment? Cotton rope near a humid bathroom window may mildew. Untreated softwood in direct sunlight may warp. Material integrity invites awareness across three dimensions:
- Physical Properties: Consider flexibility, porosity, weight, and thermal response. Will a ceramic coaster tolerate warm (not boiling) beverages without stress? Will a linen runner withstand gentle hand-cleaning?
- Environmental Interaction: How might light, moisture, temperature shifts, or frequent handling affect the material over time? Natural fibers near south-facing windows benefit from UV-resistant dyes. Wood expands and contracts with seasonal humidity changes.
- Ethical & Sourcing Context: Where did this originate? Are dyes plant-based? Is wood reclaimed or sustainably harvested? Reclaimed materials carry narrative but require careful inspection. Choosing thoughtfully deepens connection to the object and aligns creation with personal values.
Why this matters: Selecting material suited to its context prevents common disappointments. Research a material’s tendencies—consult maker forums, supplier notes, or craft library resources. When uncertain, test a small sample in the intended location for several days. Observe changes. This small step builds intuitive knowledge for future projects.
Pillar 2: Structural Soundness
Structure is the quiet foundation. It addresses: Will this object maintain its form under expected use? A wall-mounted shelf needs secure anchoring. A woven basket requires consistent knot tension. Structural soundness blends practical physics with craft awareness:
- Load Awareness: How will weight or stress distribute? Wall-mounted items should anchor into structural supports where possible. In clay work, uniform thickness reduces cracking risk during drying.
- Joinery Thoughtfulness: Are connections appropriate for the material and use? Wood glue bonds strongly when surfaces align cleanly. Macramé knots gain security through consistent tension and strategic reinforcement. Stitching benefits from backstitches at high-stress points.
- Allowing for Movement: Wood shifts with humidity. Metal expands with heat. Rigid attachments between dissimilar materials may strain over time. Where relevant, incorporate slight flexibility—floating panels, flexible adhesives, or breathable seams.
Common considerations: Grain direction affects wood stability. Wet clay is heavier than dry clay—support forms accordingly. In fiber arts, uneven tension creates visual distortion. Sketching simple load paths (“Where does force enter? Where might stress concentrate?”) builds preventive insight.
Pillar 3: Aesthetic Harmony
Harmony moves beyond matching paint swatches. It asks: How does this piece converse with its surroundings? It’s about relationship, scale, and sensory balance:
- Scale & Proportion: A large wall hanging may overwhelm a narrow hallway. Tiny ceramic accents may vanish on a deep windowsill. Mentally divide the space using the rule of thirds; place focal elements near intersection points.
- Color Dialogue: Pull a secondary hue from existing textiles or artwork. A runner with subtle ochre threads may complement sage walls and terracotta pottery more gracefully than a solid match. Notice color temperature—warm whites (ivory) versus cool whites (silver-toned)—and how they interact with wood tones or metal finishes.
- Texture Layering: Smooth ceramic beside rough-hewn wood creates gentle contrast. A nubby linen runner softens a polished table surface. If a room features mostly sleek surfaces (glass, metal), intentional handcrafted texture adds warmth.
Harmony check: Photograph the intended space. View it in grayscale. Does the planned accessory’s shape, scale, and value (light/dark contrast) create visual balance? This simple step reveals compositional flow beyond color.
Pillar 4: Functional Integration
Function is the quiet promise an object makes. A coaster should protect surfaces. A shelf should hold items securely. Functional integration ensures the piece serves gracefully within daily rhythms:
- User Experience: How does it feel to handle? Are edges sanded smooth? Does a tray lift comfortably? Run fingers over prototypes. Imagine the motion of use—pouring, lifting, wiping.
- Contextual Fit: Measure your actual furniture. A table runner typically overhangs 6–12 inches per side. Coasters benefit from slight texture underneath for grip. Wall hangings need hanging mechanisms suited to their weight.
- Maintenance Realism: Be honest about care capacity. Will you hand-wash delicate linens weekly? If not, choose more resilient fibers or designate the piece for occasional use. Design for the life you live. A beeswax finish on wood offers beauty with periodic renewal; mineral oil provides simpler upkeep.
Functional insight: Hidden details matter most. Bracket placement on shelves, seam finishing on textiles, or base treatment on ceramics—these elements may go unnoticed visually but shape daily experience profoundly.
Pillar 5: Personal Narrative
Narrative is the gentle signature of making. It asks: What makes this piece meaningfully yours? It transforms replication into expression through subtle, intentional choices:
- Embedded Memory: Press a leaf gathered on a memorable walk into clay. Incorporate fabric from a cherished garment as a hidden lining. Stain wood with tea brewed during a quiet morning.
- Honoring Process: Celebrate the “happy accident”—a slight warp in reclaimed wood becomes character. An uneven dye lot in yarn tells of handmade color. Wabi-sabi, the appreciation of impermanence and imperfection, offers a compassionate lens for handmade work.
- Symbolic Touches: Weave a knot pattern learned from a relative. Carve a tiny symbol meaningful only to you on an unseen surface. Select colors reflecting a beloved landscape.
The Guiding Insight: Thoughtful craftsmanship emerges not from machine-like precision, but from deliberate choices at the intersection of material, structure, aesthetics, function, and story—so the final object feels authentic, not accidental.
This framework cultivates intuitive judgment. With practice, these reflections become second nature, empowering you to adapt patterns, troubleshoot gently, and create with growing confidence. Now, let’s explore five projects designed to illuminate these principles. Each was chosen for its capacity to teach transferable skills—not for fleeting trends. We’ll examine material considerations, anticipate common friction points, and offer adaptable paths so you gain insight applicable across many future creations.
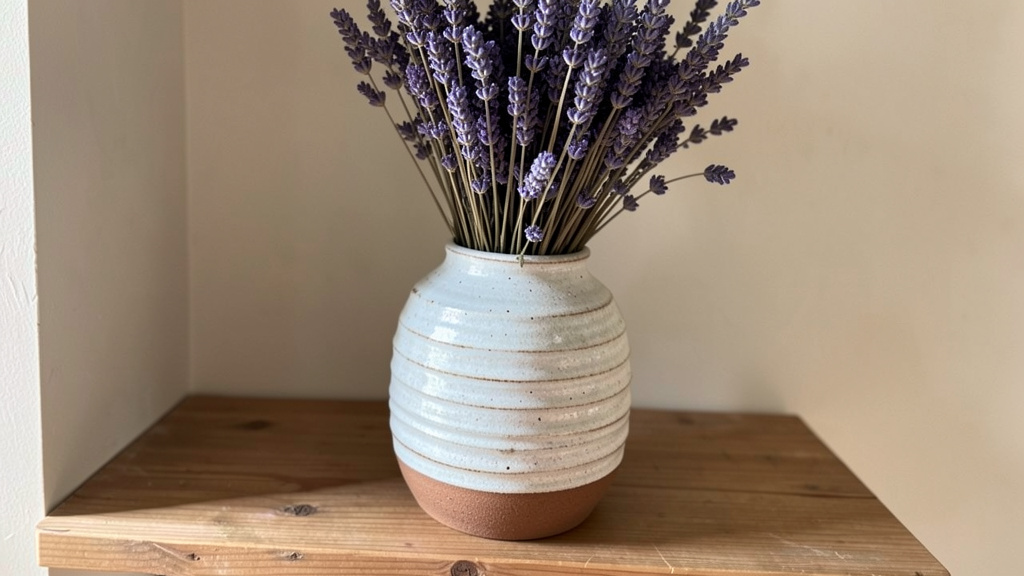
Project 1: Hand-Formed Ceramic Coasters – Exploring Clay and Finish
Coasters offer a manageable canvas to explore material behavior, surface treatment, and functional detail. This project illuminates moisture response, thermal considerations, and the meaningful difference between material types. We examine both kiln-fired stoneware (for durability) and quality air-dry clay methods (for accessibility), so you can choose a path aligned with your resources and intentions.
Why This Project Illuminates the Framework
- Material Integrity: Direct engagement with clay types, drying behavior, porosity, and finish chemistry.
- Structural Soundness: Managing flatness during drying, understanding thickness consistency.
- Aesthetic Harmony: Scale for testing color palettes, texture integration, relationship to tableware.
- Functional Integration: Non-slip base consideration, surface cleanability, realistic use expectations.
- Personal Narrative: Ideal surface for subtle impressions, symbolic marks, or color choices with meaning.
Material Considerations & Realistic Expectations
Option A: Kiln-Fired Stoneware (For Long-Term Use)
* Clay Body: Mid-range stoneware (fired to maturity) offers durability and reduced porosity compared to earthenware. Porcelain is beautiful but less forgiving for beginners. Source from pottery supply stores; specify “hand-building” clay for better plasticity.
* Glazes & Underglazes: Select products labeled explicitly for dinnerware safety if used near food/drink surfaces. Test colors on small tiles first—fired results differ from wet application. Underglazes allow detailed design before a clear glaze seal.
* Important Note: Proper firing requires access to a kiln and knowledge of temperature schedules. Community studios or educational centers often provide access and guidance.
Option B: Quality Air-Dry Clay (Accessible Entry Point)
* Clay Choice: Seek brands formulated for reduced cracking (e.g., paper-clay variants or premium craft clays). Avoid generic craft-store clay prone to brittleness.
* Sealing is Essential: Unsealed air-dry clay absorbs moisture. Apply multiple thin coats of water-based sealant (matte or satin polyurethane), lightly sanding between coats with fine grit paper. Allow full cure time per product instructions before use.
* Realistic Use: These coasters suit cold beverages, wine glasses, or as decorative trivets for warm (not hot) items. Transparency about limitations supports positive experience.
Step-by-Step Guidance with Adaptive Tips
Step 1: Template & Consistent Thickness
- How: Create a reusable template from stiff cardboard or thin plastic (3.75-inch square or 4-inch circle). Roll clay to even thickness using simple guides—small wood strips taped beside your rolling pin. Cut carefully with a sharp tool.
- Why it Helps: Consistent thickness promotes even drying, reducing warp or crack risk. Guides are inexpensive and transformative for beginners.
- Adaptive Tip: No rolling pin? Press clay gently between palms to form small discs. Embrace organic shapes—they carry handmade charm.
Step 2: Surface Design at the Right Stage
- Impressing: Press textured items (lace, burlap, leaves coated lightly in oil) into leather-hard clay (cool to touch, holds shape without sticking). Too soft = blurred detail; too dry = surface cracks.
- Carving: Use a needle tool or skewer on leather-hard clay. Sketch lightly first. Shallow lines preserve structural integrity.
- Narrative Opportunity: Press a meaningful coin, stamp initials with metal letter stamps, or embed a tiny shard of broken pottery (kintsugi-inspired).
Step 3: Patient Drying – A Critical Phase
- How: Place pieces on a wire rack (allows airflow underneath) in a draft-free, room-temperature spot. Cover loosely with cloth inside a bin for the first day to slow initial drying. Uncover and allow to dry fully (several days for air-dry; until room-temperature throughout for kiln clay).
- Why Patience Matters: Rapid drying creates internal stress, leading to cracks. Slowing the process supports integrity.
- If Cracks Appear: While still slightly damp, gently smooth hairline cracks with a damp brush. Prevention through slow drying is most effective.
Step 4: Finishing – Firing or Sealing
- Kiln Path: Bisque fire when bone-dry. Apply glaze carefully, wiping the very bottom edge to prevent shelf adhesion. Glaze fire to recommended temperature. Verify food-safe claims with your supplier if used for drinkware.
- Air-Dry Path: Once fully dry and cool, lightly sand edges. Apply sealant in thin, even coats. Sand lightly between coats. Cure completely before use.
Step 5: Functional Base Detail
- How: Attach small silicone bumpers or self-adhesive felt pads to the underside (3–4 evenly spaced). This provides grip without bulk and protects surfaces.
- Why it Matters: Even slightly uneven bases cause wobbling. This small step significantly improves daily usability.
Customization Pathways
- Color Exploration: Layer transparent sealants for depth. Use wax resist techniques (paint design with wax crayon before sealing) for patterned effects.
- Shape Variation: Try hexagons, organic free-form shapes, or nesting sets with graduated sizes.
- Cohesive Sets: Create 4–6 pieces with subtle variations (one textured, one carved) unified by color or edge treatment. This feels intentional.
Common Considerations & Gentle Solutions
- Slight Warping: Often due to uneven drying or thickness. Dry on a rack, flip gently halfway. For air-dry pieces, light sanding after sealing may improve flatness.
- Glaze Crazing (Fine Cracks): Can occur if glaze and clay expand/contract at different rates. Using compatible materials from the same supplier reduces risk. Avoid extreme temperature shifts post-firing.
- Sticky Sealant: Usually from thick application or insufficient drying between coats. Apply thin layers, sand lightly between, and ensure full cure time. Water-based sealants typically yield the most reliable results for this application.
This project cultivates patience and material awareness. The attention given to drying, finishing, and functional details builds transferable insight for resin work, woodworking, or any craft where material behavior matters. You’re not just making coasters—you’re learning to listen to your materials.
Project 2: Solid Wood Floating Shelves – Thoughtful Joinery and Installation
Floating shelves offer clean lines but require careful planning. This project explores wood selection, structural awareness, and the importance of understanding your wall’s composition. We focus on a reliable hidden-rod method that distributes weight effectively—a technique favored for its stability and clean appearance.
Why This Project Illuminates the Framework
- Material Integrity: Wood species considerations, grain direction awareness, moisture acclimation.
- Structural Soundness: Load awareness, wall anatomy understanding, support engineering.
- Aesthetic Harmony: Proportion relative to wall space, wood tone integration, shadow line consideration.
- Functional Integration: Weight capacity realism, installation precision, cleanability.
- Personal Narrative: Choosing wood with history (reclaimed), custom finishing to complement existing furniture.
Wood Selection with Context in Mind
Not all wood behaves the same. Consider these factors thoughtfully:
| Wood Type | Consider For | Note |
|---|---|---|
| Hard Maple | High-use areas, contemporary spaces | Dense, durable, takes finish well. Light color. |
| Walnut | Warm, statement pieces | Rich color, beautiful grain. Higher cost. |
| Cherry | Traditional, evolving pieces | Light when new; deepens to reddish-brown with light exposure over time. |
| Reclaimed Wood | Rustic character, sustainability | Inspect thoroughly: Check for stability, nails, or damage. Unique story. |
| Poplar | Painted projects, budget-conscious | Soft, affordable, accepts paint beautifully. |
| Clear Pine | Casual styles, practice projects | Soft grain, affordable. May show dents; avoid high-humidity areas. |
- Acclimation Matters: Wood responds to humidity. Allow kiln-dried lumber to rest in your home for 1–2 weeks before cutting—store flat with small spacers between boards for airflow. This reduces post-installation movement.
- Grain Awareness: Straight, consistent grain generally offers more stability than wildly figured grain. Cut boards so growth rings curve downward where possible for reduced cupping tendency.
The Hidden Support Approach: Clarity Over Complexity
This method uses threaded steel rods epoxied into the shelf and anchored into wall studs—a reliable approach for distributing weight along the shelf’s depth.
- Key Materials: Threaded steel rod (¼-inch diameter), marine-grade epoxy, Forstner drill bit (for clean shelf holes), quality stud finder, level, clamps.
- Critical Reminder: Wall composition varies. Always verify stud locations with a reliable stud finder. Drywall anchors alone are not suitable for floating shelves intended to hold meaningful weight. When in doubt about wall structure or load needs, consult a qualified professional.
Step-by-Step with Safety and Precision
Step 1: Wall Assessment – Never Skip
- How: Locate and mark at least two studs where the shelf will mount. Measure and mark the exact height and level line across these points. For shelves longer than 36 inches, plan for a third support point.
- Why Essential: Anchoring into structural supports is fundamental for safety and longevity. Assuming stud placement without verification is a common source of installation issues.
- Adaptive Tip: If studs don’t align with your desired shelf position, consider adjusting the shelf length or exploring alternative mounting solutions designed for your specific wall type.
Step 2: Preparing the Shelf Blank
- How: Cut wood to final size. Sand progressively. On the back edge, mark rod hole locations (typically 2–3 inches from each end, centered vertically). Drill holes perpendicular to the face using a Forstner bit. Depth should allow rods to protrude ~1 inch for wall insertion.
- Precision Aid: Use a drill press if available. Hand-drilling? Clamp a guide block with a pre-drilled hole to maintain perpendicular alignment. Misaligned holes complicate installation.
- Pro Tip: Lightly chamfer the hole entrance on the back edge. This guides rod insertion and minimizes epoxy squeeze-out.
Step 3: Securing the Rods
- How: Mix epoxy per instructions. Fill holes ~¾ full. Insert rods straight. Wipe excess immediately. Clamp shelf flat (rods vertical) and allow full cure time undisturbed (follow epoxy specifications).
- Critical Check: Verify rods are perpendicular to the shelf face before epoxy sets. A small square tool helps. Alignment ensures smooth installation later.
- If Issues Arise: Excess epoxy oozing? Clean immediately. Rod feels loose after cure? The bond may be compromised—consult epoxy guidelines or seek advice before proceeding.
Step 4: Wall Mounting – Patience Pays
- How: Hold shelf against marked level line. Transfer rod positions to the wall. Drill pilot holes into stud centers at marks. Align rods with holes and press shelf firmly against the wall. It should sit flush without forcing.
- Safety Check: Gently apply light downward pressure. It should feel solid. Any movement or flex warrants re-evaluation before loading.
- Finishing Touch: If minor gaps exist between shelf and wall (due to wall irregularities), flexible acrylic caulk painted to match the wall can provide a clean finish.
Finishing with Purpose
- Oil Finishes (Danish, Tung): Enhance grain, offer repairability. Ideal for low-moisture areas. Apply multiple thin coats, sanding lightly between.
- Water-Based Polyurethane: Durable, clear, low odor. Suitable for kitchens or high-use areas. Satin/matte sheens reduce slipperiness.
- Beeswax Blend: Soft sheen, pleasant feel. Best for decorative shelves. Requires occasional reapplication.
- Staining: Always test on scrap wood first. Wipe on, wait specified time, wipe off excess. Allow full dry time before topcoats. For reclaimed wood, clean thoroughly first; a pre-stain conditioner can promote even absorption on softwoods.
Common Considerations & Gentle Solutions
- Middle Sag Over Time: May indicate span length exceeding wood capacity, insufficient support points, or softer wood species. For longer spans, use thicker stock (1.5 inches+), harder woods, or add a center support. Plywood cores are not recommended for this mounting style.
- Gap Between Shelf and Wall: Often due to wall irregularities. Before epoxying rods, temporarily shim the shelf against the actual wall to match its plane, then drill. Or, fill minor gaps after mounting with color-matched caulk.
- Rod Misalignment: Usually stems from measurement variance or wall surface unevenness. Double-check all measurements pre-epoxy. For minor misalignment, carefully enlarging the wall pilot hole slightly may help. Significant misalignment requires reassessment.
This project builds profound respect for structure and context. The satisfaction of a securely mounted, level shelf holding meaningful objects reflects thoughtful preparation. These principles of assessment, material awareness, and precise execution apply directly to other wall-mounted projects, cabinetry details, or any endeavor where safety and stability matter.
Project 3: Macramé Wall Hanging with Natural Color Exploration
Macramé is a meditative fiber art with deep historical roots. This project moves beyond basic knots to explore fiber properties, intentional composition, and the gentle alchemy of plant-based color. We focus on creating a piece with dimension, balance, and color that resonates with your space.
Why This Project Illuminates the Framework
- Material Integrity: Fiber type considerations (cotton vs. linen), dye absorption, lightfastness awareness.
- Structural Soundness: Knot tension consistency, weight distribution, secure hanging mechanism.
- Aesthetic Harmony: Scale relative to wall, color integration, thoughtful use of negative space.
- Functional Integration: Weight-appropriate hanging hardware, gentle cleaning considerations.
- Personal Narrative: Color from seasonal kitchen scraps, symbolic knot patterns, intentional composition.
Fiber Selection with Purpose
The cord shapes the outcome. Choose with care:
- 100% Cotton Rope (3mm–4mm): Recommended for beginners. Soft, strong, holds knots reliably, accepts dyes well. Seek “macramé cord” or “sash cord.” Single-strand creates clean knot definition.
- Linen Cord: Stronger, textured, develops a lovely drape over time. Takes dye beautifully. May feel stiffer initially; more costly.
- Jute/Twine: Very rustic texture. Can shed fibers and offers inconsistent dye results. Best for textural accents where color precision isn’t key.
- Avoid: Acrylic (slippery knots, synthetic feel), nylon (shiny), or mixed fibers (unpredictable dye response).
Critical Prep: Pre-wash cord in warm water with pH-neutral soap. This removes manufacturing sizing that repels dye and prevents future shrinkage. Rinse thoroughly and air dry before use.
Natural Color Exploration – A Seasonal Practice
Plant-based dyes connect making to place and season. Results vary beautifully—this is part of their charm. Mordanting (using a fixative) significantly improves color retention.
- Mordanting Step (Highly Recommended): For cellulose fibers (cotton, linen), dissolve alum acetate in warm water per package directions. Submerge pre-washed, damp cord. Simmer gently for 60 minutes. Cool, rinse. Proceed to dyeing. Skipping this step often leads to rapid fading.
- Accessible Dye Sources:
- Avocado Pits/Skins: Simmer pits/skins in water until liquid turns pink/red. Strain. Add mordanted cord. Simmer 60 minutes. Yields soft pinks to terracotta. More pits deepen color. Baking soda in the bath shifts toward coral.
- Yellow Onion Skins: Simmer skins (save in freezer) until water is deep orange. Strain. Add cord. Simmer 60 minutes. Yields gold to rust. Iron water (rusty nails in vinegar-water) dipped after dyeing creates olive tones.
- Black Walnut Hulls (Fall Harvest): Simmer green hulls (wear gloves—they stain!). Strain. Add cord. Simmer 60 minutes. Yields rich brown. Hulls contain natural tannins; pre-mordanting still enhances lightfastness.
- Setting & Caring for Color: After dyeing and rinsing, simmer cord briefly in diluted vinegar solution (1:4 vinegar:water). Air dry away from direct sun. Hang finished pieces out of direct UV light to preserve color. Natural dyes evolve gracefully over years—a softening many makers cherish.
Knotting with Intention and Rhythm
Consistent tension creates visual harmony. Work slowly. Check alignment frequently.
- Foundational Knots:
- Lark’s Head: Attaches cord to dowel. Fold cord, loop under dowel, pull ends through.
- Square Knot: Left cord over center cords, under right cord. Right cord under center cords, up through left loop. Pull evenly. Reverse direction on subsequent knots to prevent twisting.
- Half Hitch Spiral: Continuous half hitches with one cord around a core. Creates twisted texture.
- Double Half Hitch: Two half hitches in same direction. Useful for diagonal lines or securing fringe.
- Creating Dimension:
- Vary knot density—tight clusters create solid areas; spaced knots or open sections add lightness.
- Embrace negative space. Intentional gaps allow the wall color to participate in the design.
- Gradate fringe lengths (center longest, tapering to sides) for organic flow. Mark cutting points before trimming.
- Add subtle texture: braid sections of fringe, wrap with thin contrasting cord, or attach dried botanicals after completion with invisible thread (replace as needed).
Hanging Mechanism – Strength and Simplicity
- Dowel: Smooth, sanded hardwood dowel (¾-inch to 1-inch diameter). Length = finished width + 2 inches. Sand ends smooth.
- Securing Knots: After attaching cords, a tiny drop of fabric-safe glue (like Fabri-Tac) at the base of each Lark’s Head knot on the top side prevents sliding during handling. Allow full dry time.
- Wall Attachment: Loop strong cotton cord or leather strap around each dowel end. Secure with two picture hooks rated for the piece’s weight. Measure carefully for level. Even lightweight pieces benefit from two anchor points to prevent tilting.
Common Considerations & Gentle Solutions
- Uneven Knot Tension: Common when learning. Work slowly. Hold the piece up periodically to check alignment. Pin the top dowel to a board at eye level to reduce hand strain. Consistency improves with practice—your first piece is a valuable teacher.
- Color Fading: Usually stems from skipping mordanting, using fugitive dyes (like beet juice), or direct sun exposure. Always mordant. Choose proven dyes (avocado, onion, walnut). Hang away from windows. Gentle evolution of color is part of the natural dye story.
- Tangled Fringe: Trim fringe last, after all knots are secure and glue is dry. Comb gently with fingers or a wide-tooth comb before trimming. To refresh, lightly mist with water and finger-comb. Store rolled loosely in tissue paper when not displayed.
This project invites presence. The rhythm of knotting becomes meditation. The color derived from kitchen scraps or seasonal harvests connects making to daily life. The finished piece carries the energy of your attention—a unique textile element that softens a room and holds quiet meaning. These skills in fiber handling, composition, and color awareness transfer beautifully to weaving, basketry, or other textile arts.
Project 4: Beeswax-Enhanced Linen Table Runner – Heritage Textile Care
A table runner sets the stage for shared moments. This project revives the traditional practice of finishing linen with beeswax—a method that enhances durability, adds subtle water resistance, and deepens connection to textile heritage. We explore fabric selection, mindful construction, and sustainable finishing.
Why This Project Illuminates the Framework
- Material Integrity: Linen’s unique properties (strength, breathability), beeswax blend considerations.
- Structural Soundness: Grain-aligned cutting, professional hemming, wax penetration awareness.
- Aesthetic Harmony: Scale relative to table, color interaction with tableware, texture complementarity.
- Functional Integration: Stain response, spot-cleaning methods, non-slip benefit.
- Personal Narrative: Using heirloom fabric, embedding botanicals, intentional monogramming.
Linen – A Fiber with History
Linen, woven from flax, offers exceptional strength and character. Understanding its nature supports better outcomes:
- Strength & Longevity: Linen fibers strengthen with use, becoming softer and more lustrous over time—a true heirloom textile. Higher thread counts (180+) offer durability for finishing.
- Absorbency & Breathability: Linen absorbs moisture readily and dries quickly. This is essential for even wax absorption.
- Texture & Drape: Natural slub (textural variation) adds character. Linen drapes beautifully while holding shape. Avoid polyester “linen-look” fabrics—they won’t absorb wax properly.
- Sourcing Thoughtfully: Seek OEKO-TEX or GOTS certified linen for chemical safety assurances. Reputable online retailers or local fabric stores often carry quality options. Consider repurposing vintage linen tablecloths or napkins—inspect for stains or weak areas first.
Critical Prep: Pre-wash and pre-shrink. Wash in warm water with mild detergent. Tumble dry low or air dry. Iron while slightly damp. This removes sizing, sets the weave, and prevents future shrinkage. Never use fabric softener—it coats fibers and blocks wax absorption.
Beeswax Finishing – Balance and Care
Beeswax infusion enhances functionality while honoring the fiber. The blend ratio matters for flexibility and performance.
- Recommended Blend:
- 2 parts pure, filtered beeswax (pellets simplify melting)
- 1 part food-grade jojoba oil (or coconut oil)
- Why this blend? Beeswax alone can be brittle. Jojoba oil (a stable liquid wax) adds flexibility and enhances water resistance without greasiness. Coconut oil is a common alternative; jojoba remains stable longer. Avoid paraffin wax—petroleum-based, less breathable.
- Application Methods:
- Iron Method (Precise): Grate wax finely. Sprinkle sparingly on the wrong side of pre-washed runner. Place between parchment paper. Iron on medium-low (no steam), moving constantly. Wax melts into fibers. Flip, repeat lightly on other side. Advantage: Controlled, minimal waste. Tip: Test on scrap first.
- Brush Method (Deeper Penetration): Melt blend gently in a double boiler (never direct heat—beeswax is flammable). Cool slightly. Apply thin coat to wrong side with natural bristle brush. Let dry 15 minutes. Buff gently with soft cloth. Repeat if desired. Advantage: Good for larger pieces. Tip: Work in a ventilated area.
- Curing: Allow runner to cure flat for 24–48 hours before use. This lets wax fully integrate into the fibers.
Construction with Care
- Cutting: Determine size (common: table length + 12–24 inches total overhang; width: ⅓ to ½ of table width). Align the grain: Pull a single thread at the cut edge; the resulting line is perfectly straight on the grain. Cut along this line. Off-grain cutting causes uneven drape.
- Hemming (Professional Finish):
- Press a ½-inch fold to the wrong side along all edges. Press again 1 inch to encase the raw edge. Pin.
- Stitch close to the inner folded edge using a blind hem stitch (hand-sewn for invisibility) or narrow machine stitch. This double-fold hem prevents fraying and creates a clean edge that holds wax well.
- Mitered Corners (Elevated Detail): At each corner, fold the hem allowance diagonally so folds meet at a 45-degree angle. Pin precisely. Stitch to the point, pivot, continue. Creates a sharp, professional corner that lies flat.
- Embellishments (Apply BEFORE waxing):
- Hand Embroidery: Simple running stitch border or French knots. Wax will slightly soften colors but add depth.
- Pressed Botanicals: Place a completely dry, flat flower (lavender bud, fern) between layers before final hemming. Wax seals it permanently. Ensure botanical is bone-dry to prevent mold.
- Monogramming: Use iron-on transfer pencil on wrong side, trace design, stitch. Or use fabric paint formulated for natural fibers.
Functional Integration & Gentle Care
- Stain Response: Blot liquid spills immediately with a clean cloth. Wax helps bead light moisture. For oily spots, sprinkle cornstarch, wait 15 minutes, brush off. Avoid harsh scrubbing.
- Refreshing Wax: Over time, high-use areas may need renewal. Reapply sparingly using the iron method on affected spots. Full re-waxing every 1–2 years maintains performance.
- Cleaning: Spot clean only. Never machine wash or dry clean—this strips the wax. For light soiling, wipe with a barely damp cloth. For deeper refresh, lay flat, sprinkle baking soda, wait 30 minutes, brush off thoroughly. Air out periodically in a shaded area.
- Non-Slip Benefit: The subtle wax texture helps keep plates and serving dishes stable—a quiet functional advantage.
Common Considerations & Gentle Solutions
- Blotchy Wax Appearance: Often from uneven application, too much wax, or fabric not pre-washed. Always pre-wash linen. Use less wax than you think—you can add more. For iron method, work in small sections. Buff thoroughly after curing to remove surface residue.
- Stiff or Waxy Feel: Usually excess surface wax. After full cure, buff vigorously with a soft cotton cloth (an old t-shirt works well). For future blends, slightly reduce wax ratio (e.g., 1.5:1 wax to oil) for a softer hand.
- Wax Transfer to Table: Ensure full cure time (48 hours) and thorough buffing. Test on a discreet area of your table first. If minor transfer occurs, gently warm the spot with a hairdryer on low and wipe with a soft cloth. Typically resolves after initial curing period.
This project connects you to generations who valued beauty and function in everyday objects. The scent of beeswax, the texture of aged linen, the quiet pride of a piece made to nurture gatherings—these are the intangible rewards of slow craft. The principles of textile selection, finishing chemistry, and precise construction apply directly to napkins, placemats, bread bags, or waxed canvas accessories.
Project 5: Reclaimed Wood & Copper Accent Photo Frame – Honoring Materials
A photo frame holds memory. Using reclaimed wood and copper transforms it into a meaningful artifact. This project explores material assessment, gentle metal finishing, and designing a frame that complements—rather than competes with—the image it holds. We focus on a clean mitered corner frame with a subtle copper detail.
Why This Project Illuminates the Framework
- Material Integrity: Reclaimed wood assessment, copper patina considerations, adhesive compatibility.
- Structural Soundness: Precise miter joints, reinforcement techniques, secure backing.
- Aesthetic Harmony: Frame width relative to photo, wood tone vs. image colors, copper accent proportion.
- Functional Integration: Glazing choice (acrylic vs. glass), secure photo mounting, reliable hanging.
- Personal Narrative: Wood source story, intentional patina method, photo selection meaning.
Sourcing & Preparing Reclaimed Wood – Safety First
Reclaimed wood carries history but requires careful vetting. Prioritize safety:
- Source Mindfully:
- Seek: Barn wood (pine, oak), old fence boards (untreated cedar), shipping pallets marked “HT” (Heat Treated). Ask local woodworking shops for scraps. Habitat for Humanity ReStores often have reclaimed materials.
- Avoid: Wood of unknown origin, railroad ties (creosote), painted wood (unless you can verify non-toxic paint and are prepared for safe stripping), wood with active mold, rot, or insect damage (powdery residue near holes).
- Inspect Thoroughly: Wear gloves. Run hands over surfaces. Feel for hidden nails or splinters. Look for cracks, soft spots, or insect evidence. Smell for mustiness (mold indicator).
- Clean & Prepare:
- Use a metal detector wand to locate hidden fasteners. Remove carefully with appropriate tools.
- Clean surface with stiff brush and mild soap/water solution. For grime, vinegar-water mix works well. Never soak reclaimed wood. Air dry completely (1–2 weeks) in a dry, ventilated area before working. Rushing causes warping.
- Milling to Usable Stock: Reclaimed wood is rarely flat. You may need:
- Jointer/Planer: To create flat, parallel surfaces. Target thickness: ¾ inch.
- Table/Miter Saw: For final cuts and miters.
- No workshop? Many makerspaces or local lumberyards offer milling services for a fee. Bring cleaned, dried wood.
Copper Accent – Gentle Patina Method
Copper adds warmth and artisan detail. A controlled patina creates an antique finish.
- Material: 1/16-inch copper sheet. Cut to desired accent size (e.g., 1-inch strip for edge, small square for corner).
- Creating a Verdigris Patina (Controlled):
- Clean copper thoroughly with vinegar/salt solution. Rinse, dry.
- Mix equal parts white vinegar and non-iodized salt. Add hydrogen peroxide (3%) until thin. Optional: A few drops of ammonia (use in well-ventilated area) encourages blue-green tones.
- Apply with brush or submerge. Watch color develop (minutes to hours). Rinse when desired shade is reached.
- Neutralize with baking soda/water paste. Rinse again.
- Seal thoroughly with clear acrylic spray (matte) or Renaissance Wax. Unsealed copper will continue to change and may transfer color. Sealing preserves the intended finish and protects the wood.
- Attachment: Glue sealed copper accent to the front of the finished frame using epoxy (strong metal-to-wood bond) or contact cement. Clamp lightly until set. Sand edges smooth if needed.
Frame Construction – Precision and Reinforcement
Mitered corners require care. Reinforcement is essential for longevity.
- Calculating Dimensions:
- Frame Opening = Photo size + ⅛ inch total (for ease of insertion).
- Frame Width (stile) = Personal preference (1.5 inches is classic).
- Formula: Length of each piece = Photo dimension + (2 × Frame Width) – (2 × Wood Thickness). Example: For 8×10 photo, 2-inch frame width, ¾-inch wood: Long piece = 10 + 4 – 1.5 = 12.5 inches. Short piece = 8 + 4 – 1.5 = 10.5 inches. Always cut a test piece first.
- Cutting Miters:
- Use a miter saw with a fine-tooth blade (80+ teeth) for clean cuts. Set precisely to 45 degrees. Cut all four pieces sequentially without adjusting the saw.
- Dry Fit First: Assemble without glue. Check for gaps. A tiny gap at the outside corner is often fillable; a gap at the inside corner (photo opening) affects function. Adjust saw angle minutely if needed.
- Reinforcing the Joint (Essential):
- V-Nails or Biscuits: Ideal if tools are available (rental or makerspace).
- Splines (Accessible): Cut a thin slot across the miter joint on the back using a table saw or router. Glue in a thin wood spline (¼-inch thick). Adds significant strength and visual interest on the back.
- Avoid: Gluing miters alone—they lack sufficient long-grain glue surface and may fail over time.
Finishing – Enhancing Character
Honor the wood’s history while protecting it.
- Sanding Strategy: Sand only enough to smooth splinters and prepare for finish. Start 120 grit, finish 220 grit. Preserve character: Avoid sanding away saw marks, nail holes, or weathering that tells the wood’s story. Focus on edges and surfaces that touch hands.
- Finish Selection:
- Tung/Danish Oil: Penetrates deeply, enhances grain, low sheen. Apply 3–4 thin coats, sanding lightly between. Beautiful for rustic frames.
- Beeswax & Orange Oil Blend: Food-safe, soft sheen, pleasant scent. Buff to shine. Ideal for frames handled often.
- Clear Wax (e.g., Briwax): Seals surface, highlights texture, easy repair. Apply thin coat, buff after 20 minutes.
- Avoid: Thick polyurethane coatings—they can obscure wood texture and feel incongruent with reclaimed character.
- Glazing Choice: For frames under 16×20 inches, UV-filtering acrylic is recommended. It’s lighter, shatter-resistant, and blocks fading rays. Glass is heavier and poses breakage risk. Clean acrylic with microfiber cloth and acrylic-specific cleaner.
Assembly & Hanging – Secure and Safe
- Backing: Cut acid-free foam core or mat board. Place photo on backing, secure with archival photo corners (never tape directly on photo). Insert acrylic, then backing into the frame rabbet (groove).
- Securing Backing: Use small offset clips screwed into the frame back. They hold the stack firmly without damaging the frame. Avoid points or brads that can loosen.
- Hanging Hardware:
- Small/medium frames: Centered sawtooth hanger on the top back.
- Larger frames (>16×20″): Use D-rings screwed into the frame sides (not the thin top edge) with picture wire strung between. This distributes weight safely. Always use wall hooks rated for the weight.
Common Considerations & Gentle Solutions
- Visible Gaps in Miter Joints: Often from saw calibration or wood movement during glue-up. Calibrate saw with a speed square. Use a band clamp designed for picture frames during assembly for even pressure. Fill tiny gaps with tinted wood filler before final finish.
- Wood Cracking After Assembly: Usually from insufficient acclimation or inherent wood stress. Always acclimate wood in your home for at least two weeks before milling. For existing cracks, stabilize with thin cyanoacrylate (CA) glue. Embrace larger cracks as part of the story; fill with clear epoxy tinted with pigment for a “kintsugi” effect.
- Copper Staining Wood: Prevented by thorough sealing of the patinated copper before attachment. If concerned about long-term interaction, place a thin barrier (clear acetate sheet) between copper and wood. Properly sealed copper is generally safe for contact.
This project is a profound exercise in honoring materials and memory. The wood’s history dialogues with the captured moment. The copper accent, shaped by your hands, adds a layer of intentional craft. You’ve created more than a frame—you’ve built a vessel worthy of the story it holds. These skills in material assessment, precise joinery, and thoughtful finishing apply directly to shadow boxes, small shelves, or other keepsake containers.
Navigating Friction: Thoughtful Troubleshooting and Adaptive Paths
Challenges are natural in making. This section offers perspective on common frustrations and adaptable strategies that honor your constraints—budget, time, tools, or physical needs—without compromising core principles. True craftsmanship includes knowing how to adapt with integrity.
Universal Considerations & Gentle Approaches
Consideration 1: “My result doesn’t match the polished inspiration image.”
* Perspective: Inspiration images often feature professional styling, ideal lighting, and editing. More importantly, handmade work carries the trace of human hands—a subtle brushstroke, a slight variation in dye—which adds character and authenticity.
* Supportive Practices:
* Honor Process: Focus on what you learned. Document your steps; future-you will appreciate the journey.
* Surface Preparation Matters: For finishes, 80% of the result comes from prep. Sand progressively, wipe away dust, and examine under bright light before final coats.
* Reframe “Imperfection”: A visible knot in wood, a slightly uneven dye lot—these details tell the story of making. They distinguish handmade from mass-produced.
Consideration 2: “I miscalculated material needs.”
* Perspective: Estimating is a learned skill. Unexpected cuts, knots in wood, or dye variations happen to everyone.
* Supportive Practices:
* The Buffer Rule: When purchasing, add 15–20% extra for waste, errors, or future repairs. For fabric/cord: account for shrinkage and knots. For wood: account for milling loss and unusable sections.
* Mock-Up First: Create a full-size paper template for complex shapes. Test layouts before cutting precious material.
* Adapt Gracefully: Short on material? Adjust the design. A slightly shorter shelf becomes a charming accent ledge. One less row of knots adds minimalist appeal. Document the adaptation—it becomes part of the piece’s unique story.
Consideration 3: “The finish isn’t drying/curing as expected.”
* Perspective: Humidity, temperature, and product interactions significantly affect drying. Patience is often the most effective tool.
* Supportive Practices:
* Environment Awareness: Apply finishes in moderate humidity (50–70%) and temperature (65–75°F / 18–24°C) when possible. High humidity extends drying time. Use a fan for airflow (not direct heat).
* Follow Instructions: Adhere to manufacturer’s recoat times. When uncertain, wait longer. Lightly sand with ultra-fine grit (320+) between coats to promote adhesion and smoothness.
* Test First: Always trial your full finish sequence (stain → sealer → topcoat) on a scrap of the actual material. Observe drying time, color shift, and final feel.
Adaptive Paths: Honoring Your Constraints
True resourcefulness adapts the approach, not the principles. Here’s how to maintain integrity while working within real-life boundaries.
| Constraint | Path to Avoid | Adaptive Path (Preserves Framework) | Why It Supports Making |
|---|---|---|---|
| Budget Limited | Unsafe/unsuitable substitutes | Source creatively: Reclaimed wood from community reuse centers, fabric scraps from thrifted linens, natural dyes from kitchen waste. Prioritize critical items (e.g., quality epoxy for structural joints). | Honors Material Integrity & Personal Narrative. Builds resourcefulness without compromising safety or core values. |
| Time Limited | Rushing critical steps | Modular making: Break projects into short sessions (e.g., Day 1: Cut wood; Day 2: Sand; Day 3: Finish). Choose projects with natural pauses (air-dry clay, dye soaking). Focus on one small, meaningful item. | Honors Structural Soundness & Functional Integration. Prevents errors from haste. Makes crafting sustainable within busy rhythms. |
| Skill Level Beginner | Overly complex first projects | Micro-skill practice: Tie 20 square knots on scrap cord. Drill practice holes in wood scraps. Start with air-dry clay coasters. Use pre-dimensioned wood kits as learning tools to understand assembly before sourcing raw materials. | Builds confidence and foundational awareness. Honors all pillars by ensuring early experiences reinforce good habits. |
| Tool Access Limited | Forcing techniques unsafely | Community connection: Explore makerspace memberships for tool access. Partner with local woodworkers for milling (offer materials or gratitude). Choose projects aligned with available tools (hand-formed clay vs. wheel-thrown). | Honors Structural Soundness & Material Integrity. Turns limitation into community engagement. Focuses energy on design and finishing—the heart of the piece. |
| Physical Accessibility | Straining with ill-fitting tools | Adaptive setups: Ergonomic grips, clamp-mounted work surfaces at comfortable height, electric tools for reduced hand strain. Focus on projects emphasizing fine motor skills (embroidery, small clay work, macramé). | Honors Functional Integration (for the maker!). Ensures crafting remains joyful, sustainable, and inclusive. Celebrates diverse ways of making. |
Knowing When to Adapt or Release
Wisdom lies in discernment:
* Adapt When: The issue is addressable (a scratch sanded out, a knot redone), the learning value is high, or emotional connection is strong. Document the solution—it becomes wisdom for next time.
* Release Gracefully When: Safety is compromised (structural weakness), the core material is fundamentally unstable, or frustration consistently outweighs joy. Repurpose materials: Failed clay pieces become mosaic tiles. Wood scraps become kindling or practice pieces. Say: “This taught me valuable information,” and begin anew. In handmade creation, there is no failure—only learning that informs the next step.
This section isn’t about perfectionism; it’s about building resilient, joyful making practices. By anticipating challenges and having adaptable strategies, you cultivate confidence to explore increasingly meaningful projects. The goal is sustainable, satisfying creation—not stress.
Your Questions, Answered
These questions reflect common curiosities shared across maker communities. Answers are grounded in material awareness and practical experience.
Q: Are homemade ceramic items safe for food or drink use?
A: Safety depends entirely on materials and process. For kiln-fired ware: Use clay and glazes explicitly labeled “food-safe” and “dinnerware-safe” by the manufacturer, fired to the exact temperature specified. Ensure glazes are fully vitrified (non-porous) with no crazing (fine cracks), which can harbor bacteria. For air-dry clay: It is not suitable for direct food or beverage contact. Sealants create a barrier but are not certified for repeated food exposure, especially with heat or acidity. Reserve air-dry clay creations for cold beverages only (like water glasses) or decorative use. When uncertain, choose decorative purposes.
Q: How can I assess if reclaimed wood is safe for indoor projects?
A: Safety assessment is multi-layered. First, inspect visually and by smell for active mold (musty odor, black spots), insect activity (fresh sawdust, powder near holes), or rot (soft, spongy areas). Discard affected wood. Second, check for hazardous treatments: Avoid wood marked “MB” (Methyl Bromide), railroad ties (creosote), or pressure-treated wood (often green-tinged, contains copper compounds—unsuitable for indoor surfaces). Third, clean thoroughly: Scrub with vinegar-water solution, allow to dry completely in a ventilated area. For painted wood pre-1978, assume lead paint; avoid sanding—seek professional guidance or choose unpainted wood. When sourcing pallets, only use those stamped “HT” (Heat Treated).
Q: Why did my naturally dyed project fade quickly?
A: Fading commonly stems from three factors: 1) Skipping mordanting: Mordants (like alum) chemically bond dye to fiber. Without this step, color washes or fades rapidly. Always mordant cellulose fibers (cotton, linen) before dyeing. 2) Using fugitive dyes: Some natural materials (beet juice, turmeric) fade quickly. Stick to more lightfast options like avocado pits, onion skins, black walnut, or madder root. 3) UV exposure: All dyes fade in direct sunlight. Hang naturally dyed textiles away from windows. Remember: Natural dyes often evolve gracefully over years—softening rather than disappearing. Proper mordanting ensures this evolution is slow and beautiful.
Q: Can I use a standard picture frame hanger for a wall-mounted shelf?
A: No. Standard sawtooth hangers or small D-rings designed for lightweight frames are not engineered for the leverage and weight of shelves. Floating shelves require anchoring into structural wall supports (studs) using hardware rated for the intended load. For safety and longevity, use mounting systems designed specifically for shelves—such as the hidden rod method described in Project 2. When in doubt about wall structure or load requirements, consult a qualified professional.
Q: How can I make multiple handmade accessories feel cohesive in a room with mixed styles?
A: Focus on unifying threads rather than perfect matching. Repeat a subtle color accent across pieces (e.g., terracotta in a coaster set and runner trim). Echo a texture (woven elements in a wall hanging and basket). Maintain proportional scale relative to furniture. The Five-Pillar Framework’s Aesthetic Harmony pillar guides this intentional curation—creating relationship without uniformity.
Q: What’s the most accessible project to begin with?
A: Air-dry clay coasters offer immediate engagement with minimal tools. They teach material handling, surface design, and finishing without specialized equipment. The beeswax linen runner is also approachable with basic sewing skills. Start small—completing one satisfying project builds momentum far more than an unfinished ambitious one.
Q: How should I store handmade textiles or accessories when not in use?
A: Store in a cool, dry, dark place. Wrap textiles in acid-free tissue paper. Keep wood items away from direct heat sources or humidity swings. Cushion ceramic pieces individually to prevent chipping. Natural fiber items (macramé, woven goods) benefit from being stored flat or gently rolled, not sharply folded. Include cedar blocks or lavender sachets to deter pests naturally.
Q: Can children participate safely in these projects?
A: Many steps can be adapted for supervised involvement: pressing textures into air-dry clay, sorting natural dye materials, simple knotting in macramé, or hand-stitching on fabric. Prioritize non-toxic materials, avoid sharp tools or heat sources for young children, and focus on the creative process over outcome. Making together builds connection and shared memory.
Q: How do I refresh a beeswax-finished linen runner that feels dry?
A: Lightly reapply your beeswax blend using the iron method on affected areas only. Use minimal wax—buff thoroughly after curing. For overall refresh, a full re-waxing every 1–2 years maintains performance. Always test on a small, inconspicuous area first.
Q: What if I don’t have dedicated craft space?
A: Embrace portable, contained making. Use a rolling cart for supplies. Work on a cleared table covered with a disposable cloth. Projects like macramé, small clay work, or embroidery require minimal footprint. Clean as you go. Even 20 minutes of focused making nurtures creativity. Protect surfaces with cardboard or mats, and store projects in labeled bins between sessions.
Conclusion and Your Next Step
Creating handmade home accessories is a practice of presence—a way to infuse daily spaces with intention, care, and personal resonance. The Five-Pillar Framework offers not rigid rules, but reflective companions for your making journey. It invites you to observe materials deeply, honor structural needs, seek visual harmony, design for real life, and weave in what matters to you.
Three Anchoring Insights:
1. Material awareness prevents frustration. Understanding how wood, fiber, or clay responds to its environment leads to more resilient creations.
2. Structure enables expression. A sound foundation—whether in joinery, knot tension, or seam finishing—allows beauty and story to shine without compromise.
3. Adaptation is wisdom. Working thoughtfully within your constraints (time, tools, space) fosters creativity and sustainability, turning limitations into distinctive features.
The 24-Hour Invitation: Within the next day, take one small, tangible step. Place three potential materials for a coaster project (a clay sample, a wood scrap, a length of cord) on your kitchen table. Or, photograph a wall space where a handmade piece might live. This gentle action bridges intention and beginning.
The Wider View: Each object you create contributes to a home that reflects your values and history. These pieces accumulate into a living archive of attention—a quiet counterpoint to disposability. As you apply these principles, you join a timeless thread of makers who transform raw materials into meaning. Your hands, guided by curiosity and care, do more than craft objects; they cultivate connection—to materials, to space, and to what matters most.
Explore Our Complete System:
The Mindful Maker’s Toolkit: Essential Tools for Every Home Crafter | Sustainable Sourcing Guide: Finding Ethical Materials for DIY Projects | The Seasonal Crafter: Adapting Projects to Nature’s Rhythms | From Sketch to Shelf: Designing Custom Wood Accessories | Textile Alchemy: Gentle Natural Dye Techniques for Beginners | The Repair Handbook: Mending and Renewing Handmade Items | Crafting with Intention: Building a Personal Making Philosophy